Turn on suggestions
Auto-suggest helps you quickly narrow down your search results by suggesting possible matches as you type.
Showing results for
- Good Sam Community
- Groups
- Travel Trailer Group
- Forum
- Adding Fans to Rear of RV Absorption Refer - How t...
Options
- Subscribe to RSS Feed
- Mark Topic as New
- Mark Topic as Read
- Float this Topic for Current User
- Bookmark
- Subscribe
- Mute
- Printer Friendly Page
Adding Fans to Rear of RV Absorption Refer - How to Wire?
Options
- Mark as New
- Bookmark
- Subscribe
- Mute
- Subscribe to RSS Feed
- Permalink
- Report Inappropriate Content
Oct-14-2022 11:21 AM
I would like to add two 90mm fans behind the service vent (side of trailer). This is the lower vent where most of the electrical connections are located.
MY current unit Dometic DM2652LBX with one fan near top that is thermostatically controlled.
The current installation appears the best/correct I have ever seen in my last 4 trailers/motorhomes (Jayco, ORV, Monaco, MPV Toyhauler). By correct I mean...proper space all around refer (especially behind refer), and a fan near top that sucks hot air through coils and out of top vent. All other units had twice the all around space of this one and no fan near top.
I have added fans on other trailers (mid area behind refer) but I want to do something a little different this time to perhaps increase cooling efficiency.
Current temps:
Direct sun, ambient temps 77F-83F, refer empty
Wireless thermometer
Refer/Freezer: 38F/7F (77F-11:20am); 42F/8F (81F-2:00PM); 45F/9F (83F-3:00pm)
MY Plan:
Add two 90mm fans behind lower side vent. My thoughts are to add these two fans directed to blow air upwards(sucking fresh air from outside vent)and having the upper fan suck it out at same time. I would like for all three fans to work synchronously (all three on at same time).
I can not see where the current fan thermostat is located.
My questions:
1. How can the three fans be wired together?
2. Can all three fans be controlled from the one thermostat to ensure they are all three activated at the same time. How can I accomplish this?
3. I would also like all three to be controlled manually in addition to thermostat. I am thinking a three way toggle switch (SPDT, DPDT, ?) How can I best accomplish this?
I am unable to access upper fan, thermostat, and wiring as I do not want to remove the refer.
Thanks!
2023 GMC, 3500HD, Crew Cab, 6.6L Gas/6 Speed Auto, 4X4, Standard Bed; SRW
2011 Outback 250RS - Anniversary Edition
Equal-i-zer 10K
2011 Outback 250RS - Anniversary Edition
Equal-i-zer 10K
15 REPLIES 15
Options
- Mark as New
- Bookmark
- Subscribe
- Mute
- Subscribe to RSS Feed
- Permalink
- Report Inappropriate Content
Oct-20-2022 06:04 PM
Is this white insulation in the way of the vent? If so that is a choke point.

2005 Ford F350 Super Duty, 4x4; 6.8L V10 with 4.10 RA, 21,000 GCWR, 11,000 GVWR, upgraded 2 1/2" Towbeast Receiver. Hitched with a 1,700# Reese HP WD, HP Dual Cam to a 2004 Sunline Solaris T310R travel trailer.
Options
- Mark as New
- Bookmark
- Subscribe
- Mute
- Subscribe to RSS Feed
- Permalink
- Report Inappropriate Content
Oct-20-2022 05:56 PM
Hi Baha Man,
First off, you are welcome, glad to share to help the cause.
It looks like 2 fans at the top with your control system is working. Some fine tuning will come as you use it. Looks good.
The only thing I will add to think about, not sure if the cover is on the roof vent during your tests, I suspect the the cover being off or on changes the air flow dynamics. The cover is a restriction.
If you have not had the cover on, see how it fits with the fans. If you are not getting enough air flow, part of it "might" be that the cover is too close to the fan and is choking the fans output. The fan blowing out with no cover, has zero restriction on the exhaust end.
You may be able to adjust for the lost volume with speed, waste some speed to get the wanted end result. Or if you run out of speed, then moving the fans below the screen and deeper into the opening may shift the lost efficiencies of being choked being so close to the cover. Mine are about 3" below the screen.
I'm using a Camco vent cover in place of the Dometic. The insides of those two covers are very different, at least by looks. I have no data to say which is better, just Dometic wants way to much $$ for a replacement cover. I do like the Camco for helping to keep sideways blowing rain out of the fridge though. This wind driven rain has to be just right to be head on into the side of the cover to show up, but it is possible as you can see by eye straight through the Dometic, or the older ones anyway. I really do not like the new redesigned ones that they are forcing a base change to even use. The molding quality is poor compared to what they use to make. Dometic is not the same company with higher quality as it used to be 10 years ago from what I have seen.
Thanks
John
2005 Ford F350 Super Duty, 4x4; 6.8L V10 with 4.10 RA, 21,000 GCWR, 11,000 GVWR, upgraded 2 1/2" Towbeast Receiver. Hitched with a 1,700# Reese HP WD, HP Dual Cam to a 2004 Sunline Solaris T310R travel trailer.
Options
- Mark as New
- Bookmark
- Subscribe
- Mute
- Subscribe to RSS Feed
- Permalink
- Report Inappropriate Content
Oct-20-2022 01:59 PM
I decided to add two fans at the top refer vent. They are thermostatically controlled as well as manual override. 3 amp inline fuse.
It is currently 89F in the shade. The two added fans have turned on to level 3/6 (auto mode). This means fans are turning at half speed. The hotter it gets, the faster the fans will spin. I can feel the warm air exiting the refer vent cover....good sign!
The single OEM fan has yet to turn on. If trailer/refer were in the direct sun, it would have turned on by now (last testing I did).
I'll do some testing over the next several days and see what I find. It's supposed to cool off into the low 70s by Saturday, so testing in the heat may not happen until next summer.
2023 GMC, 3500HD, Crew Cab, 6.6L Gas/6 Speed Auto, 4X4, Standard Bed; SRW
2011 Outback 250RS - Anniversary Edition
Equal-i-zer 10K
2011 Outback 250RS - Anniversary Edition
Equal-i-zer 10K
Options
- Mark as New
- Bookmark
- Subscribe
- Mute
- Subscribe to RSS Feed
- Permalink
- Report Inappropriate Content
Oct-20-2022 10:21 AM
UPDATE:
1. Found that my thermistor adjustment slide clip (inside refer) was in the UP (colder) position. However, the actual temp prob was in the middle of the plastic slide. I had moved it up, but the probe stayed put. It appears that there was no clack in the wire to allow it to slide up with the plastic slide clip.
I checked the wire inside access vent and sure enough the excess wire had been zip tied together to keep things nice and tidy. I removed zip ties and pulled a few inches of slack inside refer. I also tape the wire nd of the probe so it would not slide on plastic slider and the used a clip to hold slide in place. I moved the probe to the top of the fins.
2. I removed roof top refer vent. I wanted to inspect what was inside above refer. I did find that there is a cavity at the very top of refer between refer and roof. This cavity is approx. 24" wide by 8" tall x 8" deep. I will leave cavity alone for now and test my refer with new probe position. If needed, I can fabricate a piece of sheet metal flashing to remove cavity from upward flow of air. Not sure if I can make it fit by just cutting back wire mesh.
3. Fans....How well with they sucking air up and out of vent if mounted above wire mesh? I don't want to cut into the wire mesh to mount them just underneath wire mesh if fans will work as well above mesh. I wonder if these fans will work well enough to make up for the cavity above refer? I guess only testing will tell.
Thoughts?
2023 GMC, 3500HD, Crew Cab, 6.6L Gas/6 Speed Auto, 4X4, Standard Bed; SRW
2011 Outback 250RS - Anniversary Edition
Equal-i-zer 10K
2011 Outback 250RS - Anniversary Edition
Equal-i-zer 10K
Options
- Mark as New
- Bookmark
- Subscribe
- Mute
- Subscribe to RSS Feed
- Permalink
- Report Inappropriate Content
Oct-20-2022 08:01 AM
Thanks John-
I appreciate the detailed response and detailed charts and pics. I'll post back here what I do and the results.
I appreciate the detailed response and detailed charts and pics. I'll post back here what I do and the results.
2023 GMC, 3500HD, Crew Cab, 6.6L Gas/6 Speed Auto, 4X4, Standard Bed; SRW
2011 Outback 250RS - Anniversary Edition
Equal-i-zer 10K
2011 Outback 250RS - Anniversary Edition
Equal-i-zer 10K
Options
- Mark as New
- Bookmark
- Subscribe
- Mute
- Subscribe to RSS Feed
- Permalink
- Report Inappropriate Content
Oct-20-2022 05:59 AM
Baja Man wrote:
Thanks John. I added pics.
Is there a reason you placed thermal switch at bottom of refer on absorber pipes instead of up top closer to fan on the upper tubes? I thought the upper areas were the hottest?
You may be thinking into this more then is practically going on as far as the fan disk switch location. My work on these fridges deals with restoring older campers and servicing the appliances on them. I know the RM2652 very well, I looked up your DM2652 and the basic operation is the same although the upper coils are arranged differently.
This is the only Dometic I have seen in person that had factory installed fans. The pic date is correct. That is a more special fridge then a standard RV fridge, they were advertising their fridge as the Elkhart Hall of Fame.


I'm glad to hear Dometic finally is installing factory fans to help the situation, they should of done it a long time ago, I suspect cost was a factor in the RV world.
This U tube shows at least one of the DM2652's fan location, not sure if yours is like this, but this one has the disk switch almost on top of the fan, but yes up high. It is a sad looking OEM install if it was truly a OEM/Dometic install.
https://www.youtube.com/watch?v=dGBG1Jyx5SU
The reason I mounted my thermal disk switch at the bottom was of ease to get to it. The intent of the switch was, as the fridge is working, turn on the fan as it heats and off when it cools down. The location is different then what Dometic picked, not sure if it matters, it fits the fan need.
As FYI, I have tested the different temps all over the RM2652 coiling coil and the "hottest" pipe (location 2 below) is just after the tube that comes out of the burner stack, from there, the pipes are all colder then that location. But, they are all warmer then when the unit is not cooling. (locations 9 - 12 below are the next warmest) See here
When bench testing the fridge the temp locations measured.
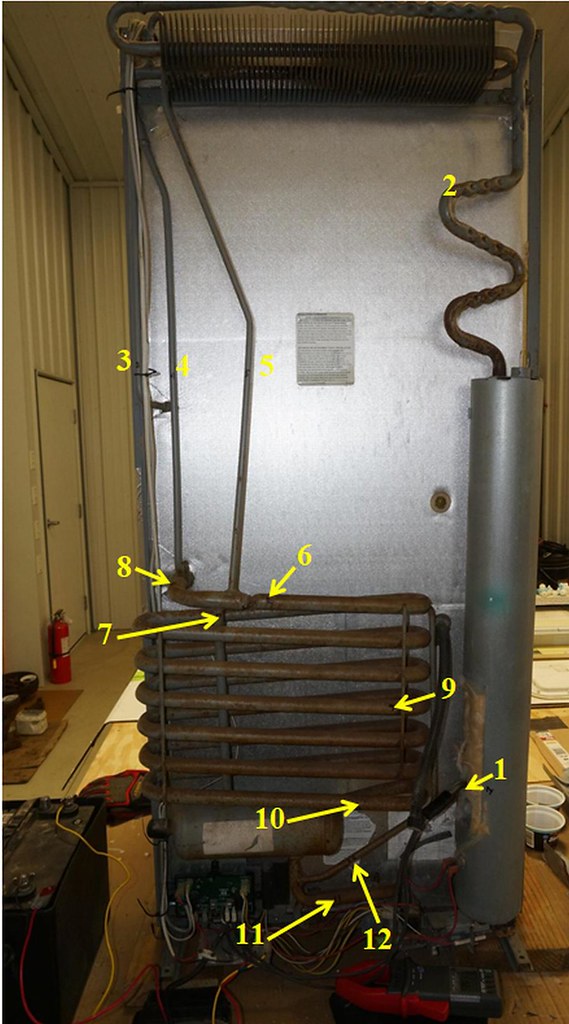
The test data

Baja Man wrote:
Since I have the OEM fan which is about 1'-2' below yours, which is at roof vent, I will add the two fans down below just inside the bottom vent just below absorber tubes, horizontally mounted, pointing upwards. These fans (similar to Titan 90mm fans) have a wire probe as a thermostat. Where should this probe be mounted?
The fans have a wired remote that controls speed and also has auto/manual modes so speed can be reduced if fans are working too good and refer temps are too low. I live and camp in SoCal (where it can get HOT and mostly camp in warm areas, so having refer temps too low may be a pipe dream, but definitely welcomed!!
Since with the above mentioned wiring method, what would be the efficiency/advantage or disadvantage of having two lower fans NOT in thermostat synch with the solo upper fan?
It seems your new fans no longer has a need to get power from the Dometic fan switch. They have their own T stat. OK, as long as you can locate their T stat to turn on the fans when the system heats and off when it cools, they should work. Not sure where you are mounting the T stats for those fans, if they do not work out for you, then add a separate thermal disk switch like I did to power them.
As for not having the bottom fans in snyc with the top fan, while there may be a small amount of inefficiency if you can measure it, I'm not sure it really matters. The fans are to help create a better draft up the back of the fridge.
I would be cautious about a fan next to the LP burner area, when I started doing fan testing, I jury rigged one fan on the bottom on the opposite side of the burner blowing up. It for sure helped as opposed to no fan, however the fan up on the roof vent, worked better as if forced more air up the entire back of the fridge versus a single one sided location.
You may want to try just one fan below and leave space for two. Test it and see if you need the second one.
I'm still not convinced something is not right with your factory installed fan setup. Or you have other issues going on creating the temp swings you are seeing. One good working fan in the right location should solve the problem, granted I am on the east coast and you are on the west in a hotter area, that may aggravate a poor fan install or the real issue with the fridge.
Have to checked the thermistor inside the fridge compartment? I just replaced one 2 weeks ago as hers was doing what yours is. Hers is 18 years old, not sure it matters, just mentioning.
Hope this helps,
Let us know how you make out.
John
2005 Ford F350 Super Duty, 4x4; 6.8L V10 with 4.10 RA, 21,000 GCWR, 11,000 GVWR, upgraded 2 1/2" Towbeast Receiver. Hitched with a 1,700# Reese HP WD, HP Dual Cam to a 2004 Sunline Solaris T310R travel trailer.
Options
- Mark as New
- Bookmark
- Subscribe
- Mute
- Subscribe to RSS Feed
- Permalink
- Report Inappropriate Content
Oct-19-2022 11:47 AM
Thanks John. I added pics.
Is there a reason you placed thermal switch at bottom of refer on absorber pipes instead of up top closer to fan on the upper tubes? I thought the upper areas were the hottest?
Since I have the OEM fan which is about 1'-2' below yours, which is at roof vent, I will add the two fans down below just inside the bottom vent just below absorber tubes, horizontally mounted, pointing upwards. These fans (similar to Titan 90mm fans) have a wire probe as a thermostat. Where should this probe be mounted?
The fans have a wired remote that controls speed and also has auto/manual modes so speed can be reduced if fans are working too good and refer temps are too low. I live and camp in SoCal (where it can get HOT and mostly camp in warm areas, so having refer temps too low may be a pipe dream, but definitely welcomed!!
Since with the above mentioned wiring method, what would be the efficiency/advantage or disadvantage of having two lower fans NOT in thermostat synch with the solo upper fan?
2023 GMC, 3500HD, Crew Cab, 6.6L Gas/6 Speed Auto, 4X4, Standard Bed; SRW
2011 Outback 250RS - Anniversary Edition
Equal-i-zer 10K
2011 Outback 250RS - Anniversary Edition
Equal-i-zer 10K
Options
- Mark as New
- Bookmark
- Subscribe
- Mute
- Subscribe to RSS Feed
- Permalink
- Report Inappropriate Content
Oct-19-2022 10:33 AM
Baja Man wrote:
I added a few pics, perhaps these are easier to read.
There are no pics extra pics showing up, did you miss posting the,?
I will pass this along to consider, I used a 3 speed fan installed in the roof vent. I started with the fan on high thinking that was a good thing. And I had a fan in the lower compartment blowing upward that was on wire plugs that I could unhook it.
I found out it was not a good thing to over fan the system. The fridge then worked too well, the compartment went to 30 F or slightly below and freezing things inside. I ended up putting the top fan on slow, unhooking the bottom fan and the fridge settled into 33 to 34F consistent.
See here, this may help you. I installed a thermal disk switch just for the upper fan so it turns on and off as needed. You may consider this for your new fans.
This is a double bearing fan made to run in the horizonal direction. The small black cube is the 3 speed switch

3M 33 taped the motor and the speed switch to help make it more dust and water protected. The speed switch is outside the grill, just unscrew the roof vent cover and adjust switch.

Folded screen back down and Dicor no sag caulked it shut

The thermal disk switch


I have done this on several campers. I also created a better bracket for the disk switch if you want to see it. I have to upload the pic, it is not on my file server.
If you put all 3 fans wired at once, you may have too much fan. Suggest running wires on the new fans down to the open compartment area where you can unwire (or unplug, use plug type connectors) them as needed. Make sure you fuse this. Those tiny fan wires will be the fuse if a short ever happens.
Once I see your diagram, I can answer your questions better if they will still be needed after reviewing this reply.
John
2005 Ford F350 Super Duty, 4x4; 6.8L V10 with 4.10 RA, 21,000 GCWR, 11,000 GVWR, upgraded 2 1/2" Towbeast Receiver. Hitched with a 1,700# Reese HP WD, HP Dual Cam to a 2004 Sunline Solaris T310R travel trailer.
Options
- Mark as New
- Bookmark
- Subscribe
- Mute
- Subscribe to RSS Feed
- Permalink
- Report Inappropriate Content
Oct-19-2022 09:12 AM
Yes, thank you all for the assistance. I added a few pics, perhaps these are easier to read.
What I'd like to do is, wire all three off of the one thermostat and also have a manual option. Ex. A toggle switch with Auto-Off-manual.
Can the wires to the OEM fan and T-stat all be accessed at bottom? It appears I need to access the wire (part 3) from the thermal fuse (part U) to fan, but I believe that wire is near top of refer making access difficult. It would make wiring all this much easier if I could access at bottom of refer.
If not able to access those wires, I would then need to determine "where" to the mount t-stat sensor wire (it is not thermal fuse as is OEM) from new two fans? Fans would be mounted pulling fresh in from lower vent and pushing air UP towards roof vent. Is the T-stat wire taped to lower absorber tubes, to absorber vessel, or ?
Thanks
2023 GMC, 3500HD, Crew Cab, 6.6L Gas/6 Speed Auto, 4X4, Standard Bed; SRW
2011 Outback 250RS - Anniversary Edition
Equal-i-zer 10K
2011 Outback 250RS - Anniversary Edition
Equal-i-zer 10K
Options
- Mark as New
- Bookmark
- Subscribe
- Mute
- Subscribe to RSS Feed
- Permalink
- Report Inappropriate Content
Oct-15-2022 08:12 PM
Baja Man wrote:
I found the wiring diagram.
Can someone explain the small box to the left side of diagram?
The fan (part V) is show wired differently in both diagrams. One shows that one wire (negative) from goes straight to ground and in the other diagram it shows one wire (negative) goes to (R, K, J2, G, J10, Ground) switch, heating cable, lamp, J2, J10, and ground.
Thanks
Your diagram is fuzzy and hard to read. But the fan appears to be wired the same in both diagrams. What looks different is the boxed area on the lower left shows other ground connections that can maybe be confusing.
If the fuzzy words on the top right of the boxed area says, GROUND, then both diagrams show the same thing. A +12 VDC hot wire feeds what looks like a fuse. Then the fuse feeds a thermal disk switch which then feeds the fan. The other wire on the fan goes to ground. Both drawings show that, it just looks different as the boxed area has other grounds connected to the same ground coming off the fan motor.
Hope this helps. If what I said above it not clear, please create a pic zoomed in we can see all the words etc.
John
2005 Ford F350 Super Duty, 4x4; 6.8L V10 with 4.10 RA, 21,000 GCWR, 11,000 GVWR, upgraded 2 1/2" Towbeast Receiver. Hitched with a 1,700# Reese HP WD, HP Dual Cam to a 2004 Sunline Solaris T310R travel trailer.
Options
- Mark as New
- Bookmark
- Subscribe
- Mute
- Subscribe to RSS Feed
- Permalink
- Report Inappropriate Content
Oct-15-2022 04:26 PM
I found the wiring diagram.
Can someone explain the small box to the left side of diagram?
The fan (part V) is show wired differently in both diagrams. One shows that one wire (negative) from goes straight to ground and in the other diagram it shows one wire (negative) goes to (R, K, J2, G, J10, Ground) switch, heating cable, lamp, J2, J10, and ground.
Thanks
2023 GMC, 3500HD, Crew Cab, 6.6L Gas/6 Speed Auto, 4X4, Standard Bed; SRW
2011 Outback 250RS - Anniversary Edition
Equal-i-zer 10K
2011 Outback 250RS - Anniversary Edition
Equal-i-zer 10K
Options
- Mark as New
- Bookmark
- Subscribe
- Mute
- Subscribe to RSS Feed
- Permalink
- Report Inappropriate Content
Oct-15-2022 04:03 PM
Refer is not in a slide.
Fridge vent is on roof.
It appears to be properly installed per installation guidelines. There is little space between refer and trailer side wall.
My thinking is to add fans at bottom so there is a push (of lower fans I will add) and a pull by the upper OEM fan.
How best to wire so all three are on at same time?
Is there a reason to not have them all on at same time?
Thoughts?
2023 GMC, 3500HD, Crew Cab, 6.6L Gas/6 Speed Auto, 4X4, Standard Bed; SRW
2011 Outback 250RS - Anniversary Edition
Equal-i-zer 10K
2011 Outback 250RS - Anniversary Edition
Equal-i-zer 10K
Options
- Mark as New
- Bookmark
- Subscribe
- Mute
- Subscribe to RSS Feed
- Permalink
- Report Inappropriate Content
Oct-15-2022 05:23 AM
I wouldn't install them at the bottom. take a look inside and see how much room there is from the cooling fins to the baffel or compartment wall. there should only be a small hap. if there isn't you would benifit more by installing a baffel and putting the fans up top so the air flow is directed across the fins.
2014 F350 6.7 Platinum
2016 Cougar 330RBK
1991 Slumberqueen WS100
2016 Cougar 330RBK
1991 Slumberqueen WS100
Options
- Mark as New
- Bookmark
- Subscribe
- Mute
- Subscribe to RSS Feed
- Permalink
- Report Inappropriate Content
Oct-14-2022 01:42 PM
Baja Man wrote:
MY current unit Dometic DM2652LBX with one fan near top that is thermostatically controlled.
Current temps:
Direct sun, ambient temps 77F-83F, refer empty
Wireless thermometer
Refer/Freezer: 38F/7F (77F-11:20am); 42F/8F (81F-2:00PM); 45F/9F (83F-3:00pm)
Hi,
If you already have a factory install fan with a T stat at the top area and you are getting that bad of cooling as described above, the bell goes off in my head something else is not right.
A question,
Is your fridge installed in a slide or other place where the top air vent is in a side wall and not up at the roof line?
I have seen some real bad wall side vent setups that rob the efficiency of the fridge. The OEM of the camper did not follow the instructions Dometic states on how to create the air path/ductwork out a side wall vented fridge setup. The air flow gets all bogged down trying to get out of a improper damper/duct setup above the fridge. Just putting a fan up top to help for a bad duct install, does not always fix the root problem.
By chance, if yours is in a side wall, can you post pics with the top vent removed so we can see the top of the fridge and how the directed the air to get out of the cabinet?
Hope this helps,
John
2005 Ford F350 Super Duty, 4x4; 6.8L V10 with 4.10 RA, 21,000 GCWR, 11,000 GVWR, upgraded 2 1/2" Towbeast Receiver. Hitched with a 1,700# Reese HP WD, HP Dual Cam to a 2004 Sunline Solaris T310R travel trailer.


