Turn on suggestions
Auto-suggest helps you quickly narrow down your search results by suggesting possible matches as you type.
Showing results for
- Good Sam Community
- Everything RV
- Tow Vehicles
- Re: Dexter HD Suspension & EZ-Flex Install (long w...
Options
- Subscribe to RSS Feed
- Mark Topic as New
- Mark Topic as Read
- Float this Topic for Current User
- Bookmark
- Subscribe
- Mute
- Printer Friendly Page
Dexter HD Suspension & EZ-Flex Install (long w/ pictures)
Options
- Mark as New
- Bookmark
- Subscribe
- Mute
- Subscribe to RSS Feed
- Permalink
- Report Inappropriate Content
Jul-02-2008 06:00 PM
I recently purchased the Dexter HD suspension kit that comes with the new EZ-Flex Idler... I had installed a similar kit on my previous Nomad 27' TT and it worked quite well so I decided to install the newer kit on my 31' Nomad... Below is a picture of the kit I installed...


Now it's worth mentioning here that this type of job isn't exactly for the "faint of heart"... Basically what your going to do is to put your TT on Jack stands and rip off the suspension and install a new one... Your going to need a pretty good assortment of standard mechanics hand tools and an air compressor with a variety of air tools is also very helpful... I would also suggest that you buy the
You could just use a big hammer and beat things into submission, but pressing the bearings and bolts in is a lot more elegant and easier on the frame and also the installers hands... I also used an air operated impact (gun) wrench, an air operated ratchet wrench, demolition bar, numerous 1/2" drive sockets, 3 pound hammer, grease gun, assorted screwdrivers, vise grips and other hand tools...
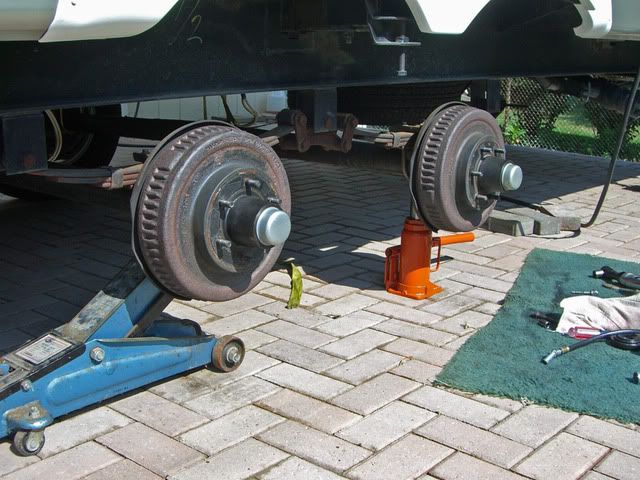
Start the project by putting your trailer on jack stands on a good firm surface... I also used my 6 stabilizer jacks attached to the trailer to further aid with stability... Here are some photos of that...
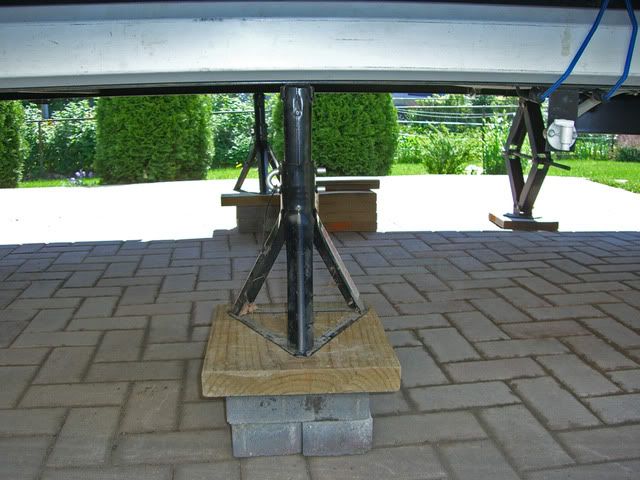
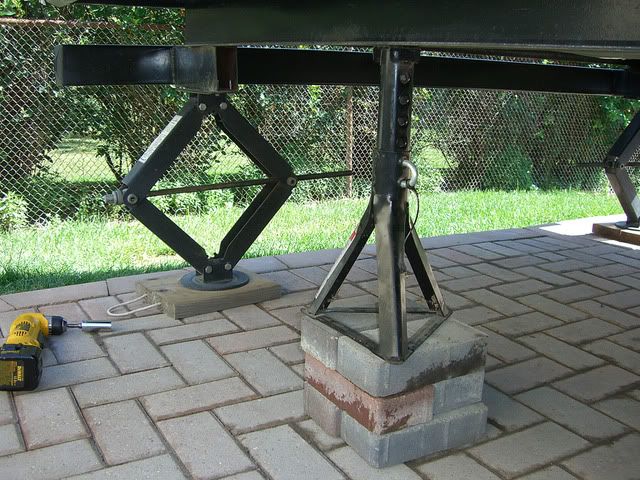
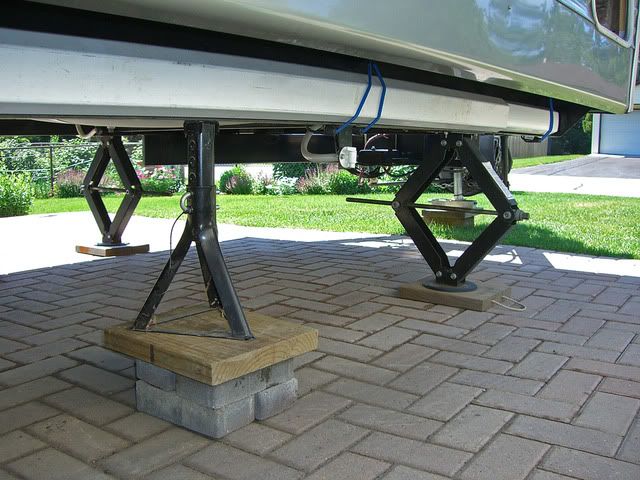
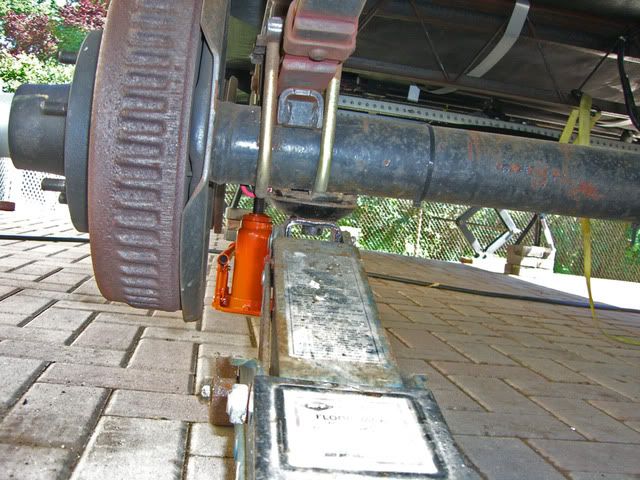
You should also have 2 or 3 hefty jacks, either the bottle type or floor type to aid in the installation... I use a 4 ton floor jack and a 12 ton bottle jack... The 12 ton picks up the TT effortlessly and is small and compact... Here are a few photos of them...
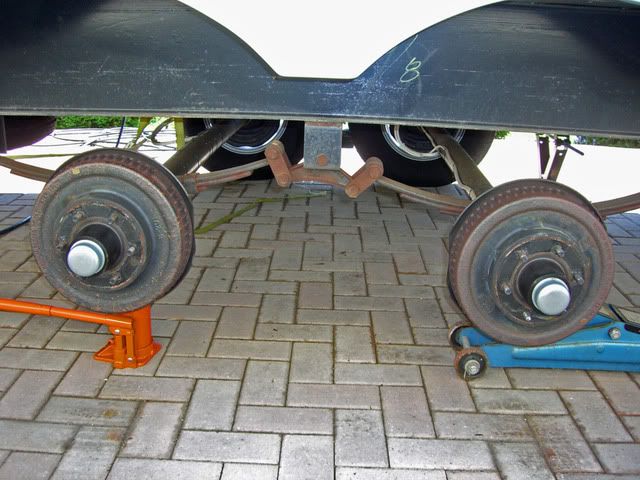
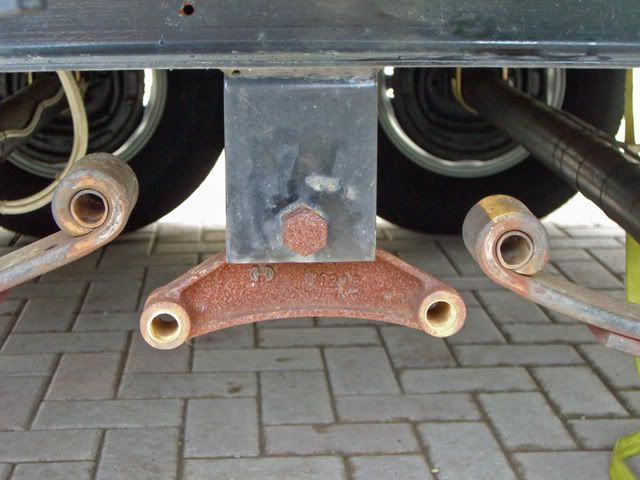
Start by removing the standard OEM idlers and shackles... This is done by removing the lock nuts on the inside of the suspension components and then hammering the bolts out of the hangers... All the bolts on my OEM suspension system were serrated, so using the impact gun to turn them and remove them would have damaged the shackle hangers by reaming out the mounting hole... If I would have done that then the new serrated bolts would have no material to bite in to... Here are a few pictures of the old suspension components...
Here is the rear OEM bolt...
In this photo the springs have been removed from the idler and their plastic bearings have not yet been removed...
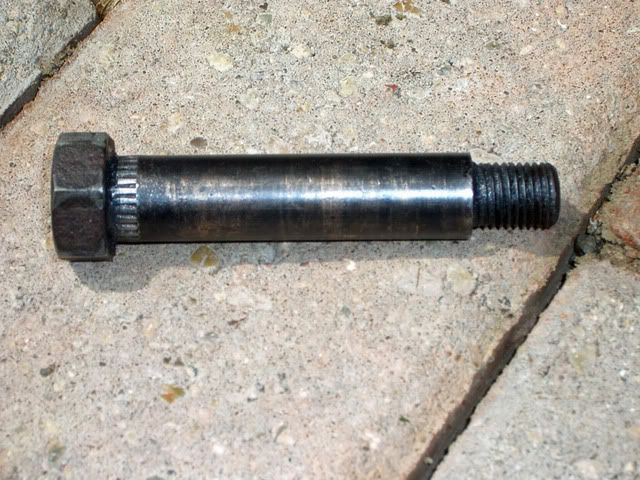
Once the old components have been removed, you can begin to install the new ones... When pressing in the new bronze bushings, it is a good idea to use a pilot bolt or installation bolt so that the soft bronze bearing does not distort or bend... Here is a bolt I used for that purpose... Note that I ground off the serrations... This bolt is also used to push out (hammer out) the plastic bearings...
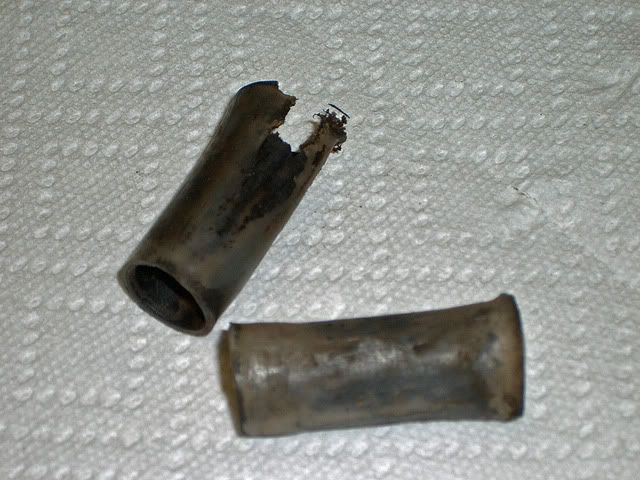
Here are a few typical plastic bearings after about 6000 miles... Some were already showing signs of extreme wear...
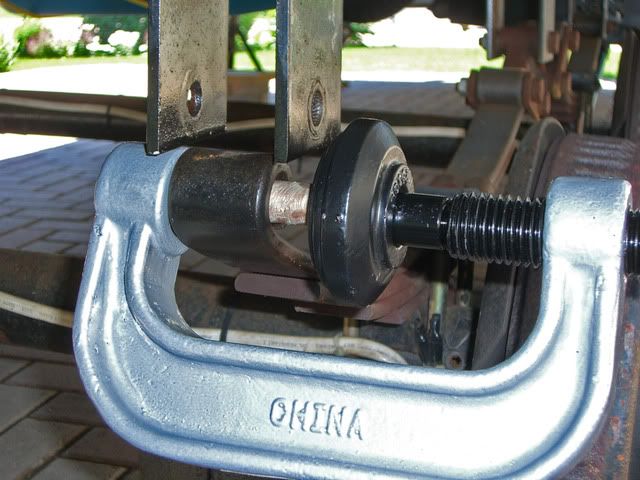
Now we can install the bronze bushings in the spring eyes... Apply grease to the inside of the spring eye, the outside of the bronze bearing, and the inside of the bronze bearing as well... Then use the Harbor Freight Ball Joint Tool (HFBJT) to push the bronze bearings into the spring eye as shown below...

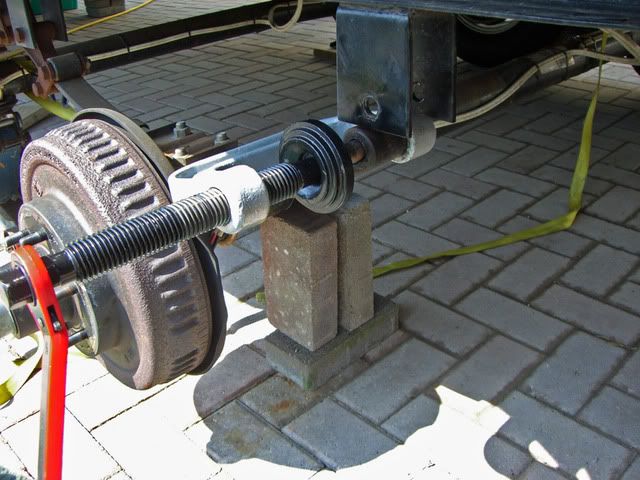
Once the bearing is pressed into the spring eye, then we press the serrated greasable bolt into hanger using the HFBJT...
This isn't the spring eye but here we are pressing the idler bolt into the hanger the same way you would do it with the spring hanger...
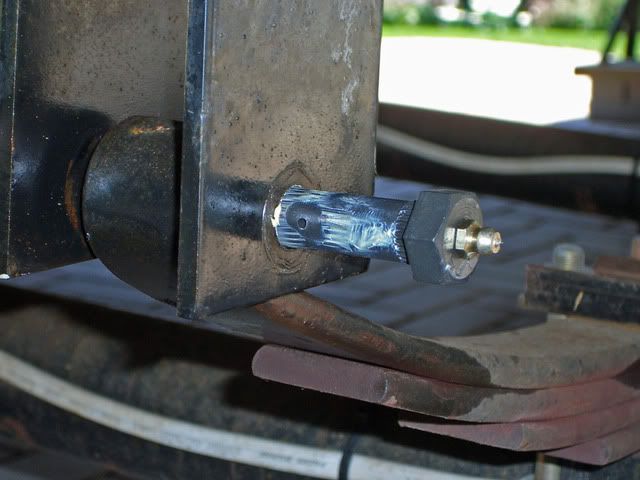
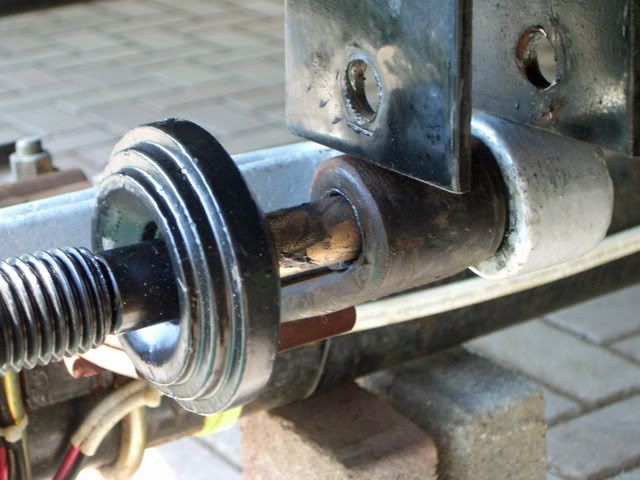
Once you complete the spring eye ends, then you can install the EZ-Flex Idler... It is installed by holding the idler between the frame hanger, inserting the proper size bolt and using the HFBJT to press the serrated bolt into the hanger... In the picture below the EZ-Flex idler has been hung on the bolt...
In the picture below, the serrated bolt is being pressed into the hanger...
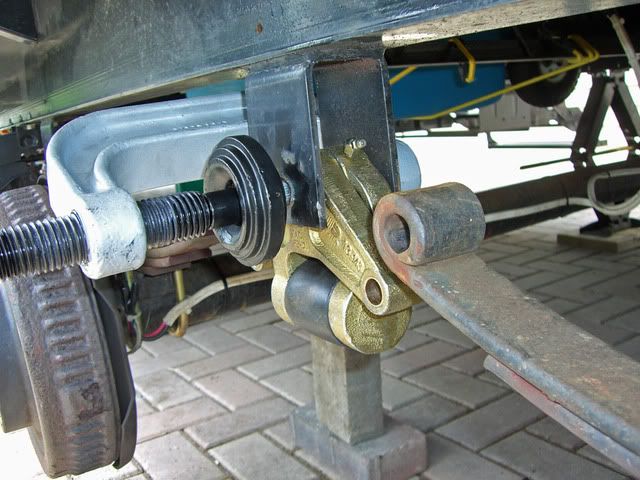
Once you have the EZ-Flex Idler mounted you can install the HD shackles for the front and rear springs... Here are a few photos of that operation... The photo below shows one shackle in place...
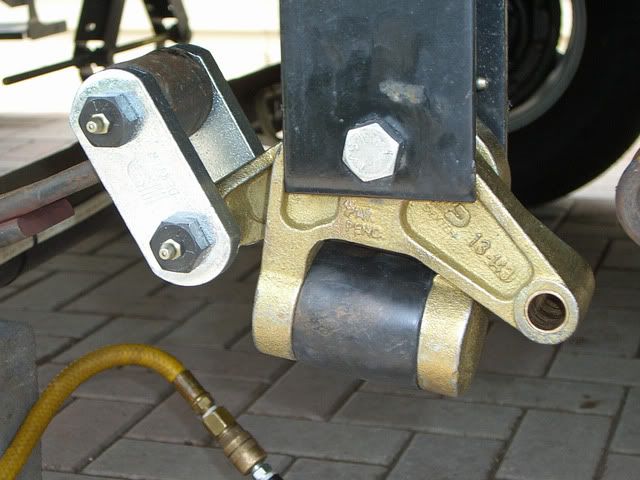
The photo below shows the second HD shackle being installed...
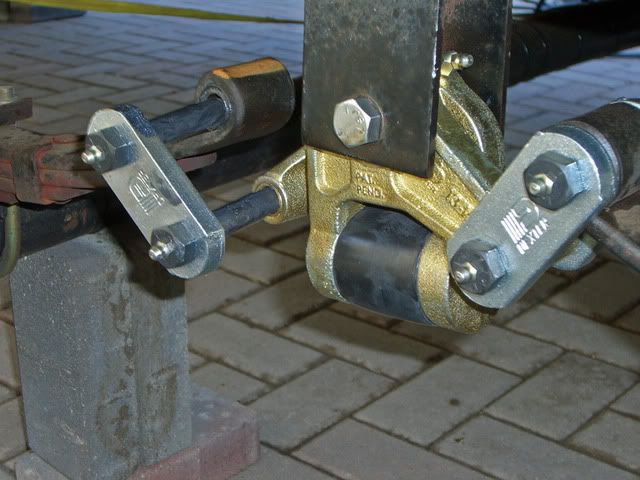
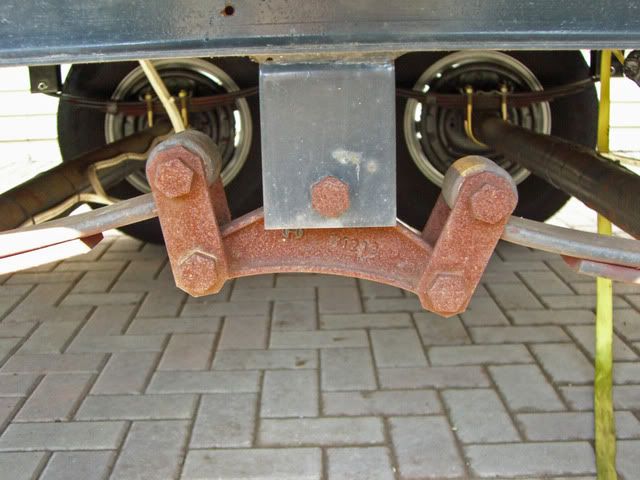
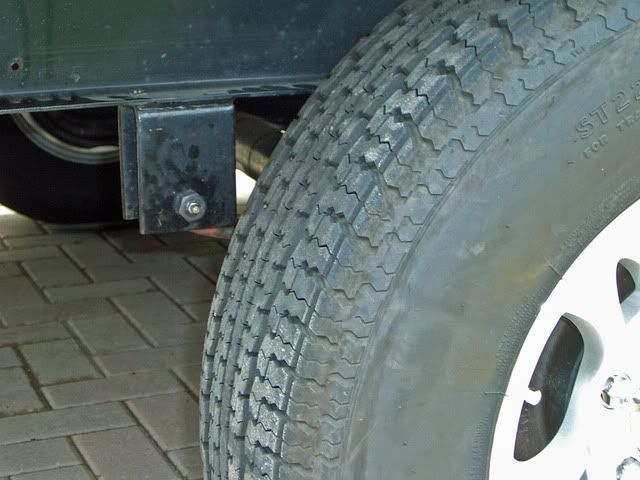
And this is what the assembly looks like when completely installed...
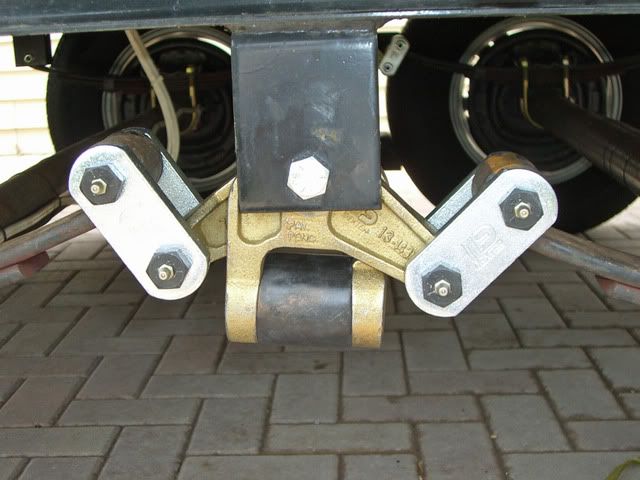
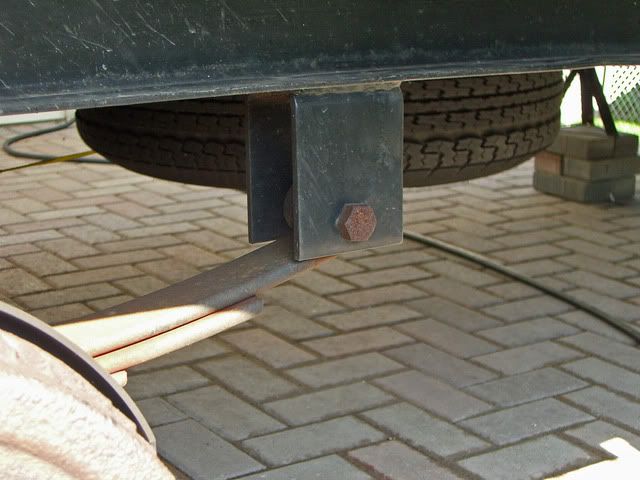
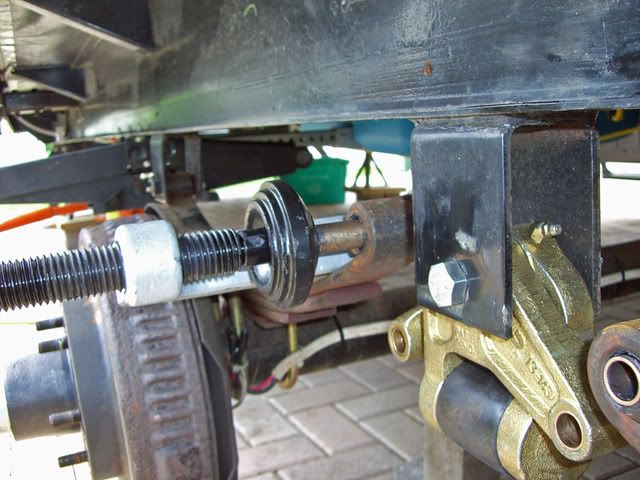
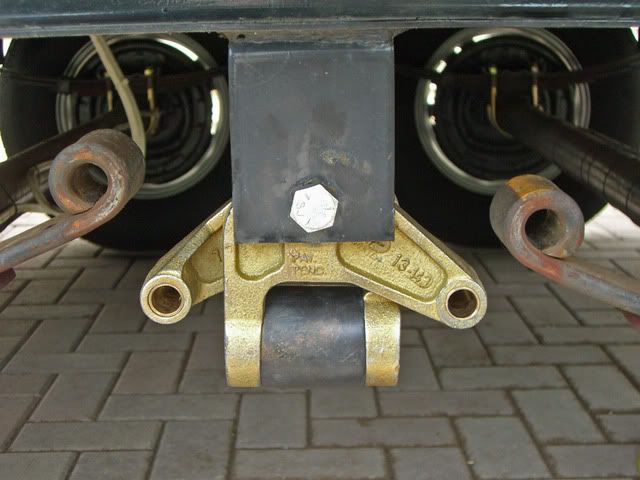
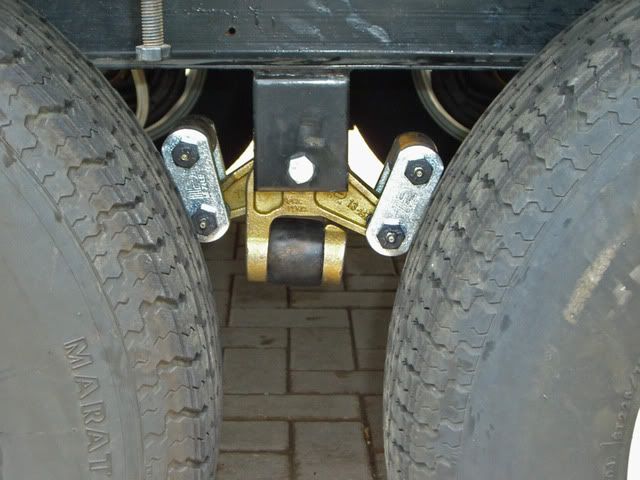
Here are a few photos from underneath the trailer looking at the inside view of the suspension components...
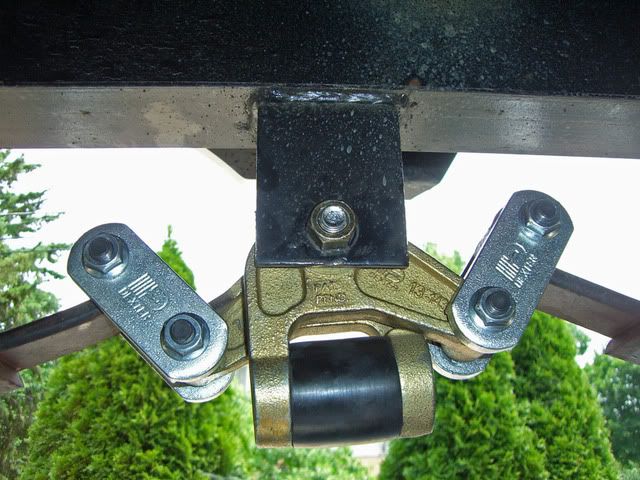

And here are a few extra views of the HFBJT in use... This tool was really a life saver... We used a similar tool that my buddy had at his shop when we did the previous trailer and I knew I would need a similar tool to successfully complete the installation of the HD EZ-Flex Kit...
And the finished product with the TT wheels again mounted...
It took me all day yesterday to install the EZ-Flex kit and HD suspension shackles on the curb side of the TT... I spent about 8+ hours on it but it was somewhat a learning experience... Today I installed the street side portion of the kit and I did that in about 4 hours... Not too bad for the first time although I don't plan to do another any time soon...
I haven't done a test ride yet - that will come in about 2 weeks when we attend another rally, but I suspect the HD Suspension shackles and EZ-Flex will be a big improvement just like the last one was, although my last one had a solid idler assembly, not rubber shock mounted like the EZ-Flex...
I'm having some problems getting grease to flow in the spring eye portions of the greasable bolts... I called Dexter Tech support and they suggested I reverse their direction... All the greasable bolt holes should run in a horizontal plane facing either the front of rear of the TT as opposed to pointing either skyward or ground ward... Dexter says the grease will not migrate properly if they are in the up or down position... So I reversed the direction of the leaf spring eye bolts and I still can't get grease into them...
I'm going to run the TT a bit and see if the bronze bearings loosen up to the point where they will take grease readily... I remember my last TT being like this and sometimes I had to jack the frame a bit to relieve pressure on the greasable bolts... We'll see what happens with this issue... There were no problems getting grease into the center idler and shackles...
Les
Now it's worth mentioning here that this type of job isn't exactly for the "faint of heart"... Basically what your going to do is to put your TT on Jack stands and rip off the suspension and install a new one... Your going to need a pretty good assortment of standard mechanics hand tools and an air compressor with a variety of air tools is also very helpful... I would also suggest that you buy the
Harbor Freight Ball Joint Tool
that you see in this post... It is used for pressing in bronze bearings and serrated bolts and works very well for this application...You could just use a big hammer and beat things into submission, but pressing the bearings and bolts in is a lot more elegant and easier on the frame and also the installers hands... I also used an air operated impact (gun) wrench, an air operated ratchet wrench, demolition bar, numerous 1/2" drive sockets, 3 pound hammer, grease gun, assorted screwdrivers, vise grips and other hand tools...
Start the project by putting your trailer on jack stands on a good firm surface... I also used my 6 stabilizer jacks attached to the trailer to further aid with stability... Here are some photos of that...
You should also have 2 or 3 hefty jacks, either the bottle type or floor type to aid in the installation... I use a 4 ton floor jack and a 12 ton bottle jack... The 12 ton picks up the TT effortlessly and is small and compact... Here are a few photos of them...
Start by removing the standard OEM idlers and shackles... This is done by removing the lock nuts on the inside of the suspension components and then hammering the bolts out of the hangers... All the bolts on my OEM suspension system were serrated, so using the impact gun to turn them and remove them would have damaged the shackle hangers by reaming out the mounting hole... If I would have done that then the new serrated bolts would have no material to bite in to... Here are a few pictures of the old suspension components...
Here is the rear OEM bolt...
In this photo the springs have been removed from the idler and their plastic bearings have not yet been removed...
Once the old components have been removed, you can begin to install the new ones... When pressing in the new bronze bushings, it is a good idea to use a pilot bolt or installation bolt so that the soft bronze bearing does not distort or bend... Here is a bolt I used for that purpose... Note that I ground off the serrations... This bolt is also used to push out (hammer out) the plastic bearings...
Here are a few typical plastic bearings after about 6000 miles... Some were already showing signs of extreme wear...
Now we can install the bronze bushings in the spring eyes... Apply grease to the inside of the spring eye, the outside of the bronze bearing, and the inside of the bronze bearing as well... Then use the Harbor Freight Ball Joint Tool (HFBJT) to push the bronze bearings into the spring eye as shown below...
Once the bearing is pressed into the spring eye, then we press the serrated greasable bolt into hanger using the HFBJT...
This isn't the spring eye but here we are pressing the idler bolt into the hanger the same way you would do it with the spring hanger...
Once you complete the spring eye ends, then you can install the EZ-Flex Idler... It is installed by holding the idler between the frame hanger, inserting the proper size bolt and using the HFBJT to press the serrated bolt into the hanger... In the picture below the EZ-Flex idler has been hung on the bolt...
In the picture below, the serrated bolt is being pressed into the hanger...
Once you have the EZ-Flex Idler mounted you can install the HD shackles for the front and rear springs... Here are a few photos of that operation... The photo below shows one shackle in place...
The photo below shows the second HD shackle being installed...
And this is what the assembly looks like when completely installed...
Here are a few photos from underneath the trailer looking at the inside view of the suspension components...
And here are a few extra views of the HFBJT in use... This tool was really a life saver... We used a similar tool that my buddy had at his shop when we did the previous trailer and I knew I would need a similar tool to successfully complete the installation of the HD EZ-Flex Kit...
And the finished product with the TT wheels again mounted...
It took me all day yesterday to install the EZ-Flex kit and HD suspension shackles on the curb side of the TT... I spent about 8+ hours on it but it was somewhat a learning experience... Today I installed the street side portion of the kit and I did that in about 4 hours... Not too bad for the first time although I don't plan to do another any time soon...
I haven't done a test ride yet - that will come in about 2 weeks when we attend another rally, but I suspect the HD Suspension shackles and EZ-Flex will be a big improvement just like the last one was, although my last one had a solid idler assembly, not rubber shock mounted like the EZ-Flex...
I'm having some problems getting grease to flow in the spring eye portions of the greasable bolts... I called Dexter Tech support and they suggested I reverse their direction... All the greasable bolt holes should run in a horizontal plane facing either the front of rear of the TT as opposed to pointing either skyward or ground ward... Dexter says the grease will not migrate properly if they are in the up or down position... So I reversed the direction of the leaf spring eye bolts and I still can't get grease into them...
I'm going to run the TT a bit and see if the bronze bearings loosen up to the point where they will take grease readily... I remember my last TT being like this and sometimes I had to jack the frame a bit to relieve pressure on the greasable bolts... We'll see what happens with this issue... There were no problems getting grease into the center idler and shackles...
Les
2000 Ford F-250SD, XLT, 4X4 Off Road, SuperCab
w/ 6.8L (415 C.I.) V-10/3:73LS/4R100
Banks Power Pack w/Trans Command & OttoMind
Sold Trailer - not RV'ing at this point in time
HUNTER THERMOSTAT INSTALL
HOME MADE WHEEL CHOCKS
419 REPLIES 419
Options
- Mark as New
- Bookmark
- Subscribe
- Mute
- Subscribe to RSS Feed
- Permalink
- Report Inappropriate Content
Jul-03-2008 06:20 PM
coolbreeze01 wrote:
Very nice. Does this come stock on any TT's?
Yes, Komfort is putting it on their trailers starting with the 2008 year models.
2000 Chevy Silverado 1500
2005 Komfort Trailblazer T23S
Honda EU2000I
2005 Komfort Trailblazer T23S
Honda EU2000I
Options
- Mark as New
- Bookmark
- Subscribe
- Mute
- Subscribe to RSS Feed
- Permalink
- Report Inappropriate Content
Jul-03-2008 05:59 PM
Very nice. Does this come stock on any TT's?
2008 Ram 3500 With a Really Strong Tractor Motor...........
LB, SRW, 4X4, 6-Speed Auto, 3.73, Prodigy P3, Blue Ox Sway Pro........
2014 Sandsport 26FBSL
LB, SRW, 4X4, 6-Speed Auto, 3.73, Prodigy P3, Blue Ox Sway Pro........
2014 Sandsport 26FBSL
Options
- Mark as New
- Bookmark
- Subscribe
- Mute
- Subscribe to RSS Feed
- Permalink
- Report Inappropriate Content
Jul-03-2008 05:39 PM
Great post, Les. I've been thinking about changing mine but wasn't sure exactly what all was involved. Your post and pictures will be very helpful if/when I decide to go ahead with the change.
TV: 05 Chevy 2500 8.1L
5er: 2010 Open Range 385RLS
Hensley Arrow and P3
5er: 2010 Open Range 385RLS
Hensley Arrow and P3
Options
- Mark as New
- Bookmark
- Subscribe
- Mute
- Subscribe to RSS Feed
- Permalink
- Report Inappropriate Content
Jul-03-2008 01:40 PM
Dixonmatco wrote:
Les, Where did you purchase this kit and what was the price?
Don't know where Les got his from but I purchased mine from Eastern Marine. They had the best price by far and I got the package today after only four days. Price was $159.95 plus $12 shipping. (Edit 7/9/16: I see the price has gone up and is now $163.65)
The price from Dexter Axle was $239.46 plus shipping.
Be aware that if you Google the kit, some places advertise a similar price but it is not for the complete kit. (Example) It is just for the unit and the two main mounting bolts and does not include the wet bolts for the links and other parts. Be aware of what you are ordering!
Barney
2004 Sunnybrook Titan 30FKS TT
Hensley "Arrow" 1400# hitch (Sold)
Not towing now.
Former tow vehicles were 2016 Ram 2500 CTD, 2002 Ford F250, 7.3 PSD, 1997 Ram 2500 5.9 gas engine
Hensley "Arrow" 1400# hitch (Sold)
Not towing now.
Former tow vehicles were 2016 Ram 2500 CTD, 2002 Ford F250, 7.3 PSD, 1997 Ram 2500 5.9 gas engine
Options
- Mark as New
- Bookmark
- Subscribe
- Mute
- Subscribe to RSS Feed
- Permalink
- Report Inappropriate Content
Jul-03-2008 01:23 PM
Thanks Les for the pics. I stumbled across EZ Flex about a week ago and started trying to do a little research on them. May try to install in the future on mine, Did it improve the ride on your old trailer? Could you tell alot of difference in the tow vehicle? Is there a way to save articles like this in your profile for easy access for future use? Thanks Mike
04 suburban 1500
00 silverado 1500
05 jayco 27bh
Couldn't get rig to post,so here is my burgler alarm!!
our pics
00 silverado 1500
05 jayco 27bh
Couldn't get rig to post,so here is my burgler alarm!!
our pics
Options
- Mark as New
- Bookmark
- Subscribe
- Mute
- Subscribe to RSS Feed
- Permalink
- Report Inappropriate Content
Jul-03-2008 09:01 AM
Les, Where did you purchase this kit and what was the price?
2000 Chevy Silverado 1500
2005 Komfort Trailblazer T23S
Honda EU2000I
2005 Komfort Trailblazer T23S
Honda EU2000I
Options
- Mark as New
- Bookmark
- Subscribe
- Mute
- Subscribe to RSS Feed
- Permalink
- Report Inappropriate Content
Jul-03-2008 07:10 AM
Each greasable bolt has 1 hole in it... According to Dexter, the hole exit is supposed to be in a horizontal plane rather than a verticle plane... I haven't sat down ad figured out what forces are in play in the axles, bolts, hangers, etc but I guess that this is the ideal position for the greasable bolt to be in so that grease will flow readily thru it and lubricate the balance of the bolt surface...
Les
Les
2000 Ford F-250SD, XLT, 4X4 Off Road, SuperCab
w/ 6.8L (415 C.I.) V-10/3:73LS/4R100
Banks Power Pack w/Trans Command & OttoMind
Sold Trailer - not RV'ing at this point in time
HUNTER THERMOSTAT INSTALL
HOME MADE WHEEL CHOCKS
Options
- Mark as New
- Bookmark
- Subscribe
- Mute
- Subscribe to RSS Feed
- Permalink
- Report Inappropriate Content
Jul-03-2008 06:58 AM
Great write-up and photos Les!:) My kit is supposed to be delivered today so I will probably be doing the same install this weekend. There is one thing I don't quite understand though. You said:
Not sure what bolt holes you are talking about or what they mean when they said the bolt holes should run in a horizontal plane facing the front or rear of the trailer. How would this affect the flow of grease anyway? I can see the bronze bushings being tight and not allowing grease flow, but can't see how the direction of the bolts would make any difference. Also, what did you mean when you "reversed the direction" and is this a problem with all of the spring bolts? :?
Barney
LAdams wrote:
All the greasable bolt holes should run in a horizontal plane facing either the front of rear of the TT as opposed to pointing either skyward or ground ward... Dexter says the grease will not migrate properly if they are in the up or down position... So I reversed the direction of the leaf spring eye bolts and I still can't get grease into them...
Not sure what bolt holes you are talking about or what they mean when they said the bolt holes should run in a horizontal plane facing the front or rear of the trailer. How would this affect the flow of grease anyway? I can see the bronze bushings being tight and not allowing grease flow, but can't see how the direction of the bolts would make any difference. Also, what did you mean when you "reversed the direction" and is this a problem with all of the spring bolts? :?
Barney
2004 Sunnybrook Titan 30FKS TT
Hensley "Arrow" 1400# hitch (Sold)
Not towing now.
Former tow vehicles were 2016 Ram 2500 CTD, 2002 Ford F250, 7.3 PSD, 1997 Ram 2500 5.9 gas engine
Hensley "Arrow" 1400# hitch (Sold)
Not towing now.
Former tow vehicles were 2016 Ram 2500 CTD, 2002 Ford F250, 7.3 PSD, 1997 Ram 2500 5.9 gas engine
Options
- Mark as New
- Bookmark
- Subscribe
- Mute
- Subscribe to RSS Feed
- Permalink
- Report Inappropriate Content
Jul-03-2008 06:44 AM
Thanks guys... Yeah, I think shocks would be a huge benifit - have always heard positive things regarding shocks... Think I'll investigate that as well for possibly my next project...
Les
Les
2000 Ford F-250SD, XLT, 4X4 Off Road, SuperCab
w/ 6.8L (415 C.I.) V-10/3:73LS/4R100
Banks Power Pack w/Trans Command & OttoMind
Sold Trailer - not RV'ing at this point in time
HUNTER THERMOSTAT INSTALL
HOME MADE WHEEL CHOCKS
Options
- Mark as New
- Bookmark
- Subscribe
- Mute
- Subscribe to RSS Feed
- Permalink
- Report Inappropriate Content
Jul-03-2008 05:33 AM
Thanks Les, very nice write up and photos. Let me know how she rides. Mine has never been a rough ride but I like how strong those shackles look. May consider this on my TT.
NCH
NCH
2000 Ford F350 4X4 PSD,CC, DRW
4:10's, BTM Muffler, Isspro Gauges,
Coolant Filter,CCV Mod
FTVB , Ford AIS
6.0 Cooler,SCT2 W/DP's 40 tow & 80 econo,Zoodad mod
2005 Keystone Hornet 30BHSS
Reese Dual Cam
Family of 4 saved by Grace!!!
MY TRUCK
OUR TRAILER
4:10's, BTM Muffler, Isspro Gauges,
Coolant Filter,CCV Mod
FTVB , Ford AIS
6.0 Cooler,SCT2 W/DP's 40 tow & 80 econo,Zoodad mod
2005 Keystone Hornet 30BHSS
Reese Dual Cam
Family of 4 saved by Grace!!!
MY TRUCK
OUR TRAILER
Options
- Mark as New
- Bookmark
- Subscribe
- Mute
- Subscribe to RSS Feed
- Permalink
- Report Inappropriate Content
Jul-02-2008 11:24 PM
Nice! I am thinking of adding them to my TT also..I already have shocks but the combination of shocks and these would be the ultimate..
BTW, have you thought about adding shocks also?
Each component serves a different purpose, but either is a plus and both is even better..
BTW, have you thought about adding shocks also?
Each component serves a different purpose, but either is a plus and both is even better..
2000 Chevy Silverado 1500
2005 Komfort Trailblazer T23S
Honda EU2000I
2005 Komfort Trailblazer T23S
Honda EU2000I
Options
- Mark as New
- Bookmark
- Subscribe
- Mute
- Subscribe to RSS Feed
- Permalink
- Report Inappropriate Content
Jul-02-2008 08:50 PM
Great job, nice pictures, thank you.
Me (Eli)
Better Half (Trinity)
2 cats
1999 Chevy 3500
1993 Shadow Cruiser 21F21RD
Better Half (Trinity)
2 cats
1999 Chevy 3500
1993 Shadow Cruiser 21F21RD
Options
- Mark as New
- Bookmark
- Subscribe
- Mute
- Subscribe to RSS Feed
- Permalink
- Report Inappropriate Content
Jul-02-2008 08:33 PM
Really a nice job. We had ours done last year and what a difference it made. Thanks for showing yours.
Chris,Charlene,Amanda and Samantha
Maggie (Lab/Huskey mix)
02 Ford F250 SC W/6.8 V10
98 Prowler 21L5B 5'er
Reese 15K
Maggie (Lab/Huskey mix)
02 Ford F250 SC W/6.8 V10
98 Prowler 21L5B 5'er
Reese 15K
Options
- Mark as New
- Bookmark
- Subscribe
- Mute
- Subscribe to RSS Feed
- Permalink
- Report Inappropriate Content
Jul-02-2008 07:52 PM
Thanks - appreciate the comments :B
Les
Les
2000 Ford F-250SD, XLT, 4X4 Off Road, SuperCab
w/ 6.8L (415 C.I.) V-10/3:73LS/4R100
Banks Power Pack w/Trans Command & OttoMind
Sold Trailer - not RV'ing at this point in time
HUNTER THERMOSTAT INSTALL
HOME MADE WHEEL CHOCKS
Options
- Mark as New
- Bookmark
- Subscribe
- Mute
- Subscribe to RSS Feed
- Permalink
- Report Inappropriate Content
Jul-02-2008 06:07 PM
nice write up
2009 F-250 Crew Cab 4x4(5.4 and 3.73's) - finally something dependable 🙂
2008 Jayco Jayflight 28BHS
Me, wife, one little girl and one little boy
all along for the ride.
2008 Jayco Jayflight 28BHS
Me, wife, one little girl and one little boy
all along for the ride.
Related Content
- 1978 Holiday Rambler - 12V DC problems - no lights in Technical Issues
- Will Air bags make a big difference? in RV Tips & Tricks
- dingy induced sway in RV Tips & Tricks
- Simple and inexpensive roof vent modification (Vent Covers) in DIY Maintenance
- Recent cost to install solar by an RV tech/shop??? in Technical Issues


