Turn on suggestions
Auto-suggest helps you quickly narrow down your search results by suggesting possible matches as you type.
Showing results for
- Good Sam Community
- Everything RV
- Technical Issues
- Re: Replacement valve assembly for Atwood water he...
Options
- Subscribe to RSS Feed
- Mark Topic as New
- Mark Topic as Read
- Float this Topic for Current User
- Bookmark
- Subscribe
- Mute
- Printer Friendly Page
Replacement valve assembly for Atwood water heater
Options
- Mark as New
- Bookmark
- Subscribe
- Mute
- Subscribe to RSS Feed
- Permalink
- Report Inappropriate Content
Sep-09-2017 02:01 PM
Hi everyone,
This is my first post. The community seems like a very knowledgeable one so I thought I'd ask my question here. We have a '91 Winnebago Chieftain class A with an Atwood GH6-6E water heater. I've had about three people look at the issue, and it appears one of the two solenoids/valves are faulty. One of them appears to open, and the other doesn't, so no flame. It's an electric ignition as well. So, at this point, we are looking for a replacement valve. However, given the age of our RV, it's a bit tricky for me to find an exact replacement. Can anyone tell me if it's common/okay to use a different valve than the exact model that's currently on the water heater?
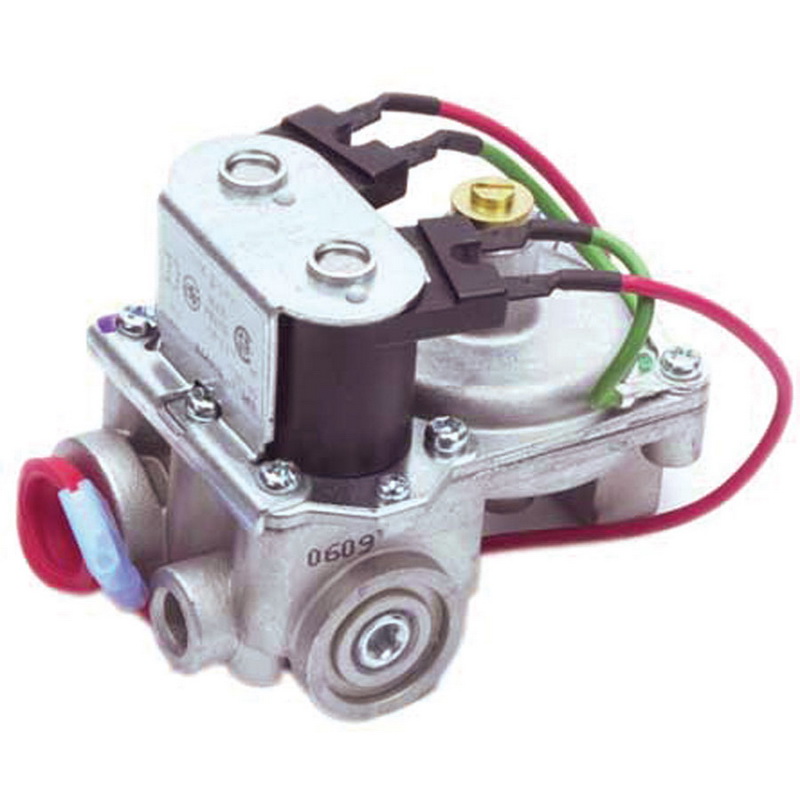
For example, there was a service company that recommended an AT93844 valve assembly. I looked it up, and only found the following possible replacement part:
http://m.opentip.com/product.php?products_id=6168695&osCsid=b359421l2kv2pv232d5090ta35&ats=product_landing
Looking at it, they definitely appear to be different. However, conceptually I think they do the same thing. One thing I'm concerned about is that the clearance between the top of the valve and the flu vent (above) may not be sufficient. Is it possible to rotate the valve so that it will fit? I wonder if that would impact the performance/safety characteristics of the valve.
Here is an image of the existing valve:

And an image of the replacement valve:
Any help on this would be appreciated. I'd hate to get the wrong replacement valve and end up down a hundred bucks 😄
Thanks everyone!
Christopher
This is my first post. The community seems like a very knowledgeable one so I thought I'd ask my question here. We have a '91 Winnebago Chieftain class A with an Atwood GH6-6E water heater. I've had about three people look at the issue, and it appears one of the two solenoids/valves are faulty. One of them appears to open, and the other doesn't, so no flame. It's an electric ignition as well. So, at this point, we are looking for a replacement valve. However, given the age of our RV, it's a bit tricky for me to find an exact replacement. Can anyone tell me if it's common/okay to use a different valve than the exact model that's currently on the water heater?
For example, there was a service company that recommended an AT93844 valve assembly. I looked it up, and only found the following possible replacement part:
http://m.opentip.com/product.php?products_id=6168695&osCsid=b359421l2kv2pv232d5090ta35&ats=product_landing
Looking at it, they definitely appear to be different. However, conceptually I think they do the same thing. One thing I'm concerned about is that the clearance between the top of the valve and the flu vent (above) may not be sufficient. Is it possible to rotate the valve so that it will fit? I wonder if that would impact the performance/safety characteristics of the valve.
Here is an image of the existing valve:
And an image of the replacement valve:
Any help on this would be appreciated. I'd hate to get the wrong replacement valve and end up down a hundred bucks 😄
Thanks everyone!
Christopher
18 REPLIES 18
Options
- Mark as New
- Bookmark
- Subscribe
- Mute
- Subscribe to RSS Feed
- Permalink
- Report Inappropriate Content
Sep-15-2017 09:55 PM
somatronicon wrote:
Hi everyone,
Just thought I'd post an update and let you all know the part I ordered, and finally got today works!
We've got hot water and so my wife, 5 kids and I thank you all for the prompt and accurate replies.
I thought I'd upload a few photos showing what we've got going on now. It wasn't as daunting of a task as I originally built it up to be.
Fieyorrrrrr!
A couple things I did while installing:
* Bent the input pipe a bit with my hand to make sure it wasn't putting too much strain on the new valve body.
* Blew out the orifice that attached to the out-flow side of the valve. I looked through it and there was a bunch of scum inside, once I blew it out it was much larger.
Thank you all again for the help and suggestions. If there is anything you see in the pictures or notes above that is incorrect, feel free to let me know 😄
Christopher
Howdy,
Nice install..........looks good.
Glad it is making hot water for you and family
Couple of things to improve function
*Gas orifice...you blew it out---hopefully just by blowing on it and NOT using high pressure air hose (or poke anything thru hole)
To properly clean.....remove it, soak it in alcohol and then pucker up and blow it dry. Poking/high pressure air can damage orifice
*Burner tube.......hopefully it is still aligned so gas flows down center of tube where it creates a venturi affect to pull air in thru air shutter and then properly mixing air/gas.
If not.gas bounces down inside of tube and air doesn't get properly mixed upsetting air/fuel ratio
*Burner flame.......WAY too much YELLOW. Flame should be strong BLUE with tinges of yellow at tips.
Yours could just be a 'rich fuel' condition and opening the air shutter a bit more may correct it. Shutter looks a bit to closed off.
If not....reclean orifice and burner tube (small bottle brush down thru tube)
Correct that flame and ENJOY!

OH yeah.....that petcock?
Did you at least open/drain/flush tank when gas valve was removed??
Really should be a NYLON plug.....:B
Is it time for your medication or mine?
2007 DODGE 3500 QC SRW 5.9L CTD In-Bed 'quiet gen'
2007 HitchHiker II 32.5 UKTG 2000W Xantex Inverter
US NAVY------USS Decatur DDG31
2007 DODGE 3500 QC SRW 5.9L CTD In-Bed 'quiet gen'
2007 HitchHiker II 32.5 UKTG 2000W Xantex Inverter
US NAVY------USS Decatur DDG31
Options
- Mark as New
- Bookmark
- Subscribe
- Mute
- Subscribe to RSS Feed
- Permalink
- Report Inappropriate Content
Sep-15-2017 08:51 PM
Congrats Christopher. Nice job and resourcefulness like you're showing, it is a real asset when it comes to keeping older or for that matter all rigs on the road.
I will say that old rigs are only slightly more likely to have a water heater fail than a 26 year old tank fail. Old-Biscuit is right about that part there is no time frame. If your water heater does leak, you will most likely notice it very soon after it starts. The way the one in our Bounder was mounted, it was contained in a small area with a drain hole directly below the tank.
Well enjoy your Winnie and your kids will remember your trips forever and yes they will bring up things from time to time that really impressed them, ours are in their mid-fifties and still talk about camp as kids.
"I travel not to go anywhere, but to go. I travel for travel's sake. The great affair is to go". R. L. Stevenson
David Bishop
2002 Winnebago Adventurer 32V
2009 GMC Canyon
Roadmaster 5000
BrakeBuddy Classic II
David Bishop
2002 Winnebago Adventurer 32V
2009 GMC Canyon
Roadmaster 5000
BrakeBuddy Classic II
Options
- Mark as New
- Bookmark
- Subscribe
- Mute
- Subscribe to RSS Feed
- Permalink
- Report Inappropriate Content
Sep-15-2017 07:41 PM
By the way, you'll probably notice that I didn't address the petcock issue as suggested by Old-Biscuit. I would have liked to, but simply forgot about it until I re-read the first page of replies 😄
Options
- Mark as New
- Bookmark
- Subscribe
- Mute
- Subscribe to RSS Feed
- Permalink
- Report Inappropriate Content
Sep-15-2017 07:33 PM
Hi everyone,
Just thought I'd post an update and let you all know the part I ordered, and finally got today works!
We've got hot water and so my wife, 5 kids and I thank you all for the prompt and accurate replies.
I thought I'd upload a few photos showing what we've got going on now. It wasn't as daunting of a task as I originally built it up to be.
Here's a flash-back to the old non-working system.

Fieyorrrrrr!

The original bracket did the trick, with some careful manipulation with a pipe wrench.

Slightly different angle showing the finished product.

Installation instructions showing how it recommended installing the valve body sideways.
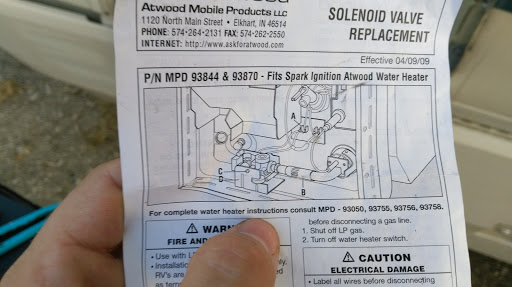
Close-up showing the sideways installation and the new bright yellow gas rated tape.

Moar bright yellow tape.

A couple things I did while installing:
* Bent the original mounting bracket to make sure there was room for the new valve.
* Bent the input pipe a bit with my hand to make sure it wasn't putting too much strain on the new valve body.
* Clean off the threads of the pipe connectors with a wire brush and make sure to dig all the old tape out with my pocket knife. They looked like new when I was done... Very satisfying.
* Blew out the orifice that attached to the out-flow side of the valve. I looked through it and there was a bunch of scum inside, once I blew it out it was much larger.
* Test the pipe connections with soapy water before kicking everything on to make sure there are no leaks.
Thank you all again for the help and suggestions. If there is anything you see in the pictures or notes above that is incorrect, feel free to let me know 😄
Christopher
Just thought I'd post an update and let you all know the part I ordered, and finally got today works!
We've got hot water and so my wife, 5 kids and I thank you all for the prompt and accurate replies.
I thought I'd upload a few photos showing what we've got going on now. It wasn't as daunting of a task as I originally built it up to be.
Here's a flash-back to the old non-working system.
Fieyorrrrrr!
The original bracket did the trick, with some careful manipulation with a pipe wrench.
Slightly different angle showing the finished product.
Installation instructions showing how it recommended installing the valve body sideways.
Close-up showing the sideways installation and the new bright yellow gas rated tape.
Moar bright yellow tape.
A couple things I did while installing:
* Bent the original mounting bracket to make sure there was room for the new valve.
* Bent the input pipe a bit with my hand to make sure it wasn't putting too much strain on the new valve body.
* Clean off the threads of the pipe connectors with a wire brush and make sure to dig all the old tape out with my pocket knife. They looked like new when I was done... Very satisfying.
* Blew out the orifice that attached to the out-flow side of the valve. I looked through it and there was a bunch of scum inside, once I blew it out it was much larger.
* Test the pipe connections with soapy water before kicking everything on to make sure there are no leaks.
Thank you all again for the help and suggestions. If there is anything you see in the pictures or notes above that is incorrect, feel free to let me know 😄
Christopher
Options
- Mark as New
- Bookmark
- Subscribe
- Mute
- Subscribe to RSS Feed
- Permalink
- Report Inappropriate Content
Sep-13-2017 10:05 PM
shastagary wrote:
this looks like it would install the same as the old one if your still thinking about repairing it. Atwood (93844) Water Heater Gas Valve
I must say I do like Amazon Prime. I added it to my cart in case the part I already ordered doesn't work/fit.
Thanks for taking the time to dig into this shastagary, much appreciated 😄
Christopher
Options
- Mark as New
- Bookmark
- Subscribe
- Mute
- Subscribe to RSS Feed
- Permalink
- Report Inappropriate Content
Sep-13-2017 10:00 PM
wasatchmtnatvr wrote:
He is on a budget. Try coil 33475 white Rodgers may work. Or update 31000. Less than 18 bucks. These are atwood part numbers.
Nice! I like the modularity. I wonder if something like the 33475 or 31000 you recommended would work with the old (original) valve assembly. If so, that's a great idea. I'll mess around with the old one when I get it off and see if the valves are removable. Of course, I already have an entire new assembly coming tomorrow, but it's good to know for next time 😄
Thanks for the suggestion wasatchmtnatvr!
Christopher
Options
- Mark as New
- Bookmark
- Subscribe
- Mute
- Subscribe to RSS Feed
- Permalink
- Report Inappropriate Content
Sep-13-2017 09:57 PM
robatthelake wrote:
I know someone will flame me for this suggestion but!
Those solenoid used replaceable coils ....well back in the late 80'S they were pretty common. Anyway they are relatively easy to take apart. Once apart if you ever took a close look you will find that the coils are fine copper wire and if you check the resistance ..well just start unwinding the wire until you find where it has broken. If you are lucky it will be in the first couple of feet,maybe five!
Try applying 12 volts to see if it works without the removed wire!
This doesn't always work ,but it did for me about ten years ago and that old water heater is still working today!
Interesting! I like your resourcefulness 😄 This is more my speed actually. I already have a part coming that someone else suggested, but I may give this a shot with the old one that no longer works to see if it's a viable solution in the future.
I wonder if newer valves can still have the coil removed... That'd be interesting to see.
Thanks for the great suggestion robatthelake!
Christopher
Options
- Mark as New
- Bookmark
- Subscribe
- Mute
- Subscribe to RSS Feed
- Permalink
- Report Inappropriate Content
Sep-12-2017 08:54 PM
He is on a budget. Try coil 33475 white Rodgers may work. Or update 31000. Less than 18 bucks. These are atwood part numbers.
Coleman folding trailer
GMC conversion van
Haulmark Harley Hauler enclosed trlr.(No Harley)
Honda Rubicon atv
GMC conversion van
Haulmark Harley Hauler enclosed trlr.(No Harley)
Honda Rubicon atv
Options
- Mark as New
- Bookmark
- Subscribe
- Mute
- Subscribe to RSS Feed
- Permalink
- Report Inappropriate Content
Sep-11-2017 03:58 PM
I know someone will flame me for this suggestion but!
Those solenoid used replaceable coils ....well back in the late 80'S they were pretty common. Anyway they are relatively easy to take apart. Once apart if you ever took a close look you will find that the coils are fine copper wire and if you check the resistance ..well just start unwinding the wire until you find where it has broken. If you are lucky it will be in the first couple of feet,maybe five!
Try applying 12 volts to see if it works without the removed wire!
This doesn't always work ,but it did for me about ten years ago and that old water heater is still working today!
Rob & Jean
98 Dutch Star Diesel Pusher ..07 Honda CRV AWD
98 Dutch Star Diesel Pusher ..07 Honda CRV AWD
Options
- Mark as New
- Bookmark
- Subscribe
- Mute
- Subscribe to RSS Feed
- Permalink
- Report Inappropriate Content
Sep-11-2017 02:43 PM
this looks like it would install the same as the old one if your still thinking about repairing it. Atwood (93844) Water Heater Gas Valve
Options
- Mark as New
- Bookmark
- Subscribe
- Mute
- Subscribe to RSS Feed
- Permalink
- Report Inappropriate Content
Sep-11-2017 10:45 AM
Old-Biscuit wrote:
Actually for that vintage and model the gas valve is installed with solenoids DOWN
As for how long tank with last....until it leaks :B
Seriously.......no time table
Pin hole leaks or cracks in welds are types of leaks on tanks
LOL, that is a totally reasonable answer 😄 It's good to know that the old one is correctly installed right now. I'll do the same with the replacement solenoid, or at least try to. I should have the parts either today or tomorrow.
Thanks again for the information and the background on the upside-down orientation of the valve.
I can access the hot water heater under one of the twin-beds in the back. I'll take some time to inspect for leaks while I'm installing the new valve.
Christopher
Options
- Mark as New
- Bookmark
- Subscribe
- Mute
- Subscribe to RSS Feed
- Permalink
- Report Inappropriate Content
Sep-09-2017 08:31 PM
Actually for that vintage and model the gas valve is installed with solenoids DOWN

As for how long tank with last....until it leaks :B
Seriously.......no time table
Pin hole leaks or cracks in welds are types of leaks on tanks
As for how long tank with last....until it leaks :B
Seriously.......no time table
Pin hole leaks or cracks in welds are types of leaks on tanks
Is it time for your medication or mine?
2007 DODGE 3500 QC SRW 5.9L CTD In-Bed 'quiet gen'
2007 HitchHiker II 32.5 UKTG 2000W Xantex Inverter
US NAVY------USS Decatur DDG31
2007 DODGE 3500 QC SRW 5.9L CTD In-Bed 'quiet gen'
2007 HitchHiker II 32.5 UKTG 2000W Xantex Inverter
US NAVY------USS Decatur DDG31
Options
- Mark as New
- Bookmark
- Subscribe
- Mute
- Subscribe to RSS Feed
- Permalink
- Report Inappropriate Content
Sep-09-2017 07:43 PM
Busdriver wrote:
Looks like the old one is upside down, have never saw one that solenoid on bottom
Hi busdriver, I know right? It seemed odd to me as well. I wonder if that was part of the reason it failed, or if it was just due to wear over time.
In either case I'll try to put the new one in right-side-up 😄
Thanks for the reply Busdriver.
Christopher
Options
- Mark as New
- Bookmark
- Subscribe
- Mute
- Subscribe to RSS Feed
- Permalink
- Report Inappropriate Content
Sep-09-2017 07:35 PM
Hi everyone, wow you have been more than helpful!
I just read through the follow-ups and was stunned by the comprehensive nature of the posts. My wife, five children and I are all very greatful.
For now due to our budget I think we'll have to get the valve assembly and mounting bracket. In the future though, I think you're right and we ought to spring for a new one. Do you know how often the hot water tanks go and what symptoms I should look for to tell if it's going?
We've followed the links and have ordered the parts. I also appreciate the information on the petcock. TBH I had no idea what that word meant until I googled it. Makes sense now 🙂
I'll reply back when I get the parts installed and working to let you know how it went.
Thanks again for all the help!
Christopher
Related Content


