Turn on suggestions
Auto-suggest helps you quickly narrow down your search results by suggesting possible matches as you type.
Showing results for
- Good Sam Community
- Everything RV
- Technical Issues
- 2019 Keystone 5th wheel - TPO lifting issue
Options
- Subscribe to RSS Feed
- Mark Topic as New
- Mark Topic as Read
- Float this Topic for Current User
- Bookmark
- Subscribe
- Mute
- Printer Friendly Page
2019 Keystone 5th wheel - TPO lifting issue
Options
- Mark as New
- Bookmark
- Subscribe
- Mute
- Subscribe to RSS Feed
- Permalink
- Report Inappropriate Content
Dec-03-2022 11:45 AM
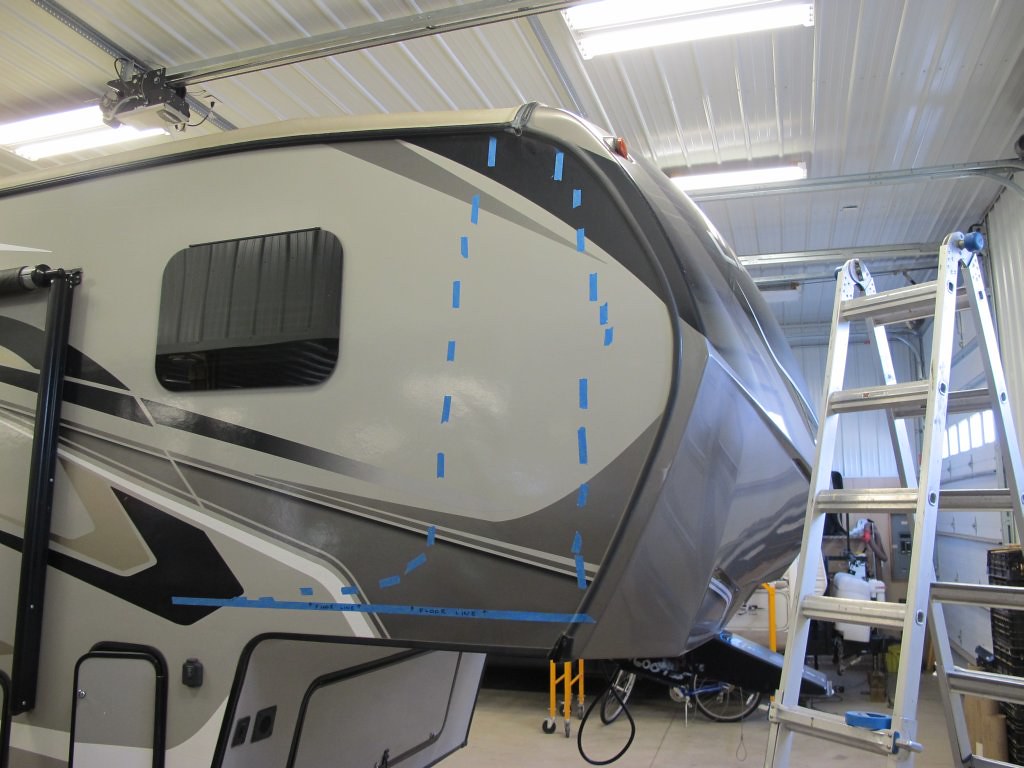
Looking to see if others have seen this TPO lifting issue at the left and right side walls of the roof.
A little background. I am helping out a neighbor who has a 2019 Laredo 5th wheel. They bought it new Dec. 2019. The build date is 10/3/2018. The camper at this point is 4 years old since the build date and 3 years since acquired.
With the mad rush of Covid and the local RV dealers slammed full, they have come to me for help with the roof. I restore older campers from water damage. I have seen enough roof and siding leaks, and done enough roof replacements, to understand what is going on with this roof. This is the first Keystone camper roof I have had apart to see how they approach the roofs on this model & year. The bottom line is, the TPO is lifting from the roof sub straight due to the method of the build.
Earlier this year, they had a tire failure and I repaired the wheel well damage. At that time I saw the start of delamination on the front right wall and my moisture meter confirmed they have a leak. The joint at the front cap to the side wall leaked. I pointed it out to them. I repaired the roof area to stop the leak, and took the left side apart as a pre-emptive repair before it started to leaked. They did not want to go to all the expense of dealing with the minor delam at this point. The front cap would need to come off to dry out the wall. During this repair I saw first hand how Keystone is sealing the roof. I'll leave my personal comments out of this for the moment.
The blue tape shows the limits of leak area. Once the bottom floor area is reached there is too much metal in the floor to tell what is water and what is metal that trick's the meter. Bottom line, there is delam starting at the top down to the bottom.
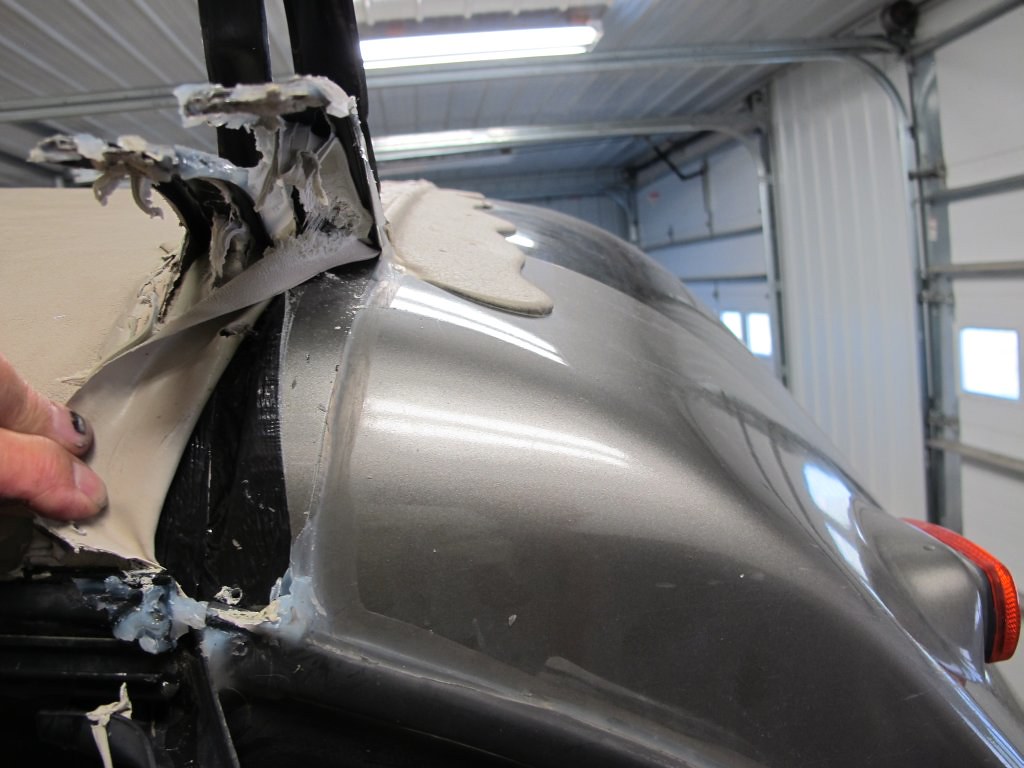
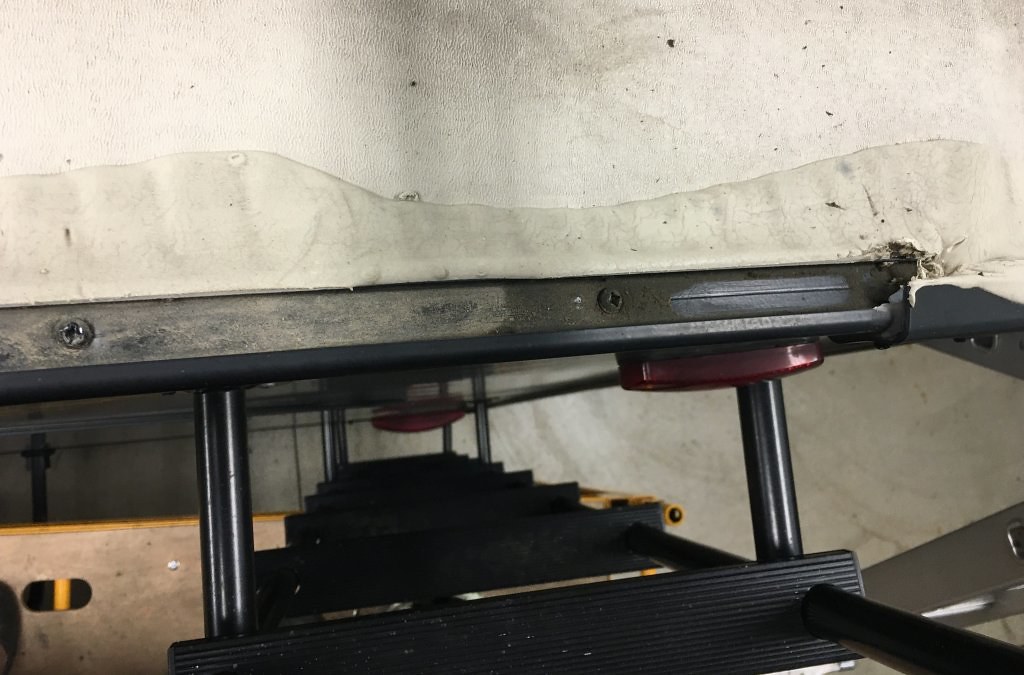
Taking the top cap to roof joint apart, I can see the methods used on the roof build. There is no butyl tape to seal the TPO to the cap, nor to seal the gutter rail to the TPO or sidewall along the main full length of the side wall. The gutter rail screws have no sealing action at the screw level, the vinyl screw cover is the only protection from water intrusion. There is about 12" of butyl on the back side of the gutter rail before the cap joint.
The main decking stops before the sheet metal curve that is stapled to the deck. There appears to be a black tape close to duct tape over the sheet metal staples from the metal to the wood decking. There is no roof adhesive on the metal that is bonding the TPO to the metal. If they used Alfa water based glue, it needs a porous sub straight to bond and metal would not bond. They pull the membrane tight and shoot screws in the gutter rail to hold it down. I'm not sure this is modern day practice for all their roofs like this, but this is what this one has.
See this pic.


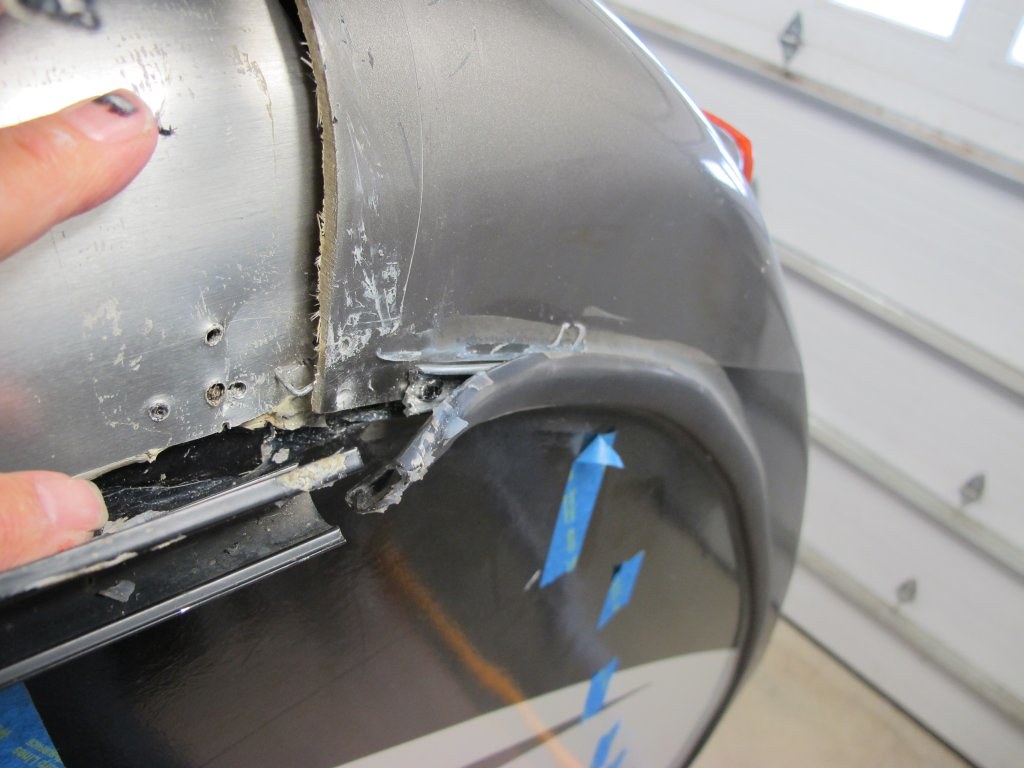
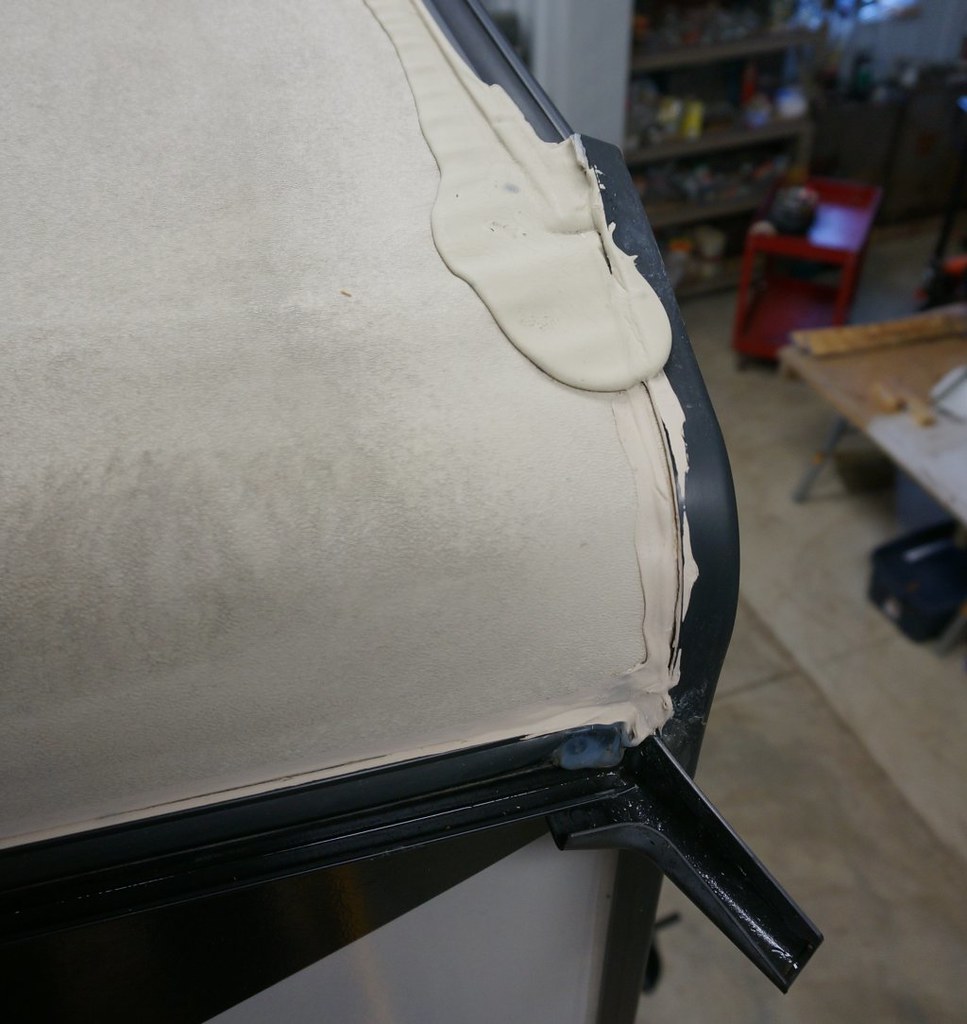
Black tape removed at the front area. Still more tape at the metal to decking area going down the length of the side wall.

Staple lift present from flexing and vibration from towing.
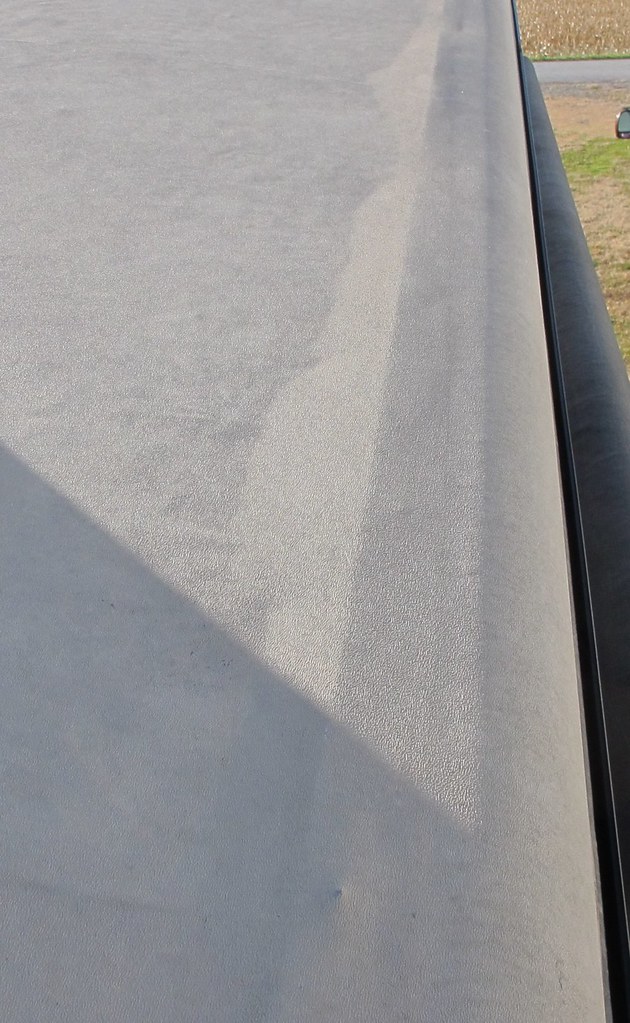
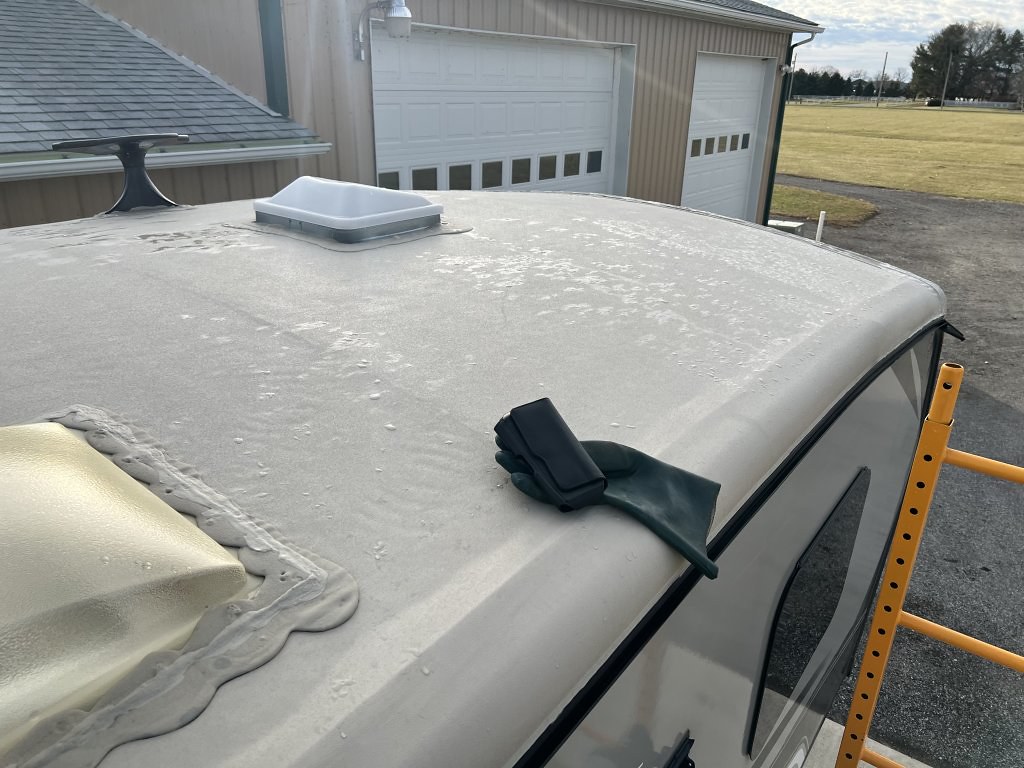
Now the main issue of this post, the full length of the camper on both sides, the TPO is lifting at the end of the sheet metal curve as the TPO goes over the decking. It is puckering up, in some cases 2 1/2" past the end of the metal. You can press the metal down as it breathes. Some staple lift is starting in spots. You can see the puckering here. These 2 pics are from when I went for a roof measurement trip. The black tape if it is full length, will not bond to the glue either.

A more close up
Here is yesterday as I was washing the roof in preparation for the roof sealing. The TPO lift is approaching the shower dome.
These last 3 pics are from the recent last 2 weeks as I was asked to what can be done to create a permeant solution to get away from roof caulk as the main sealant. Their plan is to keep the camper for a good number of years and it lives outside 24/7 here in the mid west, Snow and rain country. Due to health reasons they cannot service the roof.
Before I start into creating a long term sealant on the roof and joints, I feel I need to deal with this TPO lifting issue. It has doubled in width in the last year. With the staples starting to lift, the metal lifting, the bond to the wood decking is stressed and the TPO will slowly keep lifting wider, how far, good question.
I'm after if anyone had seen this before and what was done if any, to stop it. I know what I would do to repair this, I'm just seeking other options.
Thanks for any feedback.
John
A little background. I am helping out a neighbor who has a 2019 Laredo 5th wheel. They bought it new Dec. 2019. The build date is 10/3/2018. The camper at this point is 4 years old since the build date and 3 years since acquired.
With the mad rush of Covid and the local RV dealers slammed full, they have come to me for help with the roof. I restore older campers from water damage. I have seen enough roof and siding leaks, and done enough roof replacements, to understand what is going on with this roof. This is the first Keystone camper roof I have had apart to see how they approach the roofs on this model & year. The bottom line is, the TPO is lifting from the roof sub straight due to the method of the build.
Earlier this year, they had a tire failure and I repaired the wheel well damage. At that time I saw the start of delamination on the front right wall and my moisture meter confirmed they have a leak. The joint at the front cap to the side wall leaked. I pointed it out to them. I repaired the roof area to stop the leak, and took the left side apart as a pre-emptive repair before it started to leaked. They did not want to go to all the expense of dealing with the minor delam at this point. The front cap would need to come off to dry out the wall. During this repair I saw first hand how Keystone is sealing the roof. I'll leave my personal comments out of this for the moment.
The blue tape shows the limits of leak area. Once the bottom floor area is reached there is too much metal in the floor to tell what is water and what is metal that trick's the meter. Bottom line, there is delam starting at the top down to the bottom.
Taking the top cap to roof joint apart, I can see the methods used on the roof build. There is no butyl tape to seal the TPO to the cap, nor to seal the gutter rail to the TPO or sidewall along the main full length of the side wall. The gutter rail screws have no sealing action at the screw level, the vinyl screw cover is the only protection from water intrusion. There is about 12" of butyl on the back side of the gutter rail before the cap joint.
The main decking stops before the sheet metal curve that is stapled to the deck. There appears to be a black tape close to duct tape over the sheet metal staples from the metal to the wood decking. There is no roof adhesive on the metal that is bonding the TPO to the metal. If they used Alfa water based glue, it needs a porous sub straight to bond and metal would not bond. They pull the membrane tight and shoot screws in the gutter rail to hold it down. I'm not sure this is modern day practice for all their roofs like this, but this is what this one has.
See this pic.
Black tape removed at the front area. Still more tape at the metal to decking area going down the length of the side wall.
Staple lift present from flexing and vibration from towing.
Now the main issue of this post, the full length of the camper on both sides, the TPO is lifting at the end of the sheet metal curve as the TPO goes over the decking. It is puckering up, in some cases 2 1/2" past the end of the metal. You can press the metal down as it breathes. Some staple lift is starting in spots. You can see the puckering here. These 2 pics are from when I went for a roof measurement trip. The black tape if it is full length, will not bond to the glue either.
A more close up
Here is yesterday as I was washing the roof in preparation for the roof sealing. The TPO lift is approaching the shower dome.
These last 3 pics are from the recent last 2 weeks as I was asked to what can be done to create a permeant solution to get away from roof caulk as the main sealant. Their plan is to keep the camper for a good number of years and it lives outside 24/7 here in the mid west, Snow and rain country. Due to health reasons they cannot service the roof.
Before I start into creating a long term sealant on the roof and joints, I feel I need to deal with this TPO lifting issue. It has doubled in width in the last year. With the staples starting to lift, the metal lifting, the bond to the wood decking is stressed and the TPO will slowly keep lifting wider, how far, good question.
I'm after if anyone had seen this before and what was done if any, to stop it. I know what I would do to repair this, I'm just seeking other options.
Thanks for any feedback.
John
2005 Ford F350 Super Duty, 4x4; 6.8L V10 with 4.10 RA, 21,000 GCWR, 11,000 GVWR, upgraded 2 1/2" Towbeast Receiver. Hitched with a 1,700# Reese HP WD, HP Dual Cam to a 2004 Sunline Solaris T310R travel trailer.
6 REPLIES 6
Options
- Mark as New
- Bookmark
- Subscribe
- Mute
- Subscribe to RSS Feed
- Permalink
- Report Inappropriate Content
Dec-05-2022 03:36 PM
To Doug and others following along, here is my approach for repairing this TPO membrane lifting problem. The need/goal of repairing this lifting issue now is, after I seal the roof and all the penetrations it will be a long term repair/upgrade. Now is the time to correct this issue rather than later hoping the lift TPO does not get worse.
Since the gutter rail has no butyl tape, either between the TPO and the siding or the gutter rail to the TPO, I will lift off the gutter rail. This is not a big deal to do in this case.
The TPO lifting is at the edge of the radiused sheet metal, fold back the TPO onto the main roof as it is not bonded to the metal and this will expose the lifting staples and the breathing sheet metal.
Remove the staples, install low profile head screws in the sheet metal to the decking. I'm still on the hunt for the right screw, but it would be close to these. A #8 x 1" lg low profile head or lath head screw.
Here at McMaster is one option for low profile heads
https://www.mcmaster.com/low-profile-head-sheet-metal-screws/square-drive-flanged-extra-wide-rounded...
Truss washer head, needle point screw from Hillman or others. We have a Hillman dealer locally here in town.
https://shop.hillmangroup.com/ccrz__ProductDetails?sku=82206&cclcl=en_US
I have a belief that trying to use a flat head screw, countersunk in, the sheet metal is so thin, the edges of the screw will pull through sheet metal over time trying to get the screw heads flush. With larger diameter low profile head screw to the drilled hole in the metal, I will get better metal clamping and no sharp edges on the screw head.
After the metal is screwed down, I will apply Eternaprime liquid brushable primer to back side of the the TPO, the glued wood decking, and over the sheet metal area as prep for the area. Eternaprime is recommended on TPO.
Install Eternabond double stick tape onto the decking area starting at the point of the peeling TPO on the decking, screw heads, and run out in width on the sheet metal curve. I would start with 4" wide double stick the and go the length of the camper. There could be some small air bubble pockets as the lifting TPO is not straight. I will see if I can straighten the lift pattern to minimize this. A localized small air pocket is not worse then other small non glued pockets on the roof as long as there is no stress to make the pocket larger.
Fold the TPO membrane over, roll the TPO into the double stick. The purpose of the double stick is to regain a TPO bond to the dried glued decking and the sheet metal curve over the tops of the low profile screws. The double stick should flow slightly over the screw heads and fill/relive any point pressure of the screw head on the TPO.
Apply GSSI MH-10A commercial building butyl (1/8" by 1 1/2") between the siding and the TPO at the gutter rail area.
Line the back side of the gutter rail with GSSI butyl and install the gutter rail back in the same location as it came off. Due to colder shop temps in the winter, gently warm the butyl before application to allow it to flow when the gutter screws are tightened.
When I seal the entire roof, there will be no vinyl screw cover over the gutter screws. The roof sealant will cover over all the screw heads down into the gutter rail and at the top of the gutter rail to the TPO.
Comments welcome pointing out anything I may have missed.
Thanks
John
2005 Ford F350 Super Duty, 4x4; 6.8L V10 with 4.10 RA, 21,000 GCWR, 11,000 GVWR, upgraded 2 1/2" Towbeast Receiver. Hitched with a 1,700# Reese HP WD, HP Dual Cam to a 2004 Sunline Solaris T310R travel trailer.
Options
- Mark as New
- Bookmark
- Subscribe
- Mute
- Subscribe to RSS Feed
- Permalink
- Report Inappropriate Content
Dec-05-2022 01:18 PM
Katysdad & Dougrainer,
Thank you both for responding. Much appreciated.
Doug, some comments here,
Yes, you are right about the older traditional way to tuck 5 to 6" of the membrane under the front siding fastened to the rafter/front wall on purpose. That older method is the way all my older camper restorations were done and what I do/have done on all my roof repairs. There also was a method of butyl tape in this front wall joint on the older way of doing this front joint. It took more time and more materials though. These steps:
1. Butyl on top of membrane to the bottom of the front siding to seal the top of the membrane to the bottom of the siding.
2. More butyl on top of the joint between the top of the siding and the top of the membrane under a flat screwed down cap molding. -
3. Then, lap sealant as the final seal over the screw heads and the molding to the siding and membrane.
This particular Keystone setup is different.
A. The membrane is not under the front wall, it is over it.
B. Butyl or other sealants to mimic step 1 above are not present. There is no sealant between the membrane and the front cap.
C. There is a minor amount of butyl tape under the flat cap molding holding the membrane down over the cap and the 2nd molding over the membrane behind the cap. The butyl is narrow and thin, not sure it will seal the screw threads much, but it was there.
D. They pumped a large qty. (gobs) of lap sealant over most of the two flat moldings. The last 8 to 10" on each end of the flat molding that goes down the side wall had a vinyl screw cover on them and silicone over the gap between the two moldings and to the front cap. The lap sealant at the rear of the 2nd molding to the TPO was lacking to touch the molding. And the vinyl screw cover was not sealed to the molding. Here is the one pic I have as found before I was contacted to help a year ago.

On last years caulk check, I added extra lap sealant on the back side of the molding to the TPO as the original was shrinking away from the molding. The vinyl screw cover is as original from the OEM. I also added extra non sag lap sealant on the top of the gutter rail as what was there was so thin some places shrunk open.

This is my first Keystone or other brand, with a front one piece fiberglass cap to work on, so I am not sure what is current day industry practice. All of my restorations so far are on aluminum sided campers or the older filon front walls which sealed about the same on this front wall to roof joint. Those older campers can & will fail/leak on the front seam if the owner does not stay on top of the caulking checks, but there was a better sealing process in my mind to have a chance of lasting longer as long as the lap sealant was under constant maintenance. And there is no vinyl screw cover used as a main roof seal.
I'm not sure how the rest of the industry does this front joint with a one piece cap, or if Keystone had a bad day on the line, but I can see how this particular camper can leak as the camper ages even if the lap sealant is intact. Is what we see on this one 2018 build Keystone 5er what the rest of the industry follows? Have you seen these practices a lot?
Thank you for sharing this, it helps back up my concept for the repair. In this case, Keystone did not put butyl tape on the gutter rail or the TPO to the siding on the full length of the camper. Not sure if they missed it, or this is the current day practice. They only used a small amount of butyl tape on the gutter rail at the front cap joint. They did place a marginal, amount of lap seal on the top 1/8" edge of the gutter rail to the TPO the full length of the camper, but that is all that seals the gutter area. It appears they are counting on the vinyl screw cover to keep the water from wicking down the screw threads into the attic over time when the gutter gets flooded.
I did not bring this up, but the rear wall molding joint to the TPO has/had issues too with the use of an exposed vinyl screw cover to seal the screws. These pics are from last year when I did a caulk check for the neighbor. I saw the use of a vinyl screw cover on the roof molding. Again, not sure if this is standard practice or a bad day on the assembly line.

I removed the vinyl screw cover as I know they can wick in water. There is only one way dirt gets under this cover, water and dirt wicks in and then flows by gravity to the corners.

The left rear corner joint as found, the right side had the same problem. The TPO has shrunk away from the rear wall molding and exposed a joint. Roof membrane shrinkage is common, but if you have a larger overlap of lap sealant, your joint has better odds of holding until the roof maintenance check comes along.
A close up to see the shrunk joint.

I did address and repair the rear wall transition last year. The use of the vinyl screw cover as a water seal is no longer used. Went old school, cleaned all the dirt out and caulked the screw channel.
If the above methods we see are standard day practice, it seems to point to a cost reduction effort to reduce labor and materials to the bare minimum on how to seal up a camper. I hope this is not the new way in the industry. The old way with counting on lap sealant and butyl as your means of roof leak protection is bad enough. Maybe I'm biased as I deal with water damage all the time, but the method on this 5er setup does not add up to a long lasting method for a leak free roof system even while doing constant roofing caulk checks.
In this roof leak and TPO lift case, no, they did not take the camper to a Keystone service center. They felt they would not get much help on a 3 year old claim and a reported roof leak by an independent repair person.
Early on after they started using the new camper when Covid started, they tried to get to a dealer for minor new camper warranty work. Major items in their mind, minor in shop work to correct though. The selling dealer and the rest in our area were slammed with work and still are. It would be months before they could get in, if they even could. During that time, they reached out to Keystone direct, in this case about the fresh tank siphoning out water going down the road, and they hit a brick wall. So, they approached me back then if I could just correct the warranty issues for them as they could not get in at a dealer and I did the corrections for them. Most all the items on the list was sloppy work at the factory other then the fresh tank siphoning issue that is a somewhat industry issue with the new fresh water pressure tank fill systems. The older gravity fills with tank vents way up high did not have this problem, like their older 5er that never had an issue, but here on their new camper, they loose 50% of the water in the tank before they reach the campsite.
I'll post in the next reply on my approach for the TPO lift for comment.
Thanks again,
John
Thank you both for responding. Much appreciated.
Doug, some comments here,
dougrainer wrote:
1. OEM's install the TPO before the caps. From your pic, it appears they cut the front of the TPO very short. MOST OEM's install the TPO at least 5 inched under the caps. This helps prevent ANY air intrusion on the hiway that gets into the cap from billowing up the TPO.
Yes, you are right about the older traditional way to tuck 5 to 6" of the membrane under the front siding fastened to the rafter/front wall on purpose. That older method is the way all my older camper restorations were done and what I do/have done on all my roof repairs. There also was a method of butyl tape in this front wall joint on the older way of doing this front joint. It took more time and more materials though. These steps:
1. Butyl on top of membrane to the bottom of the front siding to seal the top of the membrane to the bottom of the siding.
2. More butyl on top of the joint between the top of the siding and the top of the membrane under a flat screwed down cap molding. -
3. Then, lap sealant as the final seal over the screw heads and the molding to the siding and membrane.
This particular Keystone setup is different.
A. The membrane is not under the front wall, it is over it.
B. Butyl or other sealants to mimic step 1 above are not present. There is no sealant between the membrane and the front cap.
C. There is a minor amount of butyl tape under the flat cap molding holding the membrane down over the cap and the 2nd molding over the membrane behind the cap. The butyl is narrow and thin, not sure it will seal the screw threads much, but it was there.
D. They pumped a large qty. (gobs) of lap sealant over most of the two flat moldings. The last 8 to 10" on each end of the flat molding that goes down the side wall had a vinyl screw cover on them and silicone over the gap between the two moldings and to the front cap. The lap sealant at the rear of the 2nd molding to the TPO was lacking to touch the molding. And the vinyl screw cover was not sealed to the molding. Here is the one pic I have as found before I was contacted to help a year ago.
On last years caulk check, I added extra lap sealant on the back side of the molding to the TPO as the original was shrinking away from the molding. The vinyl screw cover is as original from the OEM. I also added extra non sag lap sealant on the top of the gutter rail as what was there was so thin some places shrunk open.
This is my first Keystone or other brand, with a front one piece fiberglass cap to work on, so I am not sure what is current day industry practice. All of my restorations so far are on aluminum sided campers or the older filon front walls which sealed about the same on this front wall to roof joint. Those older campers can & will fail/leak on the front seam if the owner does not stay on top of the caulking checks, but there was a better sealing process in my mind to have a chance of lasting longer as long as the lap sealant was under constant maintenance. And there is no vinyl screw cover used as a main roof seal.
I'm not sure how the rest of the industry does this front joint with a one piece cap, or if Keystone had a bad day on the line, but I can see how this particular camper can leak as the camper ages even if the lap sealant is intact. Is what we see on this one 2018 build Keystone 5er what the rest of the industry follows? Have you seen these practices a lot?
dougrainer wrote:
2. Your comments about the Staples. Jayco years ago had such issues. They installed too short of staples to hold the roof deck wood and any radius on the corners. After a few months in operation, the staples lifted up and caused the TPO to also slightly release. Jayco's fix was twofold. IF close enough to the radius or corner edge, we remove the rail and gently lifted up the TPO to remove those staples and either uses countersink screws or longer staples and then installed Gorilla tape over the staples and countersunk screw small craters to allow a smooth surface when reattaching the TPO. IF the customer objected to this fix, Jayco paid us to replace the TPO and overlay the decking and use screws. ONLY problem was, You HAD to notice this in Jayco's 2 year warranty. OUT of warranty, some Jayco customers did get some help.
Thank you for sharing this, it helps back up my concept for the repair. In this case, Keystone did not put butyl tape on the gutter rail or the TPO to the siding on the full length of the camper. Not sure if they missed it, or this is the current day practice. They only used a small amount of butyl tape on the gutter rail at the front cap joint. They did place a marginal, amount of lap seal on the top 1/8" edge of the gutter rail to the TPO the full length of the camper, but that is all that seals the gutter area. It appears they are counting on the vinyl screw cover to keep the water from wicking down the screw threads into the attic over time when the gutter gets flooded.
I did not bring this up, but the rear wall molding joint to the TPO has/had issues too with the use of an exposed vinyl screw cover to seal the screws. These pics are from last year when I did a caulk check for the neighbor. I saw the use of a vinyl screw cover on the roof molding. Again, not sure if this is standard practice or a bad day on the assembly line.
I removed the vinyl screw cover as I know they can wick in water. There is only one way dirt gets under this cover, water and dirt wicks in and then flows by gravity to the corners.
The left rear corner joint as found, the right side had the same problem. The TPO has shrunk away from the rear wall molding and exposed a joint. Roof membrane shrinkage is common, but if you have a larger overlap of lap sealant, your joint has better odds of holding until the roof maintenance check comes along.
A close up to see the shrunk joint.
I did address and repair the rear wall transition last year. The use of the vinyl screw cover as a water seal is no longer used. Went old school, cleaned all the dirt out and caulked the screw channel.
If the above methods we see are standard day practice, it seems to point to a cost reduction effort to reduce labor and materials to the bare minimum on how to seal up a camper. I hope this is not the new way in the industry. The old way with counting on lap sealant and butyl as your means of roof leak protection is bad enough. Maybe I'm biased as I deal with water damage all the time, but the method on this 5er setup does not add up to a long lasting method for a leak free roof system even while doing constant roofing caulk checks.
dougrainer wrote:
3. Did your customer take it in to the Keystone service center to see if they would give some consideration? Doug
In this roof leak and TPO lift case, no, they did not take the camper to a Keystone service center. They felt they would not get much help on a 3 year old claim and a reported roof leak by an independent repair person.
Early on after they started using the new camper when Covid started, they tried to get to a dealer for minor new camper warranty work. Major items in their mind, minor in shop work to correct though. The selling dealer and the rest in our area were slammed with work and still are. It would be months before they could get in, if they even could. During that time, they reached out to Keystone direct, in this case about the fresh tank siphoning out water going down the road, and they hit a brick wall. So, they approached me back then if I could just correct the warranty issues for them as they could not get in at a dealer and I did the corrections for them. Most all the items on the list was sloppy work at the factory other then the fresh tank siphoning issue that is a somewhat industry issue with the new fresh water pressure tank fill systems. The older gravity fills with tank vents way up high did not have this problem, like their older 5er that never had an issue, but here on their new camper, they loose 50% of the water in the tank before they reach the campsite.
I'll post in the next reply on my approach for the TPO lift for comment.
Thanks again,
John
2005 Ford F350 Super Duty, 4x4; 6.8L V10 with 4.10 RA, 21,000 GCWR, 11,000 GVWR, upgraded 2 1/2" Towbeast Receiver. Hitched with a 1,700# Reese HP WD, HP Dual Cam to a 2004 Sunline Solaris T310R travel trailer.
Options
- Mark as New
- Bookmark
- Subscribe
- Mute
- Subscribe to RSS Feed
- Permalink
- Report Inappropriate Content
Dec-04-2022 07:58 AM
1. OEM's install the TPO before the caps. From your pic, it appears they cut the front of the TPO very short. MOST OEM's install the TPO at least 5 inched under the caps. This helps prevent ANY air intrusion on the hiway that gets into the cap from billowing up the TPO.
2. Your comments about the Staples. Jayco years ago had such issues. They installed too short of staples to hold the roof deck wood and any radius on the corners. After a few months in operation, the staples lifted up and caused the TPO to also slightly release. Jayco's fix was twofold. IF close enough to the radius or corner edge, we remove the rail and gently lifted up the TPO to remove those staples and either uses countersink screws or longer staples and then installed Gorilla tape over the staples and countersunk screw small craters to allow a smooth surface when reattaching the TPO. IF the customer objected to this fix, Jayco paid us to replace the TPO and overlay the decking and use screws. ONLY problem was, You HAD to notice this in Jayco's 2 year warranty. OUT of warranty, some Jayco customers did get some help.
3. Did your customer take it in to the Keystone service center to see if they would give some consideration? Doug
Options
- Mark as New
- Bookmark
- Subscribe
- Mute
- Subscribe to RSS Feed
- Permalink
- Report Inappropriate Content
Dec-04-2022 04:33 AM
Mayor30 wrote:
What is TPO?
Hi, sorry for the shop lingo, TPO is referring the roof membrane glued to the wood decking. TPO is short for thermoplastic polyolefin. It is a plastic product that has been modified to work on RV and building roofing membranes. Not all TPO is the same, what is on a camper is very different then on commercial buildings.
In this case, I do believe Keystone uses the Alfa Systems, Super Flex (their brand) TPO. See here for more on Super Flex. https://alphallc.us/products/roofing/
2005 Ford F350 Super Duty, 4x4; 6.8L V10 with 4.10 RA, 21,000 GCWR, 11,000 GVWR, upgraded 2 1/2" Towbeast Receiver. Hitched with a 1,700# Reese HP WD, HP Dual Cam to a 2004 Sunline Solaris T310R travel trailer.
Options
- Mark as New
- Bookmark
- Subscribe
- Mute
- Subscribe to RSS Feed
- Permalink
- Report Inappropriate Content
Dec-04-2022 04:20 AM
What is TPO?
Options
- Mark as New
- Bookmark
- Subscribe
- Mute
- Subscribe to RSS Feed
- Permalink
- Report Inappropriate Content
Dec-03-2022 06:03 PM
Have seen it quite a few times on other brands that use that type of build after they get a couple of seasons on them. Unless opening the roof seams for other issues would leave it be as it did not appear to be causing any issues in itself at the time. Seems the metal was not rolled tight enough and would lift off of the deck as the staples pulled free. If repairing a damaged roof I would have material rolled to the correct radius and screw it down rather than staple it.
Dodge Ram 3500 DRW Diesel


