Turn on suggestions
Auto-suggest helps you quickly narrow down your search results by suggesting possible matches as you type.
Showing results for
- Good Sam Community
- Groups
- Fifth Wheel Group
- Forum
- The Camper Saga. Opened a can of worms or mice..
Options
- Subscribe to RSS Feed
- Mark Topic as New
- Mark Topic as Read
- Float this Topic for Current User
- Bookmark
- Subscribe
- Mute
- Printer Friendly Page
The Camper Saga. Opened a can of worms or mice..
Options
- Mark as New
- Bookmark
- Subscribe
- Mute
- Subscribe to RSS Feed
- Permalink
- Report Inappropriate Content
May-10-2016 08:36 PM
This is a continuation from my other post about locating the drain plug. Long story short- there was a mouse problem.
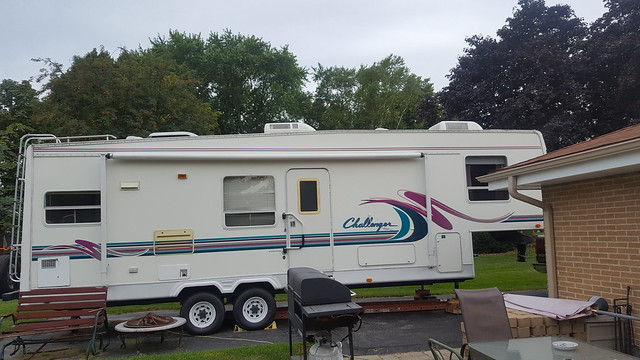
1997 Damon Challenger 30RK
While flushing the water I found-
-A hole in the fill neck from the potable fill port to the tank
-Some wires with insulation chewed off (not broken) in the same spot
-A leak somewhere in the sub-floor under furnace / duct work
Not sure if I should cut losses or keep trudging along. I've already removed the 'debris plate?' underneath and could not see any of the water lines. At this point, I can only see removing the furnace to cut a hole under it so I don't have to do visible damage.
I'm new to camper owning and doing the best I can. I don't have the funds to send it to the shop for them to rebuild it (assuming this is what would happen). If it were to go to the shop, I'd probably be better off selling/trading it in.
Any recommendations or suggestions are greatly appreciated.
Outlaw
2006 F350 DRW Towboss 6.0PSD
2011 Keystone Laredo 321BH
RIP-1997 Damon Challenger 30 RK
2011 Keystone Laredo 321BH
RIP-1997 Damon Challenger 30 RK
31 REPLIES 31
Options
- Mark as New
- Bookmark
- Subscribe
- Mute
- Subscribe to RSS Feed
- Permalink
- Report Inappropriate Content
Aug-18-2017 08:37 AM
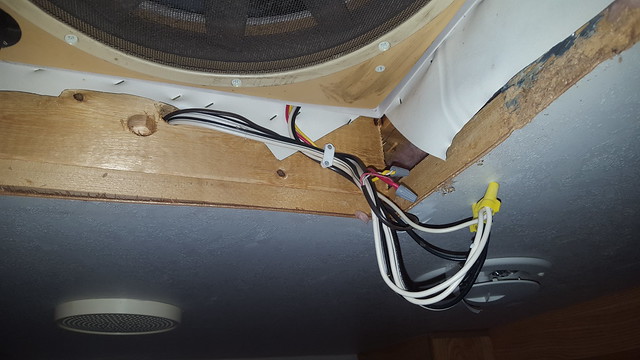
Pulling the cover down for the power vent.
 20170807_204050
New used AC
 20170808_182911
Side view installed
 20170815_184701
Front view installed
 20170815_184729
I did not have to try rebuilding the shroud as my dad (again... :D) found a used one through a local shop for $52. After we wired up the AC and mounted it. I did some more tests. We were having issues with the house breaker tripping (don't know draw already on 20A) before the camper which I'm hoping is a good thing for when we are at the campground.
The new AC configuration is:
Mid AC (ducted)
Livingroom/Kitchen and bathroom
Front AC (non-ducted)
bedroom
And for those wondering, we are still under 13' (12'7" i think it was) as it sits level. Once we get it on the truck, we will re-measure
20170807_204050New used AC
20170808_182911Side view installed
20170815_184701Front view installed
20170815_184729I did not have to try rebuilding the shroud as my dad (again... :D) found a used one through a local shop for $52. After we wired up the AC and mounted it. I did some more tests. We were having issues with the house breaker tripping (don't know draw already on 20A) before the camper which I'm hoping is a good thing for when we are at the campground.
The new AC configuration is:
Mid AC (ducted)
Livingroom/Kitchen and bathroom
Front AC (non-ducted)
bedroom
And for those wondering, we are still under 13' (12'7" i think it was) as it sits level. Once we get it on the truck, we will re-measure
2006 F350 DRW Towboss 6.0PSD
2011 Keystone Laredo 321BH
RIP-1997 Damon Challenger 30 RK
2011 Keystone Laredo 321BH
RIP-1997 Damon Challenger 30 RK
Options
- Mark as New
- Bookmark
- Subscribe
- Mute
- Subscribe to RSS Feed
- Permalink
- Report Inappropriate Content
Aug-12-2017 06:54 PM
Got the AC put up on the roof. The shroud is in bad shape. I'm going to spend a few bucks to see if I can repair and paint it. If not a new one will be needed.
My dad removed the tv antenna since the condenser sat right over it's mounting. We left the base plate and sealed the hole. The AC fit perfectly in the fan hole.
We did a couple amp tests with the camper/ac and with the "new" ac. We used a kill-a-watt meter for the testing.
Camper OFF-
Amp- 2.5-2.7 constant
Camper ON-
Amp- peak 14.8 (including constant)
New AC only-
Amp- 13.6 (slowly turning up to high)
Amp- 24+ (cranked right to high)
At this point it was 8:45pm-ish so we called it since we couldn't see anymore. I will do a couple tests tomorrow hopefully. If I can figure out how to run both without tripping 20A, we should be good to go with our 30A.
I'm hopeful w could maybe run them on low cool. but we will see.
2006 F350 DRW Towboss 6.0PSD
2011 Keystone Laredo 321BH
RIP-1997 Damon Challenger 30 RK
2011 Keystone Laredo 321BH
RIP-1997 Damon Challenger 30 RK
Options
- Mark as New
- Bookmark
- Subscribe
- Mute
- Subscribe to RSS Feed
- Permalink
- Report Inappropriate Content
Aug-08-2017 09:56 AM
A quick update.
After our last trip with the "new" ducting. It doesn't appear to be working as desired. For the kitchen/living room, it actually worked quite nicely but I think the abundant lack of insulation is killing the efficiency and once past the bathroom, it was basically nothing. I think the bedroom flow was due to the very limited space to run any additional ducting.
As a backup plan, we found an AC we are looking at putting over the bedroom.
Yes, the trailer is 30A hookup.
Yes, I know we won't be able to run at same time (at least power on at same time).
No, we don't have a full plan yet on how we are connecting it. I'm hoping the AC is able to be thermostat controlled since the fan this would be replacing is wired for it.
2006 F350 DRW Towboss 6.0PSD
2011 Keystone Laredo 321BH
RIP-1997 Damon Challenger 30 RK
2011 Keystone Laredo 321BH
RIP-1997 Damon Challenger 30 RK
Options
- Mark as New
- Bookmark
- Subscribe
- Mute
- Subscribe to RSS Feed
- Permalink
- Report Inappropriate Content
Aug-01-2017 03:10 PM
tinner12002 wrote:djousma wrote:
Just wondering out loud if there are any mice carcasses in the fresh water tank? That's a pretty big hole, and it wouldn't surprise me if they went in there.... They would get in, but would not be able to get out.
That was my thoughts also after seeing that pic of the fill tube.
Yep. Exactly what I was thinking. I haven't touched the fresh tank or inlet at this point except to use some aluminum duct tape to try keeping them from traveling. At this point too, the mice had chewed through some of the wire insulation. Everything looked intact so I electrical taped it to provide some insulation until I can figure out what the plan of attack is.
SteveB wrote:
Outlaw,
The waste tanks do not have an overflow. Either the tank is cracked or a connection (in, out or vent) is leaking. When I replaced the black tank in my Jayco I cut the top pipes and unbolted the drain valve. The new tank I used rubber grommets made for the purpose with black silicone automotive gasket sealer and short stubs. Fernco couplings completed the connections.
For the sensors you can get Horst Miricle sensors. Leave the old ones in place and put the new ones nearby.
The waste tanks are mostly black ABS. Cracks can be repair with black ABS cement (from a big box store) and some "boat cloth" fiberglass which can be sourced from a rust repair kit or marine parts place. I fixed my old black tank bottom and it held up great until the top cracked-thus the replacement.
For the fresh tank you could install a 6" dia deck hatch to gain access to the inside of the tank for a good clean out and sanitizing. I put one in the top of my old Dutchmen FW tank but the whole tank was accessible under the couch. The deck hatch is water tight for incidental contact but I would not put one on a side. https://www.amazon.com/Seaflo-Round-Inspection-Hatch-Detachable/dp/B01ASBBZXQ/ref=sr_1_16?s=sporting-goods&ie=UTF8&qid=1501243588&sr=1-16&keywords=deck+hatch
Great work keeping this one going!
Thanks for the confirmation. I didn't think so for multiple reasons.. main being that would just be nasty! lol Since I'm not able to see everything, even with pulling down the under belly panels and some of the fabric, I'm going with the same thing as the first quote above.. mice likely chewed through it at some point. Thanks for the sensor reference! If/when (more like when after talking to my dad, lol) I get to dropping the tanks, these will be the sensors to go in. Once the tank gets dropped I'll be able to confirm the damage and thanks for the tank fix stuff. Sounds easy enough. My guess is the pipe is chewed up but a tank crack somewhere near the top should be an easy fix too.
For the hatches, I like the idea, but I'm not sure how/where I could use this. Maybe in the storage floor which is just above 3 of the 4 tanks? At least for inspections maybe, then one in the top of the tank itself your saying?. Will definitely consider once the tanks are dropped and I can see what is between the floor and tanks though.
laknox wrote:SteveB wrote:
quote quote
Personally, I'd also put in a main drain on the FW tank to aid in flushing. I have one on my Komfort, and it makes cleaning it a breeze. I think it's a 1.25 or 1.5" line and valve.
Lyle
Thanks for the advice. I did a little research and this shouldn't be too difficult compared to some of the other work already or needed to be completed. Most of the "kits are only the smaller NPT style drain valves. The larger diameter you're talking about sound like it is just a box store visit for some pvc and adapters. I would just need to come up with a way to secure it out the side. I could have it hang just below the belly pan but would prefer side exit with rest of plumbing... and even though it's older, my "ocd" says I need to have a clean/flush install to look factory.
Thank you all for the info, advice and/or encouragement to keep on keeping on! 😄 It definitely helps.. until we get to the delam issue 😕
Updates------------
Took it out for a weekend trip. Only had one spill issue with the grey 1 tank for the bathroom because I forgot the shower was on. I wanted to have water in the tank to follow the black tank dump. oops... but also shows there are issues there too.
I think the wife forgot about the big issue (delam) because on the way up she brought up updating the interior (fixtures, flooring, cabinet repair/refinish...etc) but leaving the outside look original. I am completely on board with interior update IF we are able to afford the delam/structure and celing repairs. I know this isn't cheap but may be quite a bit cheaper than something else that may have it's own set of hidden problems.
At the end of the trip, I decided to replace the led rope light with a multi-color led strip due to the fact of the rop light ends were pushing on the awning and would stretch it. Being it's original to my knowledge, I don't want to have that added pressure on it. The led strip is very low profile and can be connected/disconnected very similar to the rope light.
I finally replaced the city water connection and will have to replace the FW tank fill too, at least when it's functional.
While the AC seemed to do a better job dispersing the cool are through the ducting I ran, I think the ceiling insulation is fubar. I ended up poking some hole into the temp block off we cut out to get a little more flow directly into the camper. The flow to the bedroom was not ideal. Overall temp struggled to maintain anything under 75-80F ish. outside temp during the day was low-mid 80F's.
On to the goods 😄 Some pics!
Pretty much how all the vents looked. Insulation stuck in them or push out onto the floor

Before anything was touched in the ceiling. Turning on the fan/ac produced this every time
Pulling ducting through ceiling

Surprise! Look what they left me

Before retape

After retape

First attempt to run to bedroom... this is still almost 2x too tall to fit

Temporary plug with tape and the rain factory (it's been pretty humid around here)

Old city water connection

New city water connection

New with 90 and hose connected. I bought the 90 because of the stress from the hose. I'm sure most already knew this though 😄

And for fun. This was on our weeklong trip when we stopped for lunch. We were trying to hang out with the big kids

2006 F350 DRW Towboss 6.0PSD
2011 Keystone Laredo 321BH
RIP-1997 Damon Challenger 30 RK
2011 Keystone Laredo 321BH
RIP-1997 Damon Challenger 30 RK
Options
- Mark as New
- Bookmark
- Subscribe
- Mute
- Subscribe to RSS Feed
- Permalink
- Report Inappropriate Content
Jul-28-2017 07:23 AM
SteveB wrote:
Outlaw,
The waste tanks do not have an overflow. Either the tank is cracked or a connection (in, out or vent) is leaking. When I replaced the black tank in my Jayco I cut the top pipes and unbolted the drain valve. The new tank I used rubber grommets made for the purpose with black silicone automotive gasket sealer and short stubs. Fernco couplings completed the connections.
For the sensors you can get Horst Miricle sensors. Leave the old ones in place and put the new ones nearby.
The waste tanks are mostly black ABS. Cracks can be repair with black ABS cement (from a big box store) and some "boat cloth" fiberglass which can be sourced from a rust repair kit or marine parts place. I fixed my old black tank bottom and it held up great until the top cracked-thus the replacement.
For the fresh tank you could install a 6" dia deck hatch to gain access to the inside of the tank for a good clean out and sanitizing. I put one in the top of my old Dutchmen FW tank but the whole tank was accessible under the couch. The deck hatch is water tight for incidental contact but I would not put one on a side. https://www.amazon.com/Seaflo-Round-Inspection-Hatch-Detachable/dp/B01ASBBZXQ/ref=sr_1_16?s=sporting-goods&ie=UTF8&qid=1501243588&sr=1-16&keywords=deck+hatch
Great work keeping this one going!
Personally, I'd also put in a main drain on the FW tank to aid in flushing. I have one on my Komfort, and it makes cleaning it a breeze. I think it's a 1.25 or 1.5" line and valve.
Lyle
2022 GMC Sierra 3500 HD Denali Crew Cab 4x4 Duramax
B&W OEM Companion & Gooseneck Kit
2017 KZ Durango 1500 D277RLT
1936 John Deere Model A
International Flying Farmers 64 Year Member
B&W OEM Companion & Gooseneck Kit
2017 KZ Durango 1500 D277RLT
1936 John Deere Model A
International Flying Farmers 64 Year Member
Options
- Mark as New
- Bookmark
- Subscribe
- Mute
- Subscribe to RSS Feed
- Permalink
- Report Inappropriate Content
Jul-28-2017 05:08 AM
Outlaw,
The waste tanks do not have an overflow. Either the tank is cracked or a connection (in, out or vent) is leaking. When I replaced the black tank in my Jayco I cut the top pipes and unbolted the drain valve. The new tank I used rubber grommets made for the purpose with black silicone automotive gasket sealer and short stubs. Fernco couplings completed the connections.
For the sensors you can get Horst Miricle sensors. Leave the old ones in place and put the new ones nearby.
The waste tanks are mostly black ABS. Cracks can be repair with black ABS cement (from a big box store) and some "boat cloth" fiberglass which can be sourced from a rust repair kit or marine parts place. I fixed my old black tank bottom and it held up great until the top cracked-thus the replacement.
For the fresh tank you could install a 6" dia deck hatch to gain access to the inside of the tank for a good clean out and sanitizing. I put one in the top of my old Dutchmen FW tank but the whole tank was accessible under the couch. The deck hatch is water tight for incidental contact but I would not put one on a side. https://www.amazon.com/Seaflo-Round-Inspection-Hatch-Detachable/dp/B01ASBBZXQ/ref=sr_1_16?s=sporting-goods&ie=UTF8&qid=1501243588&sr=1-16&keywords=deck+hatch
Great work keeping this one going!
2015 RAM 3500 CTD Auto 4X4 CC Dually, Reese 20K
SOLD 8/2015 '01 Dodge Ram 3500 CTD HO 6sp, Reese 15K Pro w/ Kwik Slide, Prodigy
'04 Jayco Jayflight 28.5RKS
SOLD 8/2015 '01 Dodge Ram 3500 CTD HO 6sp, Reese 15K Pro w/ Kwik Slide, Prodigy
'04 Jayco Jayflight 28.5RKS
Options
- Mark as New
- Bookmark
- Subscribe
- Mute
- Subscribe to RSS Feed
- Permalink
- Report Inappropriate Content
Jul-28-2017 03:48 AM
djousma wrote:
Just wondering out loud if there are any mice carcasses in the fresh water tank? That's a pretty big hole, and it wouldn't surprise me if they went in there.... They would get in, but would not be able to get out.
That was my thoughts also after seeing that pic of the fill tube.
2015 Ram 3500/DRW/Aisin/auto/Max tow/4.10s,Cummins, stock Laramie Limited--Silver
Tequila Sunrise 2012 Ultra Classic Limited
2018 Raptor 428SP
Tequila Sunrise 2012 Ultra Classic Limited
2018 Raptor 428SP
Options
- Mark as New
- Bookmark
- Subscribe
- Mute
- Subscribe to RSS Feed
- Permalink
- Report Inappropriate Content
Jul-27-2017 09:54 PM
Figured I would revive this with an update since it's relevant to the topic/work.
Lots of work on both TV and 5er since the last post.
We've taken several trips with it mostly in the state and within a few hours.
Longer trips were:
Wis Rapids for 4th of July, had to replace lower rad hose after the fan shroud rubbed a nice hole in it. Also required ~3gal of coolant. Luckily no issues going up and we made it to the destination before the truck really let it's bladder out all over the property.
Stayed in Rock Island KOA to visit the I80 Truck Stop Jamboree and Mellow Mushroom. Trip down was really good except the 7.4Mpg. lol Yes, I'm NOT expecting anything great, it was just funny as it was the lowest it's ever been towing. Way back, almost home, blew a hole in the intercooler boot and lost ~50% of our boost. Was able to make it home, just much slower than usual.
From the last post about cutting the hole in the AC unit. I just finished up running the flex aluminum foil duct from the AC to all of the vents. Being on standard home service with a 15a breaker, I've not been able to fully test it. It does seem to be working fairly well in the living room/kitchen where the vent space was fairly large. The bathroom and bedroom are still questionable on actual air flow due to vent height being nearly cut in half or more up at the nose. I may end up redoing it at some point.
Bent out the channel at the roof line by the rear cap to prevent drainage going right into the seal. This allows drainage off the trailer and not running down the side anymore; similar to the newer setups.
Resealed all vertical seams we could see and access. Inspected and sealed roof.
Replaced city water connection. The original was plastic and horribly deteriorated and cracked. The replacement is metal.
Replaced a few storage door latches so I don't have to use my head 🙂
Had to re-secure the underbelly at the hitch. Now is nice and solid after some self tapping screws and replacing sealants at seams.
Still to do:
Depending on ownership term, I need to drop the grey 1, black and fresh tanks.
- grey 1 level sensor likely needs replaced. I'm not sure if the tanks have an overflow or if there is a hole somewhere. One of the kids using the shower and soapy water started coming out from underneath the trailer.
- black level sensor must be replaced. Always reads 1/3-2/3 full no matter what. Like the grey tank, I'm not sure if there is an overflow hole or an actual hole in the tank
- Freshwater tank never used by us. Mice chewed through the fill tube and I'm fearful of what bodies were trapped.
- Awning patches? Edges are getting cracked. I haven't researched yet to see if I can use the awning repair tape I have or if I have to go another route.
However, on the bright side, grey 2 appears to work properly, it's also only for the kitchen sink so it's hard to fill.
Taped an led rope light to the awning roller. Wife bought it and now we fit in at night! 😄
Gave the camper another good scrub before the IA trip including delicately scrubbing the awning.. Made a big difference.
Also need to get a lot of eternabond to replace the seam tape for the slide out. I know it wont fix the water damage that has already occurred but hoping to prevent more damage. I know it's very expensive but I've considered getting it quoted to, what I assume would be, rebuilding the driver side and maybe ceiling. With what we paid, it may be worth it. There are still some con's that prevent me from pursuing it though-
- Trailer is still pretty heavy for size. (Expected with it's age and why we have F350)
- If we can't fix ceiling, we'd still have ducting/insulation issues
- Still needs above work completed
- Will probably need a roof sooner than later
- I'm probably missing other stuff
Overall- Happy with purchase as newbies. A lot of learning and DIY has been done but I feel much better having had this trailer to learn on than a newer one costing 10x.
-------------
I will probably have to post this as a separate topic but question regarding booster AC units.
The bedroom has a ceiling vent with speed controls which is also controlled by a thermostat. Provided the wiring is adequate and not some thin 12v wire, would you consider adding? I still have my research to do but wondering what others think. I'm only wired for 30A service so energy savers would be good. I wouldn't plan to use this for the whole trailer, just has a helper for maybe the bath and bedroom.
If you've gotten to this point. THANK YOU for reading and hoping you leave some feedback/advice,
Thanks,
Outlaw
*I will also get some pics up soon.
2006 F350 DRW Towboss 6.0PSD
2011 Keystone Laredo 321BH
RIP-1997 Damon Challenger 30 RK
2011 Keystone Laredo 321BH
RIP-1997 Damon Challenger 30 RK
Options
- Mark as New
- Bookmark
- Subscribe
- Mute
- Subscribe to RSS Feed
- Permalink
- Report Inappropriate Content
Aug-10-2016 05:09 PM
Overdue update
On the AC, we decided to cut the panel to just allow "full blast" out bottom of unit. This made a huge difference over trying to use the vents which are really chewed up. I'm trying to think of a way to get some flex tubing or rigid circle/oval tubing.
panel under bedroom is still holding strong.
for the TV
Ended up having to do quite a bit of work
EGR cooler was blown, replaced it
replaced dummy plugs for long start issue
replaced stand pipes for long start issue
replaced oil cooler
replaced coolant
cleaned turbo
verified updated stc fitting on hpop
finally finished cleaning outside of camper and wow, what a difference. I still need to do a good wax/sealer on it but so far is at least easy to clean.
trailer disconnect/fault was from what appeared to be bad ground. Replaced connector on TV and trailer. Also installed 7pin in the bed to connect the trailer
Still need to get the heater element but the gas is working fine. We haven't used the gas for anything else at this point.
Still don't know about FW tank.
I've been 'window shopping' at something a little newer for some longer trips we would like to do where the water tanks will become more important.
2006 F350 DRW Towboss 6.0PSD
2011 Keystone Laredo 321BH
RIP-1997 Damon Challenger 30 RK
2011 Keystone Laredo 321BH
RIP-1997 Damon Challenger 30 RK
Options
- Mark as New
- Bookmark
- Subscribe
- Mute
- Subscribe to RSS Feed
- Permalink
- Report Inappropriate Content
Jun-01-2016 09:06 PM
Update.
Found out that A/C did work but no air came out. Found this out while camping in 90* heat. Inside camper was only ~5* difference! Assumed the worst and thought the A/C was junk from mice or ducting was trashed.
Late last week-
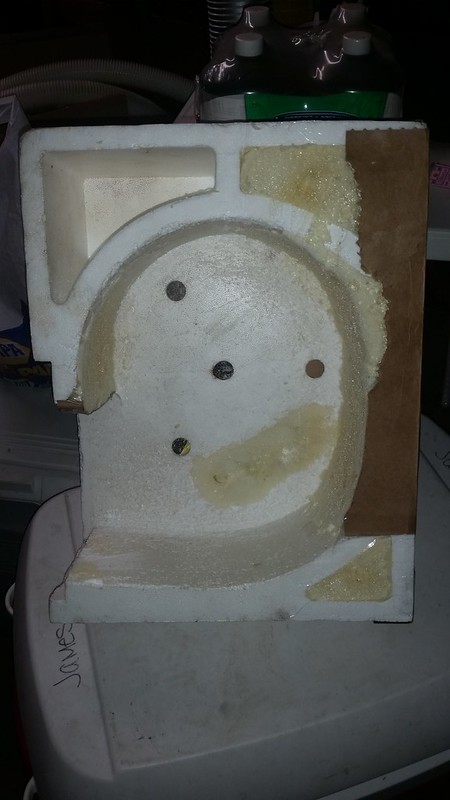
-My dad pulled the A/C apart to find the styrofoam piece around the blower was eaten.
-He came up with a way to "fix" it. I put cut out the foam and put A/C back together.
-Turned on A/C... Whatthe... Still not much coming out. Assumed ducting was issue.
Unfortunately, I did not get the eaten picture. Here is after my dad "framed" and filled with great stuff.
 20160528_195141 by Outlaw
After it was cut.
 20160528_210307 by Outlaw
Came home yesterday to find a huge mess my dad made :). He was cleaning out the ducting! After we finished running wire through it. We filled the holes we could then using real duct tape, sealed them all up the best we could. I'm happy to report this made a HUGE difference!
Multiple holes chewed by vent outlets as well as baseball sized ones in the corners right after the A/C. This was likely where all the air was going instead of the vents.
 20160531_175734 by Outlaw
You can actually feel forced air coming out of all vents.
Using a laser temp reader, The furthest vent outlets were coming out at ~55* F.
The intake can now hold a standard plastic bag up to it (before.. haha)
Also worked on-
Panel under the bedroom. I was able to secure it with HD liquid nails but need to get more in there. It is much better than it was though.
Coolant splooge on TV. After replacing the coolant cap, it seems to be OK for now. I also cleaned the EGR valve
Intercooler pipe on TV. Replaced. My dad found a good used (looked new) for $25!
Need to do-
--Need to find out why TV flashed trailer disconnnected/fault. Troubleshooting underway. Initial lookup points to ground wire in harness on truck.
--Replace water heater electric element
That's all for now folks!
Next trip is next week and is 150miles (~2hrs) away. A lot to do until then.
Found out that A/C did work but no air came out. Found this out while camping in 90* heat. Inside camper was only ~5* difference! Assumed the worst and thought the A/C was junk from mice or ducting was trashed.
Late last week-
-My dad pulled the A/C apart to find the styrofoam piece around the blower was eaten.
-He came up with a way to "fix" it. I put cut out the foam and put A/C back together.
-Turned on A/C... Whatthe... Still not much coming out. Assumed ducting was issue.
Unfortunately, I did not get the eaten picture. Here is after my dad "framed" and filled with great stuff.
20160528_195141 by OutlawAfter it was cut.
20160528_210307 by OutlawCame home yesterday to find a huge mess my dad made :). He was cleaning out the ducting! After we finished running wire through it. We filled the holes we could then using real duct tape, sealed them all up the best we could. I'm happy to report this made a HUGE difference!
Multiple holes chewed by vent outlets as well as baseball sized ones in the corners right after the A/C. This was likely where all the air was going instead of the vents.
20160531_175734 by OutlawYou can actually feel forced air coming out of all vents.
Using a laser temp reader, The furthest vent outlets were coming out at ~55* F.
The intake can now hold a standard plastic bag up to it (before.. haha)
Also worked on-
Panel under the bedroom. I was able to secure it with HD liquid nails but need to get more in there. It is much better than it was though.
Coolant splooge on TV. After replacing the coolant cap, it seems to be OK for now. I also cleaned the EGR valve
Intercooler pipe on TV. Replaced. My dad found a good used (looked new) for $25!
Need to do-
--Need to find out why TV flashed trailer disconnnected/fault. Troubleshooting underway. Initial lookup points to ground wire in harness on truck.
--Replace water heater electric element
That's all for now folks!
Next trip is next week and is 150miles (~2hrs) away. A lot to do until then.
2006 F350 DRW Towboss 6.0PSD
2011 Keystone Laredo 321BH
RIP-1997 Damon Challenger 30 RK
2011 Keystone Laredo 321BH
RIP-1997 Damon Challenger 30 RK
Options
- Mark as New
- Bookmark
- Subscribe
- Mute
- Subscribe to RSS Feed
- Permalink
- Report Inappropriate Content
May-23-2016 06:59 PM
Made the trip "without issue".
Since I haven't towed anything like this. Largest thing before it was a 16' boat. I think it towed really well. On way there was winding and hilly roads. To and from also included about 30miles of freeway which were pretty easy also.
Found out A/C in fact didn't work. It would blow slightly cool air. I'm hoping just needs recharge from sitting for so long.
--All tanks used (Gray 1, Gray 2, sewage) held what they needed to until the end of the trip.
--'City Water' connection didn't have any issues.
--Water heater only worked on gas. I'm assuming the element is fried. When we got it, it was turned on along with the breaker. Testing it was turned on, all before we knew anything about it.
Found/Need to do---
--Need to repair panel under bedroom by the hitch. it's loose and started getting worse on trip back.
--Need to find out why TV splooged coolant. Troubleshooting underway. Initial lookup points to bad coolant cap or worse- egr cooler or head gaskets.
--Need to find out why TV flashed trailer disconnnected/fault. Troubleshooting underway. Initial lookup points to ground wire in harness on truck.
--Need to replace TV intercooler pipe. Already found it cracked.
All need to be completed within 2 weeks before next trip!!
2006 F350 DRW Towboss 6.0PSD
2011 Keystone Laredo 321BH
RIP-1997 Damon Challenger 30 RK
2011 Keystone Laredo 321BH
RIP-1997 Damon Challenger 30 RK
Options
- Mark as New
- Bookmark
- Subscribe
- Mute
- Subscribe to RSS Feed
- Permalink
- Report Inappropriate Content
May-18-2016 01:47 PM
Been a crazy week. Luckily my awesome dad was able to reconnect the furnace and test...
Furnace
Water heater (gas and electric)
A/C
All of which work! Now to just get the bottom put back together before Friday afternoon when we leave on it's maiden voyage.
I did manage to get the truck done.
Full synthetic oil change
Oil filter
Upper and lower fuel filters (originals (I assume) were nasty!)
"Blue spring" update
Intake cutout for better airflow
2006 F350 DRW Towboss 6.0PSD
2011 Keystone Laredo 321BH
RIP-1997 Damon Challenger 30 RK
2011 Keystone Laredo 321BH
RIP-1997 Damon Challenger 30 RK
Options
- Mark as New
- Bookmark
- Subscribe
- Mute
- Subscribe to RSS Feed
- Permalink
- Report Inappropriate Content
May-13-2016 06:58 PM
laknox wrote:
Nice job, Outlaw. As far as the FW tank goes, you should have a main drain for it, and that should suck out any "junk" if you fill it full. From then, you can sanitize it.
Lyle
Thanks!
Unless I missed it, the only known drain is a 1/2" tube. I did not pull any covers or cut any of the sheathing that didn't require it though. Are you saying their may be a larger drain on the tank itself?
thirtydaZe wrote:
Yeah man, you kicked that things butt. That before and after is amazing. I love watching threads like this.
Thanks!
It was a lot of scrubbing but turned out A LOT better than I was expecting. The first couple times we went to look at it I thought there was going to be stains and rings where the 'barnacles' were or just stuff that wouldn't come off. Bleach/water mix and dish scrubbing sponge has doing 98% of the work. I did try a pressure washer but it still required me to clean up after it with the sponge to get the remaining filth.
SabreCanuck wrote:
Biggest things to check are:
1) SAFETY (new tires, fire ext., fire alarm, CO2 detector)?
2) Water leaks? The entire outside should be sealed from the inside in one way or another. Nice thing about good cleaning is it is an inspection at the same time. If there are any joints/seams that are not sealed then seal them. Water doesn't necessarily run downhill in an RV. Case in point, I searched high/low for the leak on our 'project' to finally discover that the previous owner appeared to have put a jack through the floor right behind the tires. Every time towed through the rain it would have flooded the floor. I was looking for leaking wall/roof.
3) Does everything work? On electric and Propane? Test and if not then figure it out. Yep, you can do it.
4) Back up plan for necessities? If it's chilly out, take an electric heater with just in case furnace doesn't work. Take a water bottle with in case you have plumbing issues
I'm nowhere near a guru but GOOGLE IS YOUR FRIEND. If you run across something, I can guarantee someone else has as well. Learn to search on Google and you can pretend to be a guru too. 🙂
I'm actually excited for you... Fun times!! LOL
Have fun!
1.A) New tires- DONE! Just put 5 new ones on a couple weeks ago.
1.B) Fire ext DONE! One came with camper but who knows if still good. I bought a foam ext.
1.C) Need to test/replace fire alarm. PO had it in a cabinet.
1.D) Need to test CO detector (not sure if it has a test button). Next to furnace at floor level.
2.A) Water leaks- CHECK! Oh yeah that water leaks. lol. It was parked outside over the winter and we've had quite a bit of rain. I've done multiple checks on the floors, pushing on the walls and in cabinets. Everything appears to be solid.
2.B) Part of water leaks check, I do need to get on the roof and check all the seals. I know from the rear ladder I was able to see the caulk/putty was getting brittle on one of the vents.
2.C) Response. Dang! That is messed up. I couldn't have sold something like that without stating that.. Some peoples kids! I assume you were able to fix or just replaced the camper?
3.A) In progress. I was able to pickup some plugs last night and test all the water receptacles work. Hot side and cold side appeared to have solid and even pressure. No leaks out the bottom :). I was also reading the water heater manual last night to figure out if it was gas/electric. I'm hoping to test at least the electric side tonight.
3.B) I'm not sure if there is anything in the propane tanks AND the furnace is still disconnected until I can reseal. Stove/oven are gas- pending furnace
Refrigerator- I've heard it kick in but haven't actually done any checks yet with all the other work getting done. Microwave- working
4.A) Because we weren't sure about propane tanks or furnace functionality, we did plan on having small electric heater on stand-by. The way we looked at it is- We've camped in a tent in a Wisconsin September while raining. Just being in the camper will be like a 4star hotel in comparison. 🙂
4.B) Not sure which direction you were going with water bottle but i did say we could use a pitcher if needed for flushing at least. We would likely already have bottled water/beverages for the stay otherwise.
4.C) Ha. I've been googling for sure. Almost too much info out there. Was also playing youtube videos while reading the manuals. Only problem with some of the info is it's too generic and with our year/model it's hard to get specifics. We got really lucky that the PO kept all the paperwork and I mean all of it! We have them for everything from the 13" tv/vcr combo to the camper dealer brochure.
Thanks!
It a definite learning curve but so far has been a good experience. Very different from the custom computer stuff I normally do!
Pure Diesel wrote:
Good job on the restoration.
Do not use the spray and foam, by itself, to fill the holes. Mice will still chew thru it. Go buy some "stainless steel" scouring pads and put them in the holes with the foam. The mice then can't chew thru. Mice and rats will chew thru PEX type piping, because they can actually smell the water thru the pipes. If you have any exposed PEX cover it up so they can't get to it. Also, PEX piping can't be exposed to any sunlight for more than 30 days.
Thanks!
I will be sure to get some steel scouring pads too. I wouldn't have thought to do that. Chewing through the pex it what made us replace a couple runs already. I don't think there is much I can do to stop that other than some of the "tricks" people do with the dryer sheets, peppermint oil...etc Where they did chew through I would never have been able to see, I'm not even sure I can access it to try preventing in the future.
I did not know that about pex, coincidentally it will not be in any sunlight. The run is under the camper and will be covered up. That should take the UV concern away at least.
Chiefcpo wrote:
The clear is not pex but luck to you the correct clamps were used (pex is a band the is squeezed and made of brass like material, the pex clamps will hold for a while but can and will loosen on the CTS piping as it is a tad smaller.
Great looking job
Thanks! I'm going to cross my fingers for now that it will not happen :). I used what is shown because it was the tools and supplies I had. When I went to the hardware store, they only had <5' pieces or 75/100' rolls of the "white" tubing.
Pure Diesel wrote:Chiefcpo wrote:
The clear is not pex but luck to you the correct clamps were used (pex is a band the is squeezed and made of brass like material, the pex clamps will hold for a while but can and will loosen on the CTS piping as it is a tad smaller.
Great looking job
http://www.pexinfo.com/
Yes, the clear is a form of PEX. That looks like it is from "Wirsbo/Aquapex" brand.
I've been installing it for almost 20 years, as a licensed plumbing contractor. There are different manufactures with different types, but still a "Cross link method" type of material. Some are put together with collars and barbed fittings and some with a crimping method.
Thanks for the additional info. It sounds like I should be OK with the method I used? To chiefcpo's point, I'm going to remain fingers crossed 🙂
Sport45 wrote:outlaw85 wrote:
SHHH!!!! lol. Yes that was my first concern as well, "What is down there?". I was thinking of renting a camera to feed down and look OR if we just go with DO NOT USE. If there is anything, were talking a tank drop I'm assuming.
I don't know what it cost to rent one, but if it's much more than $50 you might consider buying instead. A pretty good one only cost $100. Sounds like it would of come in handy on this job.
BTW, Job well done!
Inspection camera at Home Depot
Thanks for bringing this back up! I did do a quick google search (see what I did there SabreCanuck? :D). Found they have some really cheap (<$30) USB endoscopes for computers or smartphones. I know what's in my cart!
This post would've been this morning if work wouldn't have blocked it and my home computer having issues saving the post. Stupid thing worked from my phone though. Wth
2006 F350 DRW Towboss 6.0PSD
2011 Keystone Laredo 321BH
RIP-1997 Damon Challenger 30 RK
2011 Keystone Laredo 321BH
RIP-1997 Damon Challenger 30 RK
Options
- Mark as New
- Bookmark
- Subscribe
- Mute
- Subscribe to RSS Feed
- Permalink
- Report Inappropriate Content
May-12-2016 09:09 PM
outlaw85 wrote:
SHHH!!!! lol. Yes that was my first concern as well, "What is down there?". I was thinking of renting a camera to feed down and look OR if we just go with DO NOT USE. If there is anything, were talking a tank drop I'm assuming.
I don't know what it cost to rent one, but if it's much more than $50 you might consider buying instead. A pretty good one only cost $100. Sounds like it would of come in handy on this job.
BTW, Job well done!
Inspection camera at Home Depot
’19 F350 SRW CCLB PSD Fx4
'00 F250, CC SWB 4x2, V-10 3.73LS. (sold)
'83 F100 SWB 4x2, 302 AOD 3.55. (parked)
'05 GMC Envoy 4x2 4.2 3.73L.
'12 Edge 2.0 Ecoboost
'15 Cherokee Trailhawk
'00 F250, CC SWB 4x2, V-10 3.73LS. (sold)
'83 F100 SWB 4x2, 302 AOD 3.55. (parked)
'05 GMC Envoy 4x2 4.2 3.73L.
'12 Edge 2.0 Ecoboost
'15 Cherokee Trailhawk


