Turn on suggestions
Auto-suggest helps you quickly narrow down your search results by suggesting possible matches as you type.
Showing results for
- Good Sam Community
- Everything RV
- Technical Issues
- BAL Accu-Slide maxed out on adjustment
Options
- Subscribe to RSS Feed
- Mark Topic as New
- Mark Topic as Read
- Float this Topic for Current User
- Bookmark
- Subscribe
- Mute
- Printer Friendly Page
BAL Accu-Slide maxed out on adjustment
Options
- Mark as New
- Bookmark
- Subscribe
- Mute
- Subscribe to RSS Feed
- Permalink
- Report Inappropriate Content
Jan-31-2023 04:53 PM
I have two questions dealing with a BAL cable Accu-Slide system. The two questions are below. I am trying to give you the background on the camper.
The camper is a 2019 Keystone Laredo 5th wheel, Model 255SRL. It was bought new in Dec 2019; with the Covid issues, the camper has only been used three camping seasons with light to moderate use. The camper is a friend's who I'm doing some repair/service work on. I noticed the main dinette/fridge slide was not working right, it jerked when it went out and in, and there was a sagging cable outside.
Upon investigation, the cable tensioning hardware was loose inside. The adjustments I have made after seeing the issues are the first time anyone has adjusted this slide since it was bought. I'm unsure if the factory did not tighten the cable block jam nuts or if they vibrated loose from towing. The smaller bedroom slide also has loose hardware but is not far from adjustment. The main slide was very far out of adjustment and is many times heavier.
Here are pictures as found.
The sagging cable on the top front.

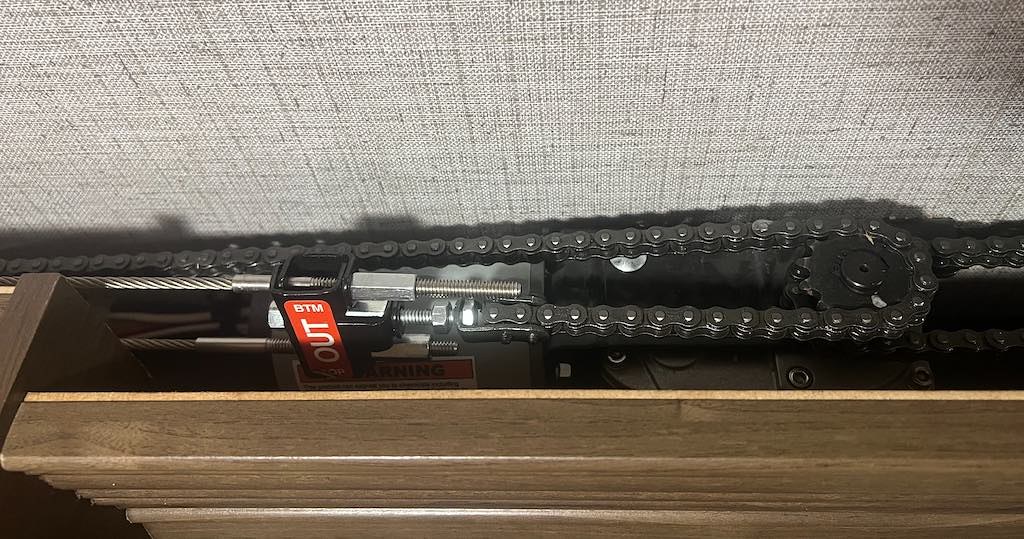
The motor drive area shows loose jam nuts and cable tension blocks on an angle. It is hard to see the jam nuts, but they are loose.

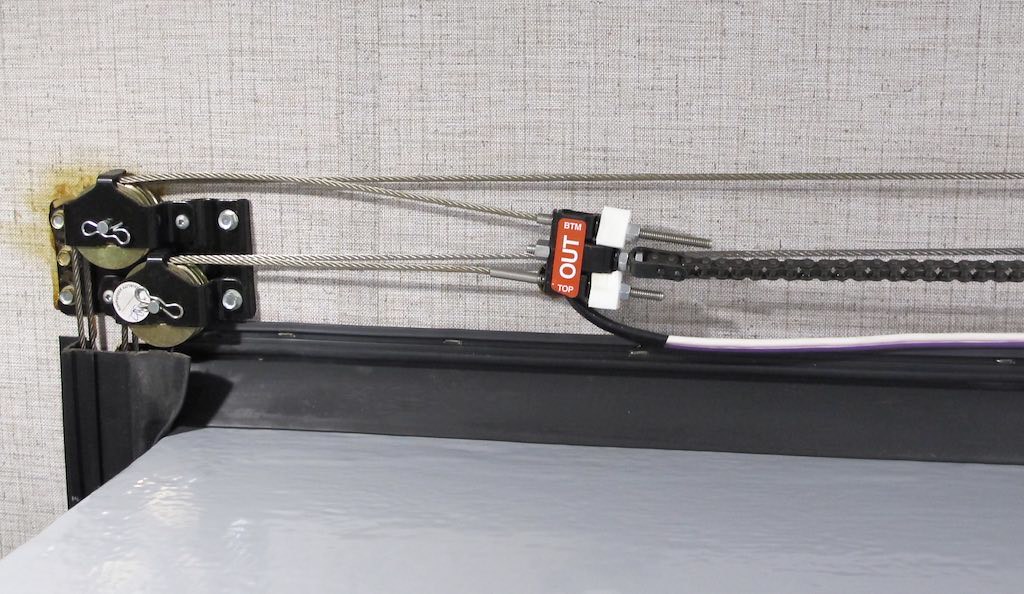
The rear "out" cable yoke/block with loose cables. This is with the slide fully retracted. Note the center chain tension bolt is maxed out.
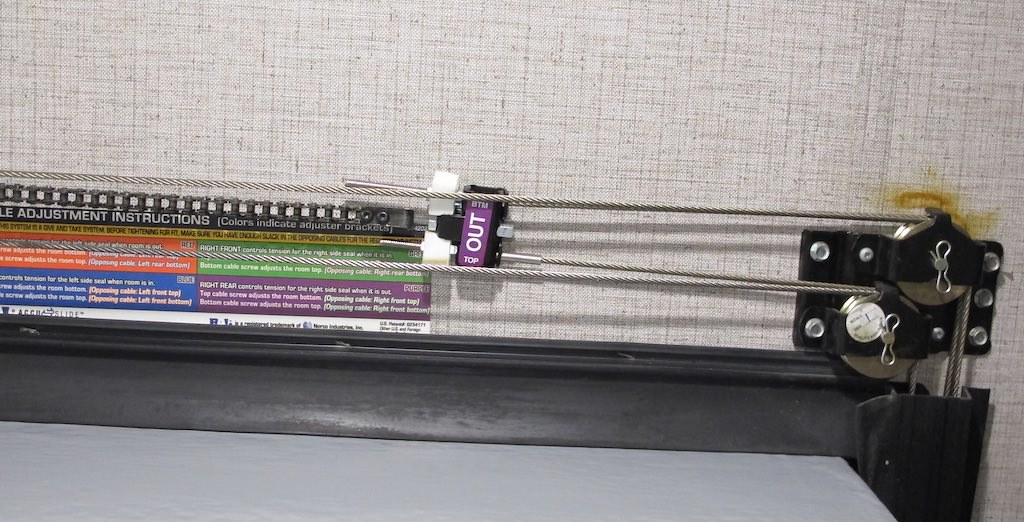
The front "out" cable block with the block on an angle. They are supposed to be vertical.
An inside view of the slide

The "inside" bottom of the slide room flanges were not touching when the slide was fully out. The rear inside bottom slide room flange had a 1 1/4" gap. The front inside bottom slide room flange had a 3/4" gap. The tops of the front and the rear inside flange touched the wall flange. This large gap shows the "out" cables are loose from where they are supposed to be and why the slide jerked when the motor started until all the slack tightened up.
NOTE: The drive chain distance from the center of the motor sprocket was even on both sides of the front and rear chains to the cable blocks. This was correct from the factory.
I read all the online BAL service manuals and saw the videos. BAL did a good job on this. However, they did not drill into what I am seeing now. I am seeking help if anyone has seen and dealt with this before.
Question 1. I'm questioning how tight the OUT cables must be to pull the bottom of the slide up against the wall? Or do they not have the bottom touch on a large, fully loaded slide room? BAL states the bottom is to touch.
I used a floor jack to level/lighten the slide, so the inside flanges were even top and bottom, front and rear, and tightened the cables to the 1/2" finger squeeze pressure adjustment. When I released the jack pressure, the OUT tension was not enough, and the bottom of the slide moved away from the wall. I have adjusted in place with full slide load the OUT blocks, but the tension on the cables and chain is banjo tight, and I'm still 1/2" away at the bottom on both ends. I have more room to adjust, but I wanted to ask before cranking some more. The tension on the bearings in that gearbox seems immense.
The way the system was, there was not enough adjustment left on the OUT cable blocks to adjust the bottom of the slide to be pulled into place. I moved the chain 9 links. Yes, that much. This much of a need to move the chain to get the OUT top to come close sort of points to the factory may not have had the bottom of the slide flanges touch as shipped.
Here are pic's as I left them tonight. You can see I still have room to adjust the OUT blocks, and the slide is up to the wall at the top, but the bottom is out 1/2". The jam nuts are not yet tightened, as I am still working through this adjustment process.
The rear OUT chain block
The front OUT chain block

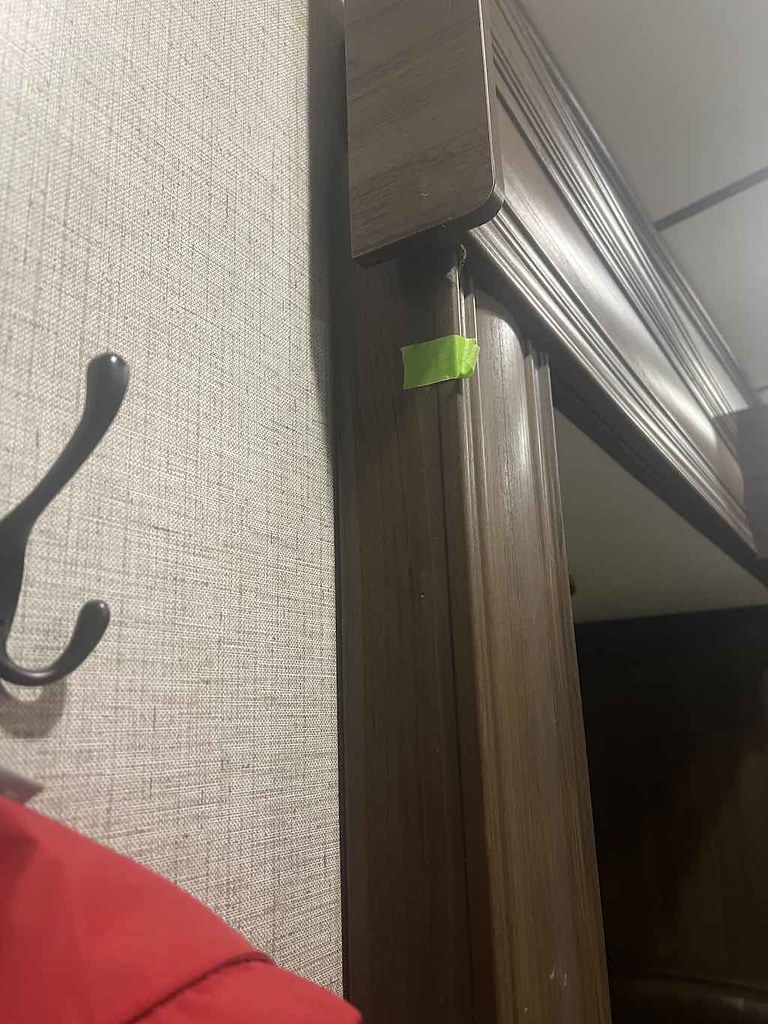
Here is the 1/2" gap at the bottom after my last adjustment
At the bottom, the green tape is where the cable is attached. I use green tape to measure in the same place while adjusting.

The top touching the wall.
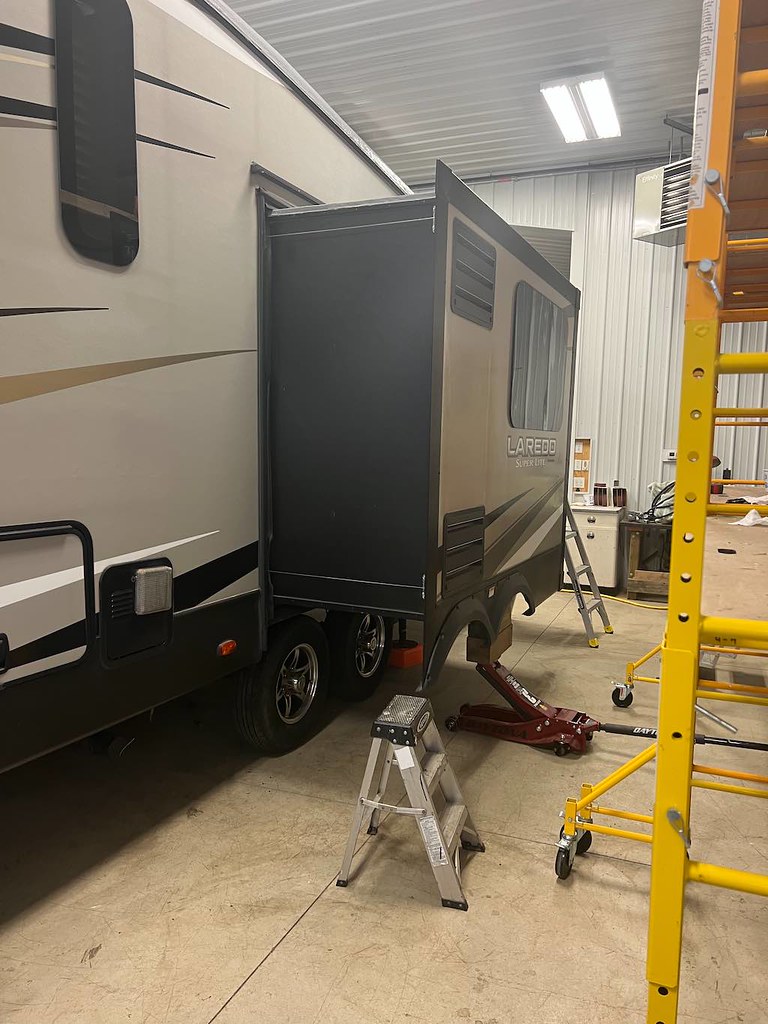
The floor jack setup I used when I unhooked the chains to adjust and even out the slide to start the tensioning.
Question 2: This topic is not mentioned in any service manuals. The way this system is at the moment, there is not enough adjustment left on the "IN" chain blocks. It appears the cable length was wrong, the cable and/or chain stretched, but no adjustment is left to create tension on the IN cable blocks.
The question is, in this case, do I remove chain links? Ideally, I need 1" to 1 1/4" inches of chain on both chains removed to get back into the middle of the adjustment.
It is hard for me to believe the cable pulley bushings are heavily worn in the three years of use; heavy pulley bushing wear could cause some of this. I am not sure the factory ever had the bottom of the slide tight to the wall. Either the crimped cable end on the outside flange brackets was in the wrong location at the factory, or the chain was too long. I'm unsure if the cables come pre-crimped from BAL or if the installer crimps them. The Rear OUT block was maxed on adjustment, as seen in the as found pics. Keystone used all the adjustments available on the rear OUT block on day one. This makes me suspicious of how the system was adjusted when shipped.
Here are pics where the IN chain blocks as I left it. The IN cables are not yet tensioned, and there is still some slack in the system. There is no more adjustment left.
The rear IN block as I left it

The front IN block as I left it

Recapping my two questions:
No. 1 I'm questioning how tight the OUT cables must be to pull the bottom of the slide up against the wall? Or do they not have the bottom touch on a large, fully loaded slide room? What distance is acceptable?
No. 2: Do I remove chain links to gain more IN adjustment? Or do something else?
Thanks for any help. I have sent a message to BAL tech support, but they have not yet returned the call. Hoping this is not the first time this has happened
Thanks
John
PS. I have adjusted many LCI rack and pinion electric slide drives, flush floor and above the floor, the older Dewald/Power Gear rack and pinion, and the old Barker rack and pinion system. This is, however, my first cable slide to work on.
The camper is a 2019 Keystone Laredo 5th wheel, Model 255SRL. It was bought new in Dec 2019; with the Covid issues, the camper has only been used three camping seasons with light to moderate use. The camper is a friend's who I'm doing some repair/service work on. I noticed the main dinette/fridge slide was not working right, it jerked when it went out and in, and there was a sagging cable outside.
Upon investigation, the cable tensioning hardware was loose inside. The adjustments I have made after seeing the issues are the first time anyone has adjusted this slide since it was bought. I'm unsure if the factory did not tighten the cable block jam nuts or if they vibrated loose from towing. The smaller bedroom slide also has loose hardware but is not far from adjustment. The main slide was very far out of adjustment and is many times heavier.
Here are pictures as found.
The sagging cable on the top front.
The motor drive area shows loose jam nuts and cable tension blocks on an angle. It is hard to see the jam nuts, but they are loose.
The rear "out" cable yoke/block with loose cables. This is with the slide fully retracted. Note the center chain tension bolt is maxed out.
The front "out" cable block with the block on an angle. They are supposed to be vertical.
An inside view of the slide
The "inside" bottom of the slide room flanges were not touching when the slide was fully out. The rear inside bottom slide room flange had a 1 1/4" gap. The front inside bottom slide room flange had a 3/4" gap. The tops of the front and the rear inside flange touched the wall flange. This large gap shows the "out" cables are loose from where they are supposed to be and why the slide jerked when the motor started until all the slack tightened up.
NOTE: The drive chain distance from the center of the motor sprocket was even on both sides of the front and rear chains to the cable blocks. This was correct from the factory.
I read all the online BAL service manuals and saw the videos. BAL did a good job on this. However, they did not drill into what I am seeing now. I am seeking help if anyone has seen and dealt with this before.
Question 1. I'm questioning how tight the OUT cables must be to pull the bottom of the slide up against the wall? Or do they not have the bottom touch on a large, fully loaded slide room? BAL states the bottom is to touch.
I used a floor jack to level/lighten the slide, so the inside flanges were even top and bottom, front and rear, and tightened the cables to the 1/2" finger squeeze pressure adjustment. When I released the jack pressure, the OUT tension was not enough, and the bottom of the slide moved away from the wall. I have adjusted in place with full slide load the OUT blocks, but the tension on the cables and chain is banjo tight, and I'm still 1/2" away at the bottom on both ends. I have more room to adjust, but I wanted to ask before cranking some more. The tension on the bearings in that gearbox seems immense.
The way the system was, there was not enough adjustment left on the OUT cable blocks to adjust the bottom of the slide to be pulled into place. I moved the chain 9 links. Yes, that much. This much of a need to move the chain to get the OUT top to come close sort of points to the factory may not have had the bottom of the slide flanges touch as shipped.
Here are pic's as I left them tonight. You can see I still have room to adjust the OUT blocks, and the slide is up to the wall at the top, but the bottom is out 1/2". The jam nuts are not yet tightened, as I am still working through this adjustment process.
The rear OUT chain block
The front OUT chain block
Here is the 1/2" gap at the bottom after my last adjustment
At the bottom, the green tape is where the cable is attached. I use green tape to measure in the same place while adjusting.
The top touching the wall.
The floor jack setup I used when I unhooked the chains to adjust and even out the slide to start the tensioning.
Question 2: This topic is not mentioned in any service manuals. The way this system is at the moment, there is not enough adjustment left on the "IN" chain blocks. It appears the cable length was wrong, the cable and/or chain stretched, but no adjustment is left to create tension on the IN cable blocks.
The question is, in this case, do I remove chain links? Ideally, I need 1" to 1 1/4" inches of chain on both chains removed to get back into the middle of the adjustment.
It is hard for me to believe the cable pulley bushings are heavily worn in the three years of use; heavy pulley bushing wear could cause some of this. I am not sure the factory ever had the bottom of the slide tight to the wall. Either the crimped cable end on the outside flange brackets was in the wrong location at the factory, or the chain was too long. I'm unsure if the cables come pre-crimped from BAL or if the installer crimps them. The Rear OUT block was maxed on adjustment, as seen in the as found pics. Keystone used all the adjustments available on the rear OUT block on day one. This makes me suspicious of how the system was adjusted when shipped.
Here are pics where the IN chain blocks as I left it. The IN cables are not yet tensioned, and there is still some slack in the system. There is no more adjustment left.
The rear IN block as I left it
The front IN block as I left it
Recapping my two questions:
No. 1 I'm questioning how tight the OUT cables must be to pull the bottom of the slide up against the wall? Or do they not have the bottom touch on a large, fully loaded slide room? What distance is acceptable?
No. 2: Do I remove chain links to gain more IN adjustment? Or do something else?
Thanks for any help. I have sent a message to BAL tech support, but they have not yet returned the call. Hoping this is not the first time this has happened
Thanks
John
PS. I have adjusted many LCI rack and pinion electric slide drives, flush floor and above the floor, the older Dewald/Power Gear rack and pinion, and the old Barker rack and pinion system. This is, however, my first cable slide to work on.
2005 Ford F350 Super Duty, 4x4; 6.8L V10 with 4.10 RA, 21,000 GCWR, 11,000 GVWR, upgraded 2 1/2" Towbeast Receiver. Hitched with a 1,700# Reese HP WD, HP Dual Cam to a 2004 Sunline Solaris T310R travel trailer.
17 REPLIES 17
Options
- Mark as New
- Bookmark
- Subscribe
- Mute
- Subscribe to RSS Feed
- Permalink
- Report Inappropriate Content
Feb-02-2023 09:08 AM
I think the pulleys are going to be your easiest gain on this. Just because of the hole setup on the brackets. You can move the brackets up so the bottom two holes on the outer edge line up with the top two holes and reinsert the bolts. Drill a new top hole and the two inside holes. From the pics that looks like at least 3/4 of an inch it would raise the cables.
2021 Chevy Silverado LTZ 3500 Diesel
2022 Montana Legacy 3931FB
Pull-Rite Super Glide 4500
2022 Montana Legacy 3931FB
Pull-Rite Super Glide 4500
Options
- Mark as New
- Bookmark
- Subscribe
- Mute
- Subscribe to RSS Feed
- Permalink
- Report Inappropriate Content
Feb-02-2023 08:05 AM
Hi everyone,
First off, thanks to all who have responded. Please, keep the comments coming. This is just a mid-day break/update.
I called and talked with BAL tech support again this morning. He gave me the G4 Accu-slide mounting specs for the Corner Pulley Brackets (the top left and right cable pulleys on the wall) at how high above the rough opening they are supposed to be at. And he gave me the spec on the motor drive mounting angle. Yes, the motor end is supposed to be pointing downhill at a cant to help this IN cable block yoke crashing problem. This gear motor is mounted parallel to the slide opening aggravating the crash problem.
These are the G4 install instructions, just they lack the mounting specs of the corner pulleys and the motor height https://balrvproducts.com/wp-content/uploads/downloads/InstallationOperation/G4-Installation-Instruc...
Thinking through all this for myself, I need to verify what is mounted correctly before adjusting anything to ensure the entire system result will come into proper alignment. I am fighting two issues in the big picture right now where I am at;
1. The crash at the gearmotor with the cable block yoke
2. All cable block yokes and individual cables are close to being totally out of adjustment. And the rear BTM OUT cable is maxed out of adjustment.
The way the system is mounted right now and acting up, it is like all eight cables are too long. This may be the symptom of not mounting the corner turn pulleys in the correct height relationship to the motor (they are too low). The system has a lot of adjustments if everything is mounted correctly. There is 2" total adjustment in the long center bolt for the cable block yokes, and 2" of adjustment in the cable ends themselves. Yet, all eight cables and cable yokes are close to maxed out. Ideally, when new, the system is adjusted close to mid-range of design adjustment or skewed toward min adjustment to leave extra room for chain and cable stretch. If the corner pulley brackets are mounted too low, say by 3/4 to 1", every cable will be 3/4 - 1" too long to accommodate the low-mounted corner pulleys. If the corner pulled is too low, this also affects the angle uphill the cable block yokes take to get over the Gearmotor sprocket aggravating the cable block yoke crash.
If you look at this picture on my first reply of the "as found", the rear slide end cable block/yoke is close to maxed out from the installation and the cables.
And here is the front end of the slide "as found." This end has some level of adjustment, but a lot was used up on the original install.
While I know bolts loosen or tighten and rattle out of adjustment, in this case, they rattle loose, not tighter, against increasing pressure. Those 2 pics above seem to point to the system was not optimized in the right spot upon installation. Everything gets worse with time with chain and cable stretch.
I have another trailer to get done today and may not be back to this until tomorrow. But please keep the comments coming.
Thanks for the comments, and keep them coming. I will report back after I can get back into this camper.
John
2005 Ford F350 Super Duty, 4x4; 6.8L V10 with 4.10 RA, 21,000 GCWR, 11,000 GVWR, upgraded 2 1/2" Towbeast Receiver. Hitched with a 1,700# Reese HP WD, HP Dual Cam to a 2004 Sunline Solaris T310R travel trailer.
Options
- Mark as New
- Bookmark
- Subscribe
- Mute
- Subscribe to RSS Feed
- Permalink
- Report Inappropriate Content
Feb-02-2023 06:19 AM
schlep1967 wrote:
I think I see the difference now between the bedroom wardrobe slide and the one you are having problems with. The wardrobe slide motor is installed at an angle with the motor lower than the gear. That gives the clearance for the adjustment bracket.
Since you can't really re-drill the mounting holes, I would suggest elongating the holes on the left side of the mounting bracket so you can slide the motor end down. That should give you the clearance you need.
Most likely you will have to elongate all but one of the holes.
You may also be able to gain a little by doing the same thing with the pulleys on the left side of the slide. Elongate the holes and slide them up a little bit. If you can gain 1/8th inch on each end I bet you'll have the clearance you need.
2021 Chevy Silverado LTZ 3500 Diesel
2022 Montana Legacy 3931FB
Pull-Rite Super Glide 4500
2022 Montana Legacy 3931FB
Pull-Rite Super Glide 4500
Options
- Mark as New
- Bookmark
- Subscribe
- Mute
- Subscribe to RSS Feed
- Permalink
- Report Inappropriate Content
Feb-02-2023 06:07 AM
StirCrazy wrote:
as long as all your pullys and such are good, I would remove some chain links. but I would check all the piviot points and anchor points first to make sure there isn't anything wrong there. it could be that who ever put it togeather just mounted stuff in slightly wrong places causeing excess cable or the cable streched a bit from use.
Removing links won't change the relationship between the chain and the motor. And he will need the range of motion to move the slide all the way out/in.
On a short in length but deep slide the ends of the chain have to go past the motor.
2021 Chevy Silverado LTZ 3500 Diesel
2022 Montana Legacy 3931FB
Pull-Rite Super Glide 4500
2022 Montana Legacy 3931FB
Pull-Rite Super Glide 4500
Options
- Mark as New
- Bookmark
- Subscribe
- Mute
- Subscribe to RSS Feed
- Permalink
- Report Inappropriate Content
Feb-02-2023 05:40 AM
as long as all your pullys and such are good, I would remove some chain links. but I would check all the piviot points and anchor points first to make sure there isn't anything wrong there. it could be that who ever put it togeather just mounted stuff in slightly wrong places causeing excess cable or the cable streched a bit from use.
2014 F350 6.7 Platinum
2016 Cougar 330RBK
1991 Slumberqueen WS100
2016 Cougar 330RBK
1991 Slumberqueen WS100
Options
- Mark as New
- Bookmark
- Subscribe
- Mute
- Subscribe to RSS Feed
- Permalink
- Report Inappropriate Content
Feb-02-2023 05:37 AM
I looked at mine again and my motor sits lower. Just above the slide-out seal. I have a full wall slide so the cables tend to sag but they still don't hit the motor. Check with the trailer manufacture and see if there is enough support behind the motor to mount it lower.
Options
- Mark as New
- Bookmark
- Subscribe
- Mute
- Subscribe to RSS Feed
- Permalink
- Report Inappropriate Content
Feb-02-2023 04:29 AM
I think I see the difference now between the bedroom wardrobe slide and the one you are having problems with. The wardrobe slide motor is installed at an angle with the motor lower than the gear. That gives the clearance for the adjustment bracket.
Since you can't really re-drill the mounting holes, I would suggest elongating the holes on the left side of the mounting bracket so you can slide the motor end down. That should give you the clearance you need.
Most likely you will have to elongate all but one of the holes.
Since you can't really re-drill the mounting holes, I would suggest elongating the holes on the left side of the mounting bracket so you can slide the motor end down. That should give you the clearance you need.
Most likely you will have to elongate all but one of the holes.
2021 Chevy Silverado LTZ 3500 Diesel
2022 Montana Legacy 3931FB
Pull-Rite Super Glide 4500
2022 Montana Legacy 3931FB
Pull-Rite Super Glide 4500
Options
- Mark as New
- Bookmark
- Subscribe
- Mute
- Subscribe to RSS Feed
- Permalink
- Report Inappropriate Content
Feb-02-2023 03:50 AM
JBarca, My phone number was in the first PM I sent you.Give me a call today when you get a chance.
2021 Chevy Silverado LTZ 3500 Diesel
2022 Montana Legacy 3931FB
Pull-Rite Super Glide 4500
2022 Montana Legacy 3931FB
Pull-Rite Super Glide 4500
Options
- Mark as New
- Bookmark
- Subscribe
- Mute
- Subscribe to RSS Feed
- Permalink
- Report Inappropriate Content
Feb-01-2023 07:09 PM
I have that system. If there is no more adjustment via the screw. You can adjust the chain. I believe there are decent video's available
19'Duramax w/hips,12'Open Range,Titan Disc Brake
BD3,RV safepower,22" Blackstone
Ox Bedsaver,RV760 w/BC20,Glow Steps, Enduraplas25,Pedego
BakFlip,RVLock,5500 Onan LP,Prog.50A surge,Hughes autoformer
Porta Bote 8.0 Nissan,Sailun S637
Correct Trax,Splendide
BD3,RV safepower,22" Blackstone
Ox Bedsaver,RV760 w/BC20,Glow Steps, Enduraplas25,Pedego
BakFlip,RVLock,5500 Onan LP,Prog.50A surge,Hughes autoformer
Porta Bote 8.0 Nissan,Sailun S637
Correct Trax,Splendide
Options
- Mark as New
- Bookmark
- Subscribe
- Mute
- Subscribe to RSS Feed
- Permalink
- Report Inappropriate Content
Feb-01-2023 06:52 PM
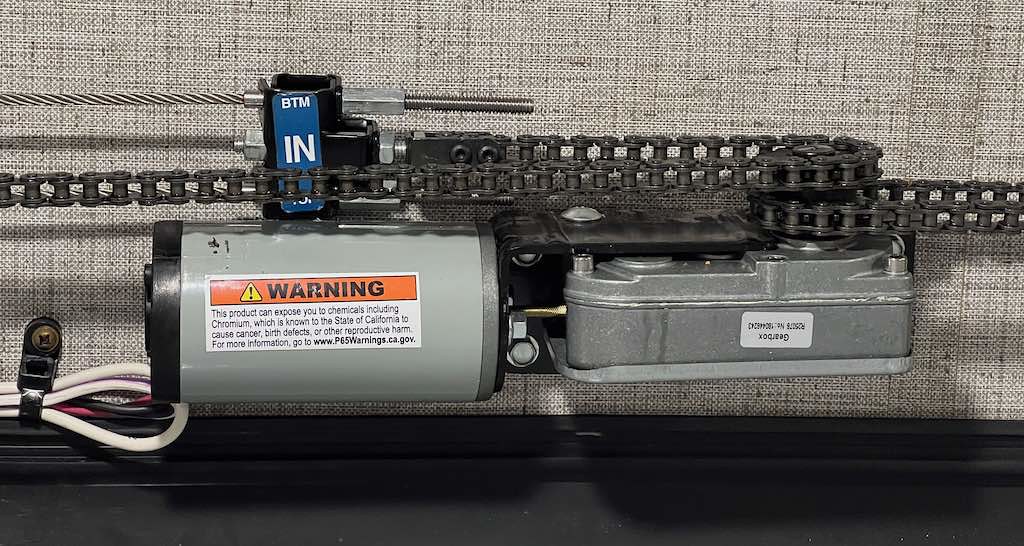
Here are the pictures of the rear wall slide cables hitting the gear motor. The IN cable block hit hard; you can hear and see the slide jump twice. The first hit is the adjusting screw nut, followed by the chain cable block. The ground-up motor end cap and the heavy rubs in the motor casing show this has been ongoing for some time. After some digging, I believe the factory mounted the motor too high. This camper has a bedroom wardrobe slide with the same G4 series Accu-slide. The bedroom slide does not hit. It has other adjustments that need to be done, but it does not hit.
Reviewing the BAL G4 series install manual, it doe snot state an exact height for the motor. I will call BAL tech service tomorrow and confirm all this. Please comment if anyone has seen this before and knows of a correction. My first thought is the remote motor correctly not to have it hit.
Here is the BAL Video showing how to adjust the Accu-slide. https://www.youtube.com/watch?v=dUIW7kkJa5I
At minute 4:19 it shows this view of the motor mounted. The cables are more straight, not dead on, but more straight, heading into the gearbox sprocket, showing the cable blocks are missing the motor. The motor is lower to the rough opening in the slide.

Here is minute 5:37 in the video with another view; the IN chain side is loose during this adjustment, which is why the chain is hanging down on the backside.

Now to the Keystone main slide with the problem. Here is the system as I left it tonight.
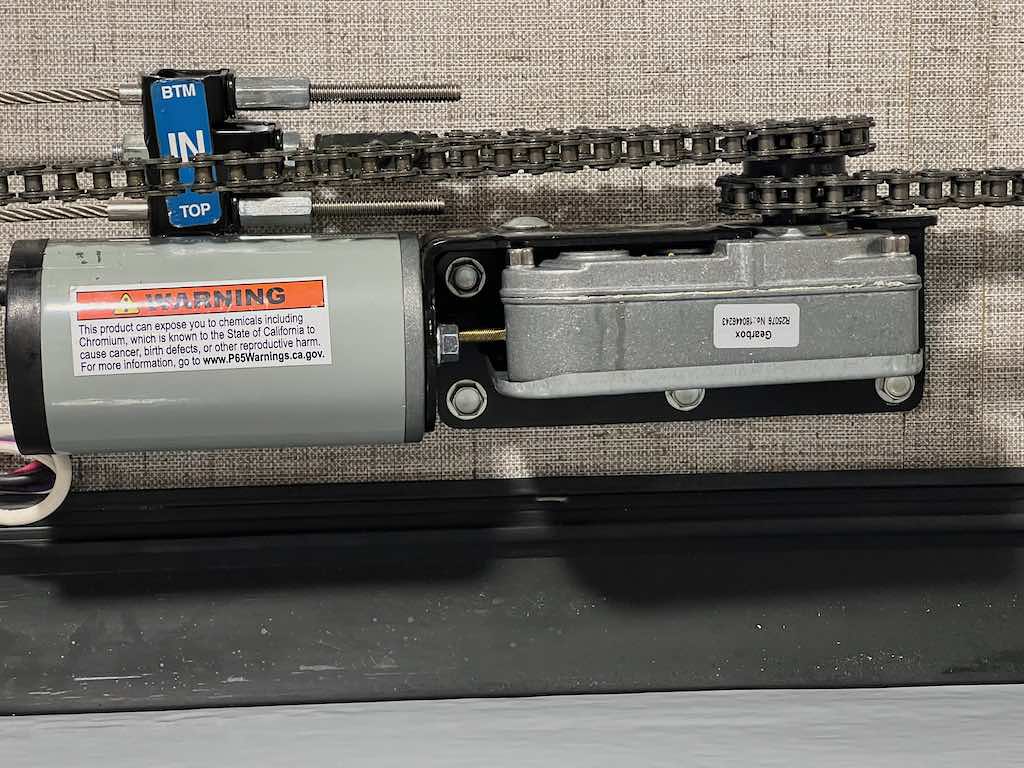
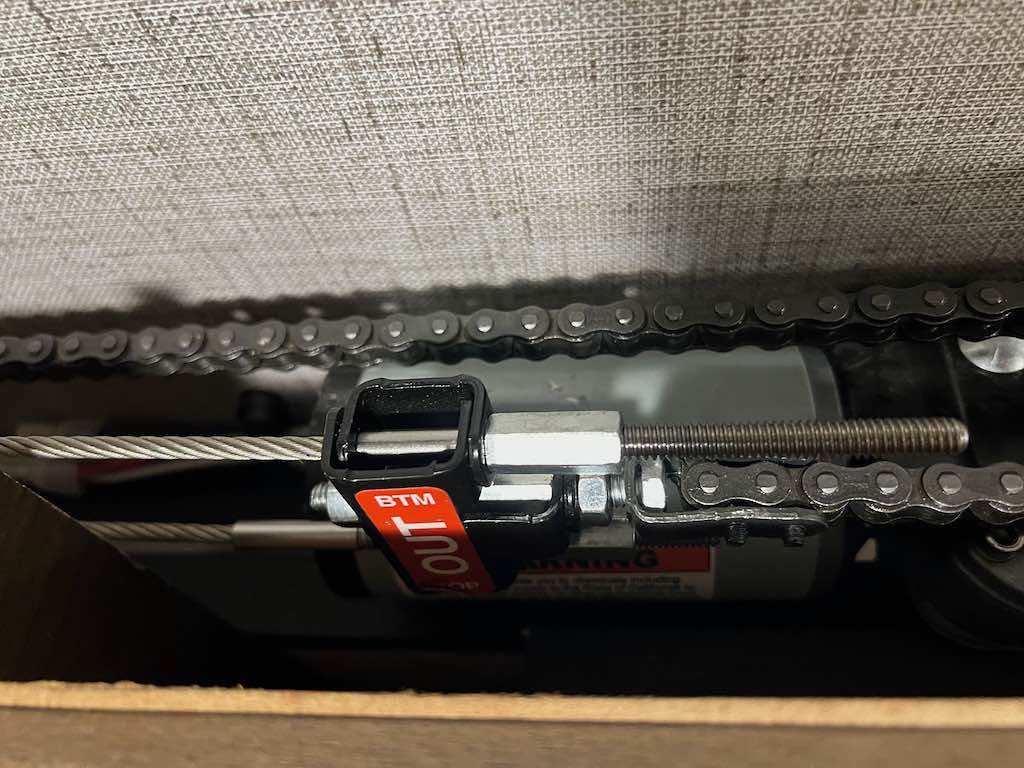
The rear side of the slide is at the full IN position. The IN block hits the motor.

The front side so you can see the whole system.

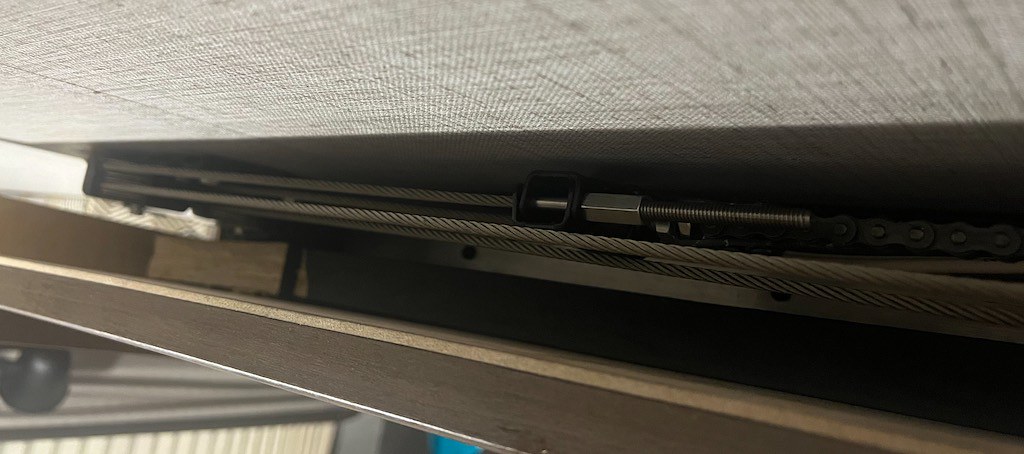
Close-up of the problem.
The first part of the hit was the cable screw and nut hit, then the cable bracket.

An end view. Look at the chain going towards the front of the slide, and see how downhill that chain is heading.

The wear marks on the motor
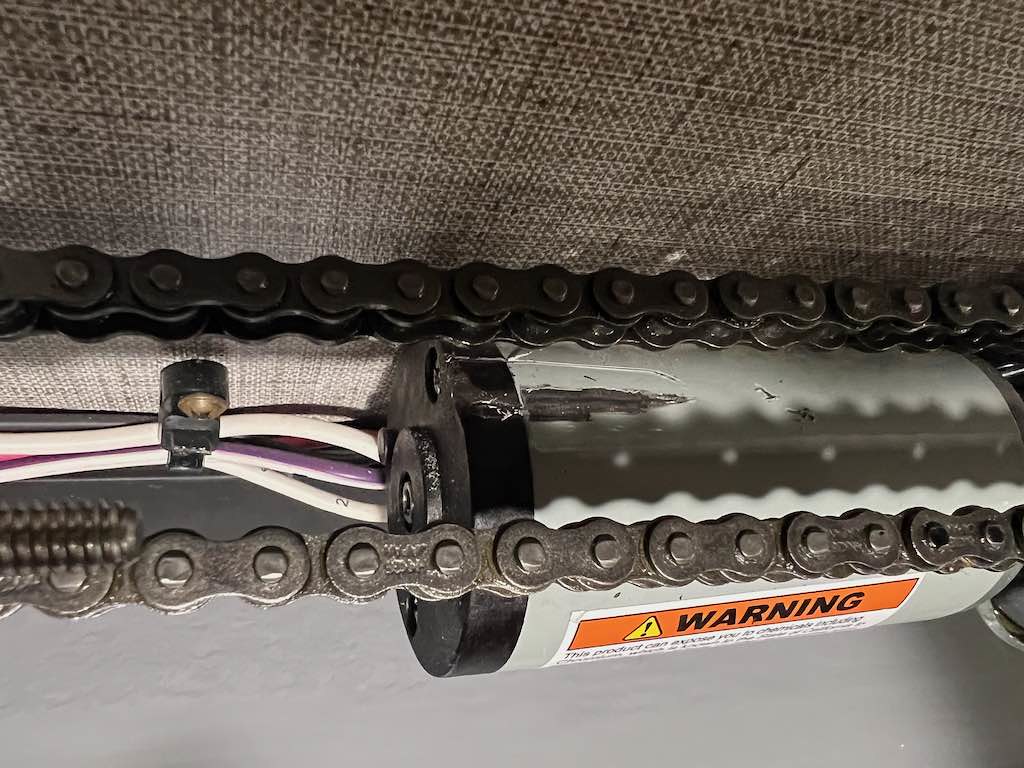
It is a 2 1/2" long drag to the end of the marks.

A straight-on view. See how much the wallboard is shown above the black slide seal. This is where I am saying the motor looks to be mounted too high up.
And here is the OUT cable block that hits slightly too. It is out of adjustment, and I will try the pipe spacer to give me some more tension adjustment.
Now to the bedroom wardrobe slide. Again this slide needs adjustment, but the cable blocks do not hit the motor. The motor is also slightly pitched uphill.

The IN cable block misses

The OUT block misses. You can see how close the motor is to the rough opening and top slide seal areas. Almost no wallboard is showing, and it is tipped uphill.

This is where it stands as of now. The cable hitting the motor has to be corrected, and I need to get some more tension on the OUT cable on the rear bottom of the slide.
Any thoughts would be greatly appreciated.
John
PS I will report back on the BAL tech service call.
Reviewing the BAL G4 series install manual, it doe snot state an exact height for the motor. I will call BAL tech service tomorrow and confirm all this. Please comment if anyone has seen this before and knows of a correction. My first thought is the remote motor correctly not to have it hit.
Here is the BAL Video showing how to adjust the Accu-slide. https://www.youtube.com/watch?v=dUIW7kkJa5I
At minute 4:19 it shows this view of the motor mounted. The cables are more straight, not dead on, but more straight, heading into the gearbox sprocket, showing the cable blocks are missing the motor. The motor is lower to the rough opening in the slide.
Here is minute 5:37 in the video with another view; the IN chain side is loose during this adjustment, which is why the chain is hanging down on the backside.
Now to the Keystone main slide with the problem. Here is the system as I left it tonight.
The rear side of the slide is at the full IN position. The IN block hits the motor.
The front side so you can see the whole system.
Close-up of the problem.
The first part of the hit was the cable screw and nut hit, then the cable bracket.
An end view. Look at the chain going towards the front of the slide, and see how downhill that chain is heading.
The wear marks on the motor
It is a 2 1/2" long drag to the end of the marks.
A straight-on view. See how much the wallboard is shown above the black slide seal. This is where I am saying the motor looks to be mounted too high up.
And here is the OUT cable block that hits slightly too. It is out of adjustment, and I will try the pipe spacer to give me some more tension adjustment.
Now to the bedroom wardrobe slide. Again this slide needs adjustment, but the cable blocks do not hit the motor. The motor is also slightly pitched uphill.
The IN cable block misses
The OUT block misses. You can see how close the motor is to the rough opening and top slide seal areas. Almost no wallboard is showing, and it is tipped uphill.
This is where it stands as of now. The cable hitting the motor has to be corrected, and I need to get some more tension on the OUT cable on the rear bottom of the slide.
Any thoughts would be greatly appreciated.
John
PS I will report back on the BAL tech service call.
2005 Ford F350 Super Duty, 4x4; 6.8L V10 with 4.10 RA, 21,000 GCWR, 11,000 GVWR, upgraded 2 1/2" Towbeast Receiver. Hitched with a 1,700# Reese HP WD, HP Dual Cam to a 2004 Sunline Solaris T310R travel trailer.
Options
- Mark as New
- Bookmark
- Subscribe
- Mute
- Subscribe to RSS Feed
- Permalink
- Report Inappropriate Content
Feb-01-2023 05:44 PM
Hi Folks,
First off, thanks, everyone, for your comments. They do help. And a special thanks to schlep1967 and opnspaces. Your posts made me think harder about some areas, and I have made some progress today.
The cliff notes version, I will summarize more after this is all over, it is not over yet.
I talked with BAL tech service today. What a great group. A breath of fresh air in the manufacturing world for customer support. Very helpful. I told them my situation, and they explained some details. High points:.
During the OUT adjustment, the bottom slide flanges are to touch the frame when cables are adjusted properly.
I spoke about the tensioning issue and what seemed like an absorbent amount of tension needed, and I was still 1/2" away from the wall on the bottom. He said you are fighting the slide's weight; use a floor jack and remove some of the weight. I explained I tried that but lost the tension when I removed the jack. He stated you have to compensate for the sag and crank more. I did and was able to get the slide bottom in within 1/16" to 1/8".
He did say, as a last, absolute last resort, that if you have no more adjustments, you can remove 1" of links only at the IN end of the chain. This is only for special cases if you have one of the on-the-edge odd setups.
He did talk about shifting the chain 1 or 2 links on the sprocket to shift some excess adjustment from the OUT cable block to the IN cable block.
We talked about cable stretch, chain stretch, and pulley bushing wear. He agreed, on this slide, being this new, with such little use, there should be no heavy wear or stretch. This concluded the call.
After the call and thinking about all this, I used the floor jack and jacked the slide slightly high by about 1/4" on the outside wall. This over-jacking kicked the top of the slide in a little. This allowed me to adjust the tension more on the bottom cable and not have to crack so hard. I adjusted the OUT setup, which now can hold the settings under the slide's weight (no jack) with both ends of the slide bottom flange within 1/16" to 1/8" at the top and bottom slide flanges on both ends of the slide. This confirmed I could get the system setup correctly in the OUT direction.
However, I still had too much excess chain at the IN chain cable bracket to adjust the IN direction. After I had the OUT set correct, I saw about 1" extra adjustment on the 1/4 - 20 center draw bolt on the OUT cable blocks. I measured where all the OUT cables were located about the ends of the cable threads, put the jack back in place, unhooked the chains, and moved two links backward on the chains. Each link is 3/8". This lost 3/4" adjustment at the OUT blocks and created 3/4" more adjustment at the IN blocks. I still have 1/4" more center bolt adjustment if needed at the OUT blocks.
I put all the OUT cables back in tension and proceeded with the IN blocks. I was able to get the IN block adjusted as is. This allowed me to start moving the slide in and out under power.
The slide room now moves instantly when the power button is pressed, with no delay in movement; it just goes out and no jerking or on the way in. It took several tweaks and cable adjustment tweaks to get the outside slide seal compressed correctly and have the correct 1/2" lift test tension on all eight cables when they are relaxed. As the system runs, all the trapped cable slack comes out, and you eventually get it all tight with tweaking adjustments.
The system is working, but I still have two problems.
The rear bottom inside slide flange has about a 1/2" gap. This came after running the slide in and out several times. The front bottom is good. And I am out of cable adjustment on the bottom OUT cable block. My first correction for this is to add a 1" tube spacer made out of 1/8" sch 40 pipe over the 1/4" threads on the OUT BTM block cable. This is from opnspaces comment. This is an easily reversible fix if it does not cure the problem. I can always cut that chain later, but I do not think I will have to.
The next problem, I believe, is a gearbox install problem from the factory. Now that the slide is working, I can see the interface problem that has been going on for a long time. The IN and OUT cable blocks crash into the gear motor. The IN block is worse than the OUT block.
I will post pics in the next reply on the motor issue. Be back soon.
Thanks
John
2005 Ford F350 Super Duty, 4x4; 6.8L V10 with 4.10 RA, 21,000 GCWR, 11,000 GVWR, upgraded 2 1/2" Towbeast Receiver. Hitched with a 1,700# Reese HP WD, HP Dual Cam to a 2004 Sunline Solaris T310R travel trailer.
Options
- Mark as New
- Bookmark
- Subscribe
- Mute
- Subscribe to RSS Feed
- Permalink
- Report Inappropriate Content
Feb-01-2023 06:14 AM
The only thing I can say is before removing chain links I would try putting a 2" thick stack of washers under each adjustment nut. If it all works then you can remove the washers and cut the chain. If no change you can remove the washers no harm no foul.
.
2001 Suburban 4x4. 6.0L, 4.10 3/4 ton **** 2005 Jayco Jay Flight 27BH **** 1986 Coleman Columbia Popup
2001 Suburban 4x4. 6.0L, 4.10 3/4 ton **** 2005 Jayco Jay Flight 27BH **** 1986 Coleman Columbia Popup
Options
- Mark as New
- Bookmark
- Subscribe
- Mute
- Subscribe to RSS Feed
- Permalink
- Report Inappropriate Content
Feb-01-2023 04:50 AM
Remember this is an 8 cable system 4 that pull out and 4 that pull in. It is a give and take setup. Both sides should be equally tight with about a 1/2 inch of movement on the "loose" side of the cable. I.e. When the slide is in, the cable you can see on the inside is the loose cable. When the slide is out, the cable you can see outside is the loose cable.
Nothing should be "banjo tight".
Nothing should be "banjo tight".
2021 Chevy Silverado LTZ 3500 Diesel
2022 Montana Legacy 3931FB
Pull-Rite Super Glide 4500
2022 Montana Legacy 3931FB
Pull-Rite Super Glide 4500
Options
- Mark as New
- Bookmark
- Subscribe
- Mute
- Subscribe to RSS Feed
- Permalink
- Report Inappropriate Content
Feb-01-2023 04:40 AM
I have the same BAL Accuslide system on my NEXUS Phantom and the upper and lower cables are tight when the slide is out. I still have adjustment left on both the in and out cables. I did notice when mine is in I have about a half inch space at the bottom while the top is tight.


