Turn on suggestions
Auto-suggest helps you quickly narrow down your search results by suggesting possible matches as you type.
Showing results for
- Good Sam Community
- Groups
- Travel Trailer Group
- Forum
- Lance Lite Wing & Truck Box Area Repair
Options
- Subscribe to RSS Feed
- Mark Topic as New
- Mark Topic as Read
- Float this Topic for Current User
- Bookmark
- Subscribe
- Mute
- Printer Friendly Page
Lance Lite Wing & Truck Box Area Repair
Options
- Mark as New
- Bookmark
- Subscribe
- Mute
- Subscribe to RSS Feed
- Permalink
- Report Inappropriate Content
Apr-17-2018 11:31 PM
Hi all! I have been lurking for a while and reading through a lot of the info here for a long time, but I finally registered to post. I picked up a 1999 Lance Lite 845 from the original owner a couple months back. This is my second camper. My first one I learned a lot from as far as leaks and hidden water damage...
Anyway, this one has basically always been stored under a carport so it is pretty solid and dry for the most part, but it has some "peeling" wood on the outside of the truck box area. It looks to me like what happened is that during loading, the side scraped along the wheel well which opened it up, moisture got in there, and the panel is delaminating. There are the doors to access the truck box from inside the camper for plugging in the lights and what not and it's the outside of those "walls" I'm talking about.
Currently I'm in the process of removing all the old caulking and re-sealing the whole thing. Roof, doors, windows, etc. What a project that is - almost wish I never started! I could use some motivational words on this endeavour, holy cow. Feels like it will never end, but I'm digressing...
I'm coming to a point now where I need to address this wood paneling. It appears to just be 1/8" thick paneling with some kind of rubber coating on the outside? Am I crazy or is that all there is to it? I'm worried it might actually be something thicker like a true plywood and I'm only seeing the first couple layers delaminate, but the "wall" is so thin right there where the access doors I mentioned earlier are I have a hard time believing it's very thick. I have tried looking through the threads on the repairs, but a lot of them have photos that no longer work, and none of them seem to mention the type of materials they use.
So, before I get too much further with caulking everything up, I need to repair that sheeting/paneling/whatever you want to call it. Any ideas what it is or suggestions on what to use? Or, even better, photos of that part disassembled for repair?
Thanks in advance everyone!
Labels:
- Labels:
-
Truck Campers
10 REPLIES 10
Options
- Mark as New
- Bookmark
- Subscribe
- Mute
- Subscribe to RSS Feed
- Permalink
- Report Inappropriate Content
Jun-12-2018 10:50 PM
Here is the full story behind my picture above:
http://www.walzenbach.de/MK/BogQueenEN.html
I never removed the rear jacks or bumper.
Our Lance was my first experience with RV "restoration". I am no professional either. But sending it back wasn't an option.
The corner mouldings are a PITA to clean from the old caulking. But if you do that, you can reuse them.
2014 Ford F350 XLT 6.2 SCLB + 2017 Northstar Arrow
Options
- Mark as New
- Bookmark
- Subscribe
- Mute
- Subscribe to RSS Feed
- Permalink
- Report Inappropriate Content
Jun-12-2018 09:51 PM
Thanks for the encouragement! I have to admit, I'm fairly amateur at all this and it's hard to keep myself motivated from just scrapping it. But, it's one of the better ones I've seen when looking at photos of things other people have repaired, so if they can do it, I guess I can too. I think what gets to me is that I feel like I will never find "the end" of it and will have to keep taking it apart until nothings left!
I ended up doing like you and pulled more off the back aluminum paneling and compartment doors. Mine has two 2x2 boards that go the width of the camper just under the entry door and the compartments. It seems the rearmost of those two boards is the only one that's rotten because the forward one seems fine. However, I can't fully see it yet, so I'm just wishful thinking at this point.

So, I think what I need to do to move forward is as follows:
Build a platform to set the camper on so I can take the rear jacks off
Remove aluminum skin on the sides to access the rest of the wings
Remove aluminum skin on the rear to access the vertical 2x2s in the rear corners the jacks mount to
Remove the rearmost horizontal 2x2 and replace it
Splice in replacement sections for the vertical 2x2s in the corners (how the heck should I do this?)
Replace the miscellaneous pieces that are the framework for the storage compartments
Rebuild the wing sections
Rebuild the very bottom valance type thing that covers the grey water tank
Replace the plumbing that was cut/damaged during the disassembly
Reskin the exterior with new plywood
Finish caulking everything
I ended up doing like you and pulled more off the back aluminum paneling and compartment doors. Mine has two 2x2 boards that go the width of the camper just under the entry door and the compartments. It seems the rearmost of those two boards is the only one that's rotten because the forward one seems fine. However, I can't fully see it yet, so I'm just wishful thinking at this point.
So, I think what I need to do to move forward is as follows:
Build a platform to set the camper on so I can take the rear jacks off
Remove aluminum skin on the sides to access the rest of the wings
Remove aluminum skin on the rear to access the vertical 2x2s in the rear corners the jacks mount to
Remove the rearmost horizontal 2x2 and replace it
Splice in replacement sections for the vertical 2x2s in the corners (how the heck should I do this?)
Replace the miscellaneous pieces that are the framework for the storage compartments
Rebuild the wing sections
Rebuild the very bottom valance type thing that covers the grey water tank
Replace the plumbing that was cut/damaged during the disassembly
Reskin the exterior with new plywood
Finish caulking everything
Options
- Mark as New
- Bookmark
- Subscribe
- Mute
- Subscribe to RSS Feed
- Permalink
- Report Inappropriate Content
Jun-11-2018 01:52 AM
Looking good! Isn't it great how these projects always snowball? You start with a small issue and it keeps getting bigger and bigger. It is always worse than it initially looks.
But you will love the end result.
I have been there, back in 2009, and the pictures look similar, right down to the color of the tarp:
But you will love the end result.
I have been there, back in 2009, and the pictures look similar, right down to the color of the tarp:
2014 Ford F350 XLT 6.2 SCLB + 2017 Northstar Arrow
Options
- Mark as New
- Bookmark
- Subscribe
- Mute
- Subscribe to RSS Feed
- Permalink
- Report Inappropriate Content
Jun-11-2018 01:02 AM
I took some more time working on this tonight and pulled the panel off the other wing to take a look at the rot there.
Heres one side:

Here's the other side:

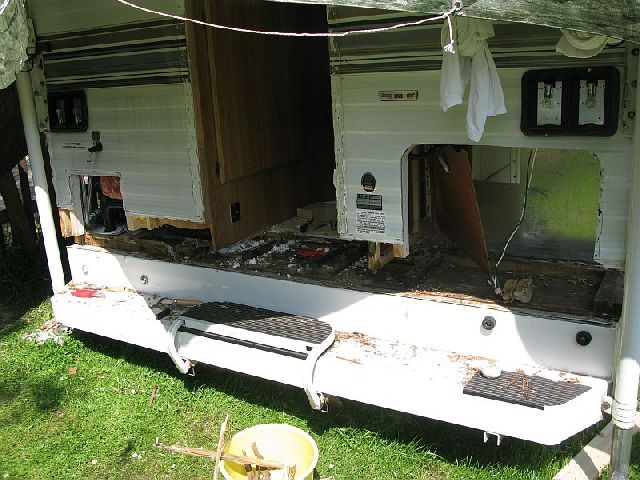
And finally, I pulled the aluminum panel off the back below the door:

After taking photos to document some stuff, I went ahead and pulled the rotted frame off the bottom:

At this point I think I'm going to go ahead and pull the rear jacks off the camper so I can repair the rot in the wing areas easier, then I can rebuild the panel below the door. I plan to reinforce that area at the same time because I want to try and add a step bumper of some kind. Currently all I have are the bolts for attaching the folding stairs, but I would like to do something better.
After I get those done, I think it would be safe to finally go ahead and re-skin the belly and the box area which is why I originally started this in the first place. Of course, I also have to re-do the plumbing to the tanks, the wiring to the sensors, and a few other random things that I had to take apart in the process of getting this far.
Heres one side:
Here's the other side:
And finally, I pulled the aluminum panel off the back below the door:
After taking photos to document some stuff, I went ahead and pulled the rotted frame off the bottom:
At this point I think I'm going to go ahead and pull the rear jacks off the camper so I can repair the rot in the wing areas easier, then I can rebuild the panel below the door. I plan to reinforce that area at the same time because I want to try and add a step bumper of some kind. Currently all I have are the bolts for attaching the folding stairs, but I would like to do something better.
After I get those done, I think it would be safe to finally go ahead and re-skin the belly and the box area which is why I originally started this in the first place. Of course, I also have to re-do the plumbing to the tanks, the wiring to the sensors, and a few other random things that I had to take apart in the process of getting this far.
Options
- Mark as New
- Bookmark
- Subscribe
- Mute
- Subscribe to RSS Feed
- Permalink
- Report Inappropriate Content
Jun-10-2018 06:51 PM
Ok, so I'm super slow with progress, but I have been moving forward VERY slowly with this repair.
I wanted to replace the belly panel because it was delaminating at the front edge like the side was in the original photo, and it also looked like someone set the camper down on something in the truck bed at some point and punched a hole through the wood into the styrofoam. I figured I could re-sheet the bottom quick and easy enough also. I regret this decision, but alas, I move forward.
The belly sheet was glued and stapled like crazy, and makes for fairly frustrating and difficult removal, but it's done other than clean up prep when I'm ready to install the new one. Here's the camper with the belly sheet off:

Front left corner:

Front right corner:

I also had to remove the grey water tank at the rear to pull the belly sheet all the way off (it's also missing in the above photo). That lead into another issue of needing to cut apart the plumbing. Don't you just love how projects snowball into something bigger?
Grey water tank out:

You will notice that I also pulled the aluminum skin off the wing area. That's because I noticed some rot in there and I wanted a better look. It's actually not as bad as I suspected, but still, more for the project. The left rear compartment had some significant delamination of the paneling around it also, but there is a lot of water stuff going on in here between the plumbing, the drain valves for the water system, the dump valves, the poor sealing of the wings, etc. Nothing leaks on this camper plumbing wise, so at least that's good.
As an update to my plan for replacement paneling, I found a local supplier who carries 2.7mm plywood for only $11 a sheet. I think I plan to use this and glue a thin plastic poly panel to that instead of using the FRP panels I originally planned to use. The wood will provide a lot more strength than just the FRP as well as a better substrate for gluing things together, and of course, the poly panel will give me the weather resistance I want. All said, I think I can make these panels for about $35 each ($11 for the wood, $24 for the poly sheet).
I wanted to replace the belly panel because it was delaminating at the front edge like the side was in the original photo, and it also looked like someone set the camper down on something in the truck bed at some point and punched a hole through the wood into the styrofoam. I figured I could re-sheet the bottom quick and easy enough also. I regret this decision, but alas, I move forward.
The belly sheet was glued and stapled like crazy, and makes for fairly frustrating and difficult removal, but it's done other than clean up prep when I'm ready to install the new one. Here's the camper with the belly sheet off:
Front left corner:
Front right corner:
I also had to remove the grey water tank at the rear to pull the belly sheet all the way off (it's also missing in the above photo). That lead into another issue of needing to cut apart the plumbing. Don't you just love how projects snowball into something bigger?
Grey water tank out:
You will notice that I also pulled the aluminum skin off the wing area. That's because I noticed some rot in there and I wanted a better look. It's actually not as bad as I suspected, but still, more for the project. The left rear compartment had some significant delamination of the paneling around it also, but there is a lot of water stuff going on in here between the plumbing, the drain valves for the water system, the dump valves, the poor sealing of the wings, etc. Nothing leaks on this camper plumbing wise, so at least that's good.
As an update to my plan for replacement paneling, I found a local supplier who carries 2.7mm plywood for only $11 a sheet. I think I plan to use this and glue a thin plastic poly panel to that instead of using the FRP panels I originally planned to use. The wood will provide a lot more strength than just the FRP as well as a better substrate for gluing things together, and of course, the poly panel will give me the weather resistance I want. All said, I think I can make these panels for about $35 each ($11 for the wood, $24 for the poly sheet).
Options
- Mark as New
- Bookmark
- Subscribe
- Mute
- Subscribe to RSS Feed
- Permalink
- Report Inappropriate Content
May-20-2018 12:11 PM
I just did some quick looking at the hardware store website. Seems I can get a max of about R-6 out of a 1" thick rigid board for $20 a sheet. I can do denim or fiberglass batt at R 6.7 at 1.8" for denim or 2" thick for fiberglass (I will have to try and cut it thinner or just squish it which will reduce the R factor either way) for $5 a roll for fiberglass or $11 a roll for denim.
It seems I will most likely just put the batting back in rather than deal with the foam board. Seems like the insulation difference is negligible, and the cost makes more sense to go that way. The only advantage to the board I can see is it is much better for moisture absorbance.
It seems I will most likely just put the batting back in rather than deal with the foam board. Seems like the insulation difference is negligible, and the cost makes more sense to go that way. The only advantage to the board I can see is it is much better for moisture absorbance.
Options
- Mark as New
- Bookmark
- Subscribe
- Mute
- Subscribe to RSS Feed
- Permalink
- Report Inappropriate Content
May-20-2018 11:54 AM
Is foam board actually better than fiberglass batting? I was under the impression that it wasn't as efficient. It would certainly be the right time to do it though! They used what appears to be plain white styrofoam in the floor of the unit.
Options
- Mark as New
- Bookmark
- Subscribe
- Mute
- Subscribe to RSS Feed
- Permalink
- Report Inappropriate Content
May-20-2018 06:30 AM
Foam board insulation might be a good upgrade there, if the wall cavity is deep enough to accommodate it
2009 Silverado 3500HD Dually, D/A, CCLB 4x4 (bought new 8/30/09)
2018 Arctic Fox 992 with an Onan 2500i "quiet" model generator
2018 Arctic Fox 992 with an Onan 2500i "quiet" model generator
Options
- Mark as New
- Bookmark
- Subscribe
- Mute
- Subscribe to RSS Feed
- Permalink
- Report Inappropriate Content
May-19-2018 08:25 PM
Well, I finally got around to tearing into this. Literally.
For those who are curious, the lower section on this is sheeted with 3.6mm thick paneling according to the stamp on the back of the sheeting. Mine is nice and dry behind my delaminated panel which is awesome. Smells like new wood in there surprisingly! It appears the bottom is sheeted with the same thickness, but doesn't have the same texture.
My plan is to use textured FRP paneling from the local big box store and structural adhesive and a few staples to hold it on. It's thinner at only 0.090" thick per sheet as opposed to the 0.140" of the original sheeting, but I'm hoping the 0.050" difference isn't a big deal anywhere. I don't really see why it would matter honestly. I plan to resheet the side that's removed, the "top" of this area, and the whole bottom of the camper with the sheeting. I should be able to do it with 3 or 4 sheets at about $35 a sheet, so not too bad!
Photo of the reason I tore into it (previous owner had been trying to use some kind of tape to seal the edges which are left unsealed from Lance):

Photo of the panel (and fiberglass insulation) removed:

Hope that helps anyone else who might be looking like I was and curious. I might update this as I go along if anyone is interested in the repairs.
For those who are curious, the lower section on this is sheeted with 3.6mm thick paneling according to the stamp on the back of the sheeting. Mine is nice and dry behind my delaminated panel which is awesome. Smells like new wood in there surprisingly! It appears the bottom is sheeted with the same thickness, but doesn't have the same texture.
My plan is to use textured FRP paneling from the local big box store and structural adhesive and a few staples to hold it on. It's thinner at only 0.090" thick per sheet as opposed to the 0.140" of the original sheeting, but I'm hoping the 0.050" difference isn't a big deal anywhere. I don't really see why it would matter honestly. I plan to resheet the side that's removed, the "top" of this area, and the whole bottom of the camper with the sheeting. I should be able to do it with 3 or 4 sheets at about $35 a sheet, so not too bad!
Photo of the reason I tore into it (previous owner had been trying to use some kind of tape to seal the edges which are left unsealed from Lance):
Photo of the panel (and fiberglass insulation) removed:
Hope that helps anyone else who might be looking like I was and curious. I might update this as I go along if anyone is interested in the repairs.
Options
- Mark as New
- Bookmark
- Subscribe
- Mute
- Subscribe to RSS Feed
- Permalink
- Report Inappropriate Content
Apr-18-2018 12:14 AM
Not very visible area, so cosmetics are not big issue so this sounds like perfect candidate for laminating.
Picture would help?

Picture would help?


