Turn on suggestions
Auto-suggest helps you quickly narrow down your search results by suggesting possible matches as you type.
Showing results for
- Good Sam Community
- Everything RV
- Technical Issues
- Solar Postive Battery Connection
Options
- Subscribe to RSS Feed
- Mark Topic as New
- Mark Topic as Read
- Float this Topic for Current User
- Bookmark
- Subscribe
- Mute
- Printer Friendly Page
Solar Postive Battery Connection
Options
- Mark as New
- Bookmark
- Subscribe
- Mute
- Subscribe to RSS Feed
- Permalink
- Report Inappropriate Content
Nov-15-2017 12:14 PM
Hey guys. I'm in the process of putting the final touches on my 5er solar project. 4 Kyocera 130 watt panels, Morningstar TM-45 Charge Controller, Bogart TM-2030 Battery Monitor, Magnum MMS1012 inverter and 2 Crown CR-240 6 volt batteries. I may end up adding two more batteries later but for now the pair will suffice.
One of the things I'm struggling with is the number of connections to the primary positive battery post. I still need to attach the inverter postive connection and I'm running out of room on the post.
Any suggestions?
One of the things I'm struggling with is the number of connections to the primary positive battery post. I still need to attach the inverter postive connection and I'm running out of room on the post.
Any suggestions?
2010 Eagle Super Lite 315RLDS
2018 GMC Sierra 3500HD 6.6L Duramax
2010 Nights 45
2011 Nights 70
2012 Nights 144
2013 Nights 46
2014 Nights 49
2015 Nights 57
2016 Nights 73
2017 Nights 40
2018 Nights 56
2019 Nights 76
2020 Nights 68
2018 GMC Sierra 3500HD 6.6L Duramax
2010 Nights 45
2011 Nights 70
2012 Nights 144
2013 Nights 46
2014 Nights 49
2015 Nights 57
2016 Nights 73
2017 Nights 40
2018 Nights 56
2019 Nights 76
2020 Nights 68
31 REPLIES 31
Options
- Mark as New
- Bookmark
- Subscribe
- Mute
- Subscribe to RSS Feed
- Permalink
- Report Inappropriate Content
Nov-18-2017 08:08 AM
The issues I ran into when using copper tubing, is that unless it has been thoroughly flattened and through fasteners are able to be torqued and maintain that torque for extended periods of time, connections will loosen and cause catastrophic failure to perform. Wrench a through-bolt tight enough and the copper will compress to the point where only annealing by resistance heating can cause fastener loss of torque. Hence a loose terminal.
Flatten copper tubing by pounding on an piece of steel used as a die to render a satisfactory finish. The copper will work harden doing this. Anneal the copper by heating it -very hot- with a propane torch, then plunge the copper into water. Finish flattening the piece. Then steel wool it to brightness. Dielectric grease works well to ****** oxidation.
I had to go through this nonsense repairing State of Nevada highway department trucks back in the 1970's. They would not invest in bussbars. It was this four month stint, that caught Jay Adams, attention in the District 9 CalTrans office (Tonopah and Bishop gossiped).
Nevada had an Oshkosh rotary snowplow that had more electrical failures than seemed possible. I proceeded to make buss bars out of schedule 80 copper pipe. I purchased the 3/8" and 1/4" silicon bronze bolts myself. I then soldered the bolt heads on the reverse side of the buss bar. A kind employee, by the name of Willie Manzini, jumped through hoops to get a two foot long branch of "Mountain Mahogany" an unidentifiable wood that I suspect was actually light colored ironwood. I cut it on a bandsaw and drilled holes. Talk about a home-brew setup. The wood cut like it was metal I had to spray the bandsaw blade with water.
Well, it worked. The rotary engine kept running, gauges and lights did not flicker off and a simple welding job of a monster transfer case shift fork with my own personal stash of Allstate 275 welding rod put the rotary back in service. It had been down for nearly a year "waiting" for a back-ordered shift fork. The mechanic's staff in Tonopah was not amused. Jay Adams told me the story went all the way to Carson City. Tough.
I like do-it-myself projects. For instance...
Smaller buss bars. Forget screws, they are a PITA to start the threads. Remove the screws. Remove the bussbar plate. The screws are usually #8 on USA bussbars. Purchase 3/8" long phillips head screws. Tighten the snot out of them. KEPS nuts with integral star lockwaher can now be used on the working side. Ring terminals can be hung on studs. an 11/32" hollow shaft nut driver can be used to tighten the keps nuts.
The final touch can be had by sourcing DOG POINT #8 screws. They are hard to find but eliminate the process of starting the keps nuts onto the screw threads.
Options
- Mark as New
- Bookmark
- Subscribe
- Mute
- Subscribe to RSS Feed
- Permalink
- Report Inappropriate Content
Nov-18-2017 02:32 AM
So what I ended up doing was fabricating a short "Shunt" to allow two more connection points out of copper tubing. I attached the inverter positive cable, inverter temperature sensor and charge controller temperature sensor to the main battery post. The other connections were split between the two connection points on the copper "shunt".
2010 Eagle Super Lite 315RLDS
2018 GMC Sierra 3500HD 6.6L Duramax
2010 Nights 45
2011 Nights 70
2012 Nights 144
2013 Nights 46
2014 Nights 49
2015 Nights 57
2016 Nights 73
2017 Nights 40
2018 Nights 56
2019 Nights 76
2020 Nights 68
2018 GMC Sierra 3500HD 6.6L Duramax
2010 Nights 45
2011 Nights 70
2012 Nights 144
2013 Nights 46
2014 Nights 49
2015 Nights 57
2016 Nights 73
2017 Nights 40
2018 Nights 56
2019 Nights 76
2020 Nights 68
Options
- Mark as New
- Bookmark
- Subscribe
- Mute
- Subscribe to RSS Feed
- Permalink
- Report Inappropriate Content
Nov-16-2017 11:57 AM
The most reliable connection to a car car RV battery that would see high amperage discharges is this...

And inter-tie with this...
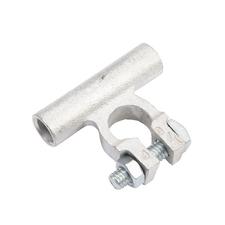
Both positive and chassis negative battery posts
This place can custom fabricate and ship to you...
http://www.genuinedealz.com/custom-cables/custom-battery-cable-assembly
After seeing innumerable studs de-soldered from RV terminals due to high inverter ampere loading, I am dead-set against using the Gyro-Gearloose wing nut and stud. A plated steel nut and external tooth star washer binds a ring terminal to a top stud reasonably well. Counterforce rotation stress during tightening. Water pump pliers or even a large crescent wrench would work. Beware of shorting the tool against chassis metal. Remember NEGATIVE is FIRST OFF and LAST ON.
And inter-tie with this...
Both positive and chassis negative battery posts
This place can custom fabricate and ship to you...
http://www.genuinedealz.com/custom-cables/custom-battery-cable-assembly
After seeing innumerable studs de-soldered from RV terminals due to high inverter ampere loading, I am dead-set against using the Gyro-Gearloose wing nut and stud. A plated steel nut and external tooth star washer binds a ring terminal to a top stud reasonably well. Counterforce rotation stress during tightening. Water pump pliers or even a large crescent wrench would work. Beware of shorting the tool against chassis metal. Remember NEGATIVE is FIRST OFF and LAST ON.
Options
- Mark as New
- Bookmark
- Subscribe
- Mute
- Subscribe to RSS Feed
- Permalink
- Report Inappropriate Content
Nov-16-2017 11:40 AM
ahh yes, there it is, tied into the existing 12v wiring harness.
"If I'm wearing long pants, I'm too far north" - 2oldman
Options
- Mark as New
- Bookmark
- Subscribe
- Mute
- Subscribe to RSS Feed
- Permalink
- Report Inappropriate Content
Nov-16-2017 10:31 AM
2oldman wrote:
Afaict I have no battery wiring to frame.
The frame path is for 12v negative stuff. Your converter uses that.
1. 1991 Oakland 28DB Class C
on Ford E350-460-7.5 Gas EFI
Photo in Profile
2. 1991 Bighorn 9.5ft Truck Camper on 2003 Chev 2500HD 6.0 Gas
See Profile for Electronic set-ups for 1. and 2.
on Ford E350-460-7.5 Gas EFI
Photo in Profile
2. 1991 Bighorn 9.5ft Truck Camper on 2003 Chev 2500HD 6.0 Gas
See Profile for Electronic set-ups for 1. and 2.
Options
- Mark as New
- Bookmark
- Subscribe
- Mute
- Subscribe to RSS Feed
- Permalink
- Report Inappropriate Content
Nov-16-2017 09:48 AM
Afaict I have no battery wiring to frame.
"If I'm wearing long pants, I'm too far north" - 2oldman
Options
- Mark as New
- Bookmark
- Subscribe
- Mute
- Subscribe to RSS Feed
- Permalink
- Report Inappropriate Content
Nov-16-2017 09:30 AM
Your neg list is missing the battery neg to frame that should now be shunt to frame and the inverter's neg goes to the shunt too.
1. 1991 Oakland 28DB Class C
on Ford E350-460-7.5 Gas EFI
Photo in Profile
2. 1991 Bighorn 9.5ft Truck Camper on 2003 Chev 2500HD 6.0 Gas
See Profile for Electronic set-ups for 1. and 2.
on Ford E350-460-7.5 Gas EFI
Photo in Profile
2. 1991 Bighorn 9.5ft Truck Camper on 2003 Chev 2500HD 6.0 Gas
See Profile for Electronic set-ups for 1. and 2.
Options
- Mark as New
- Bookmark
- Subscribe
- Mute
- Subscribe to RSS Feed
- Permalink
- Report Inappropriate Content
Nov-16-2017 08:25 AM
2oldman wrote:
OP.. what about the negative post?
The negative battery post only gets one cable. This cable goes to the shunt. All other negative cables hook to the other side of the shunt. At this point there's only the negative battery cable from the charge controller and the negative battery sense wire from the charge controller.
On the positive side of the battery there is the following:
1) Charge controller positive battery cable.
2) OEM converter positive cable.
3) Battery monitor positive wire.
4) Charge controller temperature sensor.
5) Inverter temperature sensor.
6) Charge controller positive sense wire.
2010 Eagle Super Lite 315RLDS
2018 GMC Sierra 3500HD 6.6L Duramax
2010 Nights 45
2011 Nights 70
2012 Nights 144
2013 Nights 46
2014 Nights 49
2015 Nights 57
2016 Nights 73
2017 Nights 40
2018 Nights 56
2019 Nights 76
2020 Nights 68
2018 GMC Sierra 3500HD 6.6L Duramax
2010 Nights 45
2011 Nights 70
2012 Nights 144
2013 Nights 46
2014 Nights 49
2015 Nights 57
2016 Nights 73
2017 Nights 40
2018 Nights 56
2019 Nights 76
2020 Nights 68
Options
- Mark as New
- Bookmark
- Subscribe
- Mute
- Subscribe to RSS Feed
- Permalink
- Report Inappropriate Content
Nov-16-2017 07:51 AM
OP.. what about the negative post?
"If I'm wearing long pants, I'm too far north" - 2oldman
Options
- Mark as New
- Bookmark
- Subscribe
- Mute
- Subscribe to RSS Feed
- Permalink
- Report Inappropriate Content
Nov-16-2017 03:38 AM
centerline wrote:
as for the solar array of 4 130w panels, 2 batts will work without any problem, but 3 or 4 12v batts would allow you to get the most from the system... you are being short changed on your investment having only two batteries with that many potential amps...
I'm aware of the shortfall in the system by not having 4 batteries. At this time I just didn't want to mess with having to build a new battery box that would take up space I'm already using. Some day I'm sure I'll add two more but not today.
2010 Eagle Super Lite 315RLDS
2018 GMC Sierra 3500HD 6.6L Duramax
2010 Nights 45
2011 Nights 70
2012 Nights 144
2013 Nights 46
2014 Nights 49
2015 Nights 57
2016 Nights 73
2017 Nights 40
2018 Nights 56
2019 Nights 76
2020 Nights 68
2018 GMC Sierra 3500HD 6.6L Duramax
2010 Nights 45
2011 Nights 70
2012 Nights 144
2013 Nights 46
2014 Nights 49
2015 Nights 57
2016 Nights 73
2017 Nights 40
2018 Nights 56
2019 Nights 76
2020 Nights 68
Options
- Mark as New
- Bookmark
- Subscribe
- Mute
- Subscribe to RSS Feed
- Permalink
- Report Inappropriate Content
Nov-16-2017 01:44 AM
MEXICOWANDERER wrote:
..............
................

Funny, I just used that type of bus bar in my TC. I was installing a 1500 watt inverter and decided to clean up the mess in the battery box too.

0 awg welding cable. A 300 amp MRBF fuse on the red post. The only other wires in the battery box now is the 3-wire harness to the Trimetric. The shunt is in the battery box, so it had to come in there too. The Trimetric power is connected directly to the battery with its own fuse so it’s not shut off by the master disconnect.


:):)
2001 Lance 1121 on a 2016 F450 ‘Scuse me while I whinge.
And for all you Scooby-Doo and Yosemite Sam types………..Let’s Go Brandon!!!
And for all you Scooby-Doo and Yosemite Sam types………..Let’s Go Brandon!!!
Options
- Mark as New
- Bookmark
- Subscribe
- Mute
- Subscribe to RSS Feed
- Permalink
- Report Inappropriate Content
Nov-15-2017 08:03 PM
for me building busbars is not worth the time investment to source raw material, then fabricate. Project within a project just sucks up time IMHO. Any good marine parts center will have a selection of "rated" busbars and or power posts in stock.
Personally, like the products available from VTE warehouse.
https://www.vtewarehouse.com/content/electromech/busbar/terminal_busbars.php
Personally, like the products available from VTE warehouse.
https://www.vtewarehouse.com/content/electromech/busbar/terminal_busbars.php
Options
- Mark as New
- Bookmark
- Subscribe
- Mute
- Subscribe to RSS Feed
- Permalink
- Report Inappropriate Content
Nov-15-2017 05:20 PM
Nawwww
I quick kiss is a peck
One that makes noise is a smootch.
One that interferes with breathing can make you late to work and may lead to an additional income tax deduction.
We used buss so as to avoid confusing the word with something your kid just missed.
So in all, it isn't worth making a fus over.
I quick kiss is a peck
One that makes noise is a smootch.
One that interferes with breathing can make you late to work and may lead to an additional income tax deduction.
We used buss so as to avoid confusing the word with something your kid just missed.
So in all, it isn't worth making a fus over.
Options
- Mark as New
- Bookmark
- Subscribe
- Mute
- Subscribe to RSS Feed
- Permalink
- Report Inappropriate Content
Nov-15-2017 05:00 PM
centerline wrote:
you can connect all the outgoing wires to one positve post and one negative post, and all the incoming wires from the chargers to the opposite pos and neg posts...
the batteries wired parallel will be fine this way and keep the posts organized...
just make sure each "pair" of wires are connected to the posts of opposite batteries, and not to the posts of the same battery.
as for the solar array of 4 130w panels, 2 batts will work without any problem, but 3 or 4 12v batts would allow you to get the most from the system... you are being short changed on your investment having only two batteries with that many potential amps...
A "bus" is something that "takes it all", while a "buss" is a kiss.
The usual rule is to discharge and charge the batts from the same posts. You can have solar charging at the same time as load discharging. I am not sure at all, if the battery can keep track of which way the electrons ought to be going if you use opposite posts like that.
On the neg bus, the OP has a Trimetric, so his shunt is the neg bus bar. One fat wire from it to the batt neg post. The Tri shunt bolt can also run out of height for more ring lugs, so that might mean an additional bus bar on the neg side. The inverter can take the converter or solar to its pos terminal too, to help with bussing.
1. 1991 Oakland 28DB Class C
on Ford E350-460-7.5 Gas EFI
Photo in Profile
2. 1991 Bighorn 9.5ft Truck Camper on 2003 Chev 2500HD 6.0 Gas
See Profile for Electronic set-ups for 1. and 2.
on Ford E350-460-7.5 Gas EFI
Photo in Profile
2. 1991 Bighorn 9.5ft Truck Camper on 2003 Chev 2500HD 6.0 Gas
See Profile for Electronic set-ups for 1. and 2.
Related Content
- Electrical Issue: Converter, Battery, Something Else? in Technical Issues
- Connecting tow line battery charger in Technical Issues
- What are all of these battery connections on my 17k in Technical Issues
- Connecting 2 batteries together in Technical Issues
- Negative and ground wire questions in DIY Maintenance


